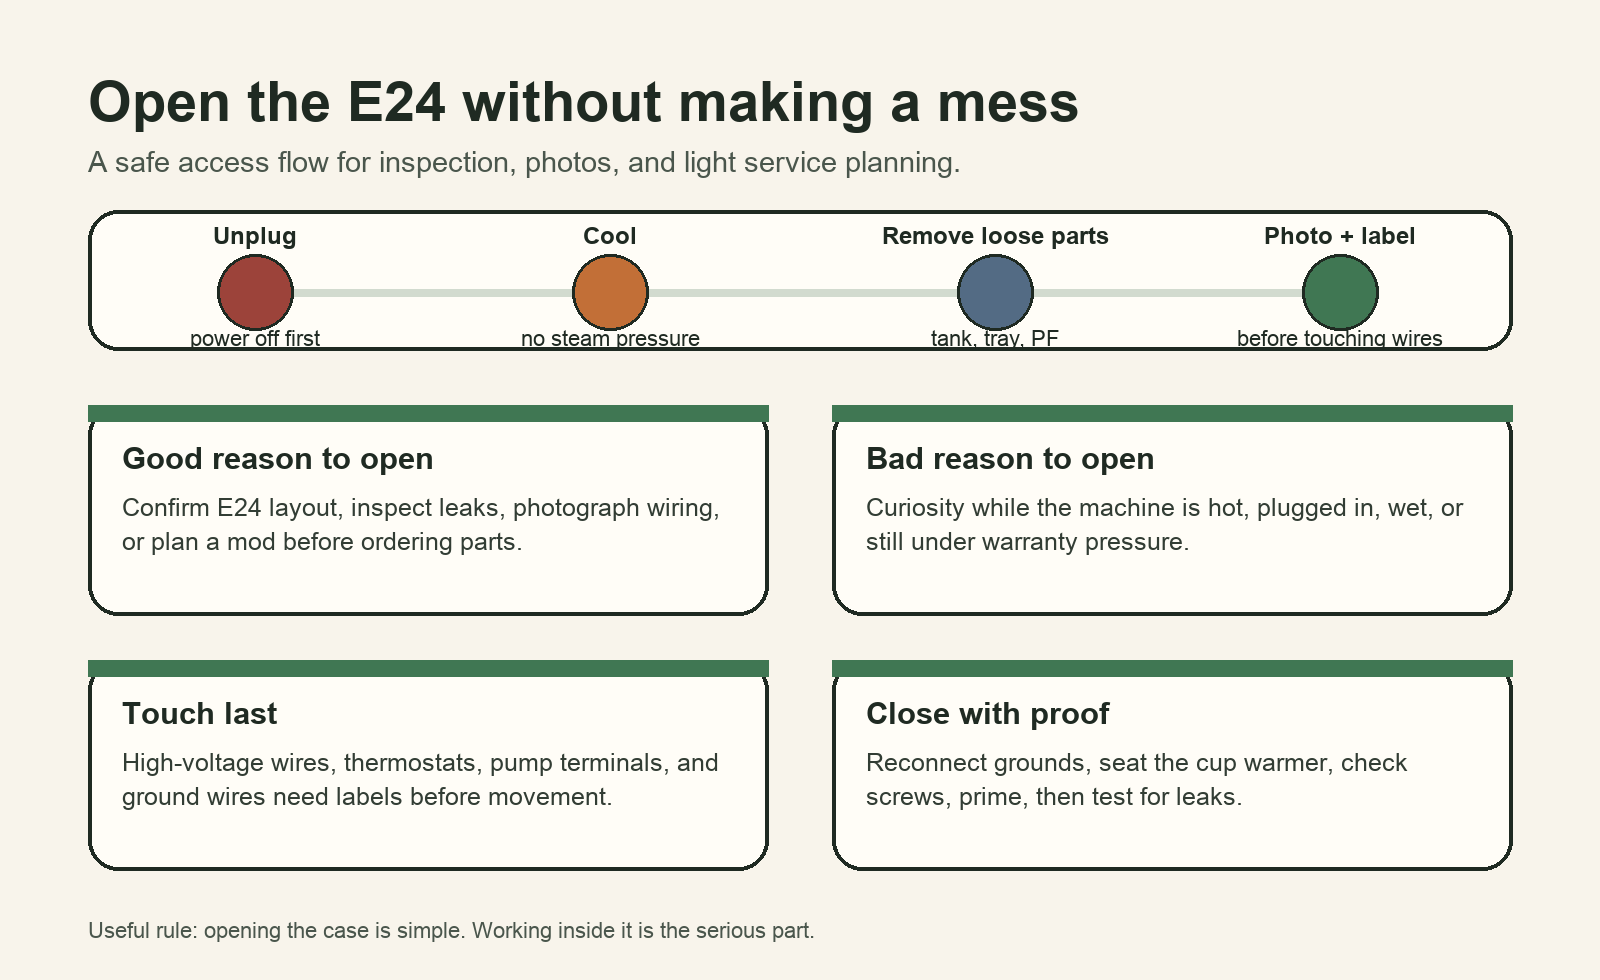
You open a Gaggia Classic E24 by unplugging it, cooling it, removing loose parts, undoing rear top-cover screws, lifting the cup warmer carefully, and reconnecting ground wires during reassembly.
You may want to inspect a brass boiler, check a leak, plan a PID, or photograph wiring. That simple job can become stressful if steam, water, or live wires are still involved. This how to open gaggia classic e24 workflow keeps the job calm, visual, and reversible.
The goal is a clean look inside, safe labels, and a machine that closes correctly afterward.
1. Why Should You Know How to Open Gaggia Classic E24?
Knowing how to open gaggia classic e24 first helps you decide whether the job belongs to a simple inspection, a warranty claim, or a real repair. Here is the practical point: opening the case is usually easier than working inside it.
What problem does this solve?
Many owners open the case after seeing flakes, leaks, loose screws, or a strange sound. Before you touch anything, decide what you need to confirm:
- Is the machine truly an E24 with a brass boiler?
- Is a leak visible only under pressure?
- Do you need photos before asking support?
- Are you planning a PID, OPV, or steam workflow change?
What should you avoid?
Do not open a hot, wet, plugged-in machine. Do not move wires before photos. Do not turn curiosity into a repair session. Small pause, big benefit: a clear purpose reduces mistakes.
Key Takeaway: Open for evidence, not entertainment. You should know what question the open case must answer.
2. What Should You Check Before Removing the Top Cover?
Before learning how to open gaggia classic e24, confirm the machine is unplugged, cool, empty of loose parts, and safe to move. This step prevents water, screws, and loose parts from becoming one messy pile.
Which parts should come off first?
Remove anything that can fall, splash, or block your hands. Start here: keep the workspace simple and dry.
- Water tank and tank lid
- Drip tray and grate
- Portafilter
- Cups from the top tray
- Loose accessories near the machine
How should you prepare photos?
Take one photo before each change. Use good light. Shoot the rear screws, top panel, ground wires, switch area, and boiler area.
Key Takeaway: A two-minute setup can prevent a two-hour reassembly problem.
3. Which Tools Do You Need for a Clean E24 Opening?
The tool list for how to open gaggia classic e24 is short: a Phillips screwdriver, tape labels, a phone camera, a towel, and a small tray for screws. You do not need force.
What belongs on the bench?
Keep the work area simple. No fancy move here: fewer tools means fewer wrong actions.
- Phillips screwdriver that fits the rear screws
- Painter tape or wire labels
- Small container for screws
- Dry towel under the machine
- Phone or camera for reference photos
What should stay away?
Keep water, coffee grounds, and metal jewelry away from the open case. If you use a multimeter, know what you plan to measure before opening the machine.
Key Takeaway: The right tools make opening feel routine. The wrong tools invite scratches, stripped screws, and confusion.
4. How Do You Remove the Top Cover Safely?
To follow how to open gaggia classic e24 safely, undo the rear top screws, lift the cup warmer slowly, and watch for the ground wires attached to the cover. Do not pull the top away fast.
What is the usual top-cover sequence?
This sequence matches the common Classic Pro/Evo/E24 service layout. Go slow here: the top cover may still be connected.
- Remove rear top-cover screws.
- Lift the cup warmer slightly.
- Find the ground wire connections.
- Photograph the wire positions.
- Disconnect only if needed.
Why do ground wires matter?
Ground wires are not decoration. They must return to the correct metal contact points during reassembly.
Key Takeaway: The top cover is not just a lid. Treat it like an electrical safety part.
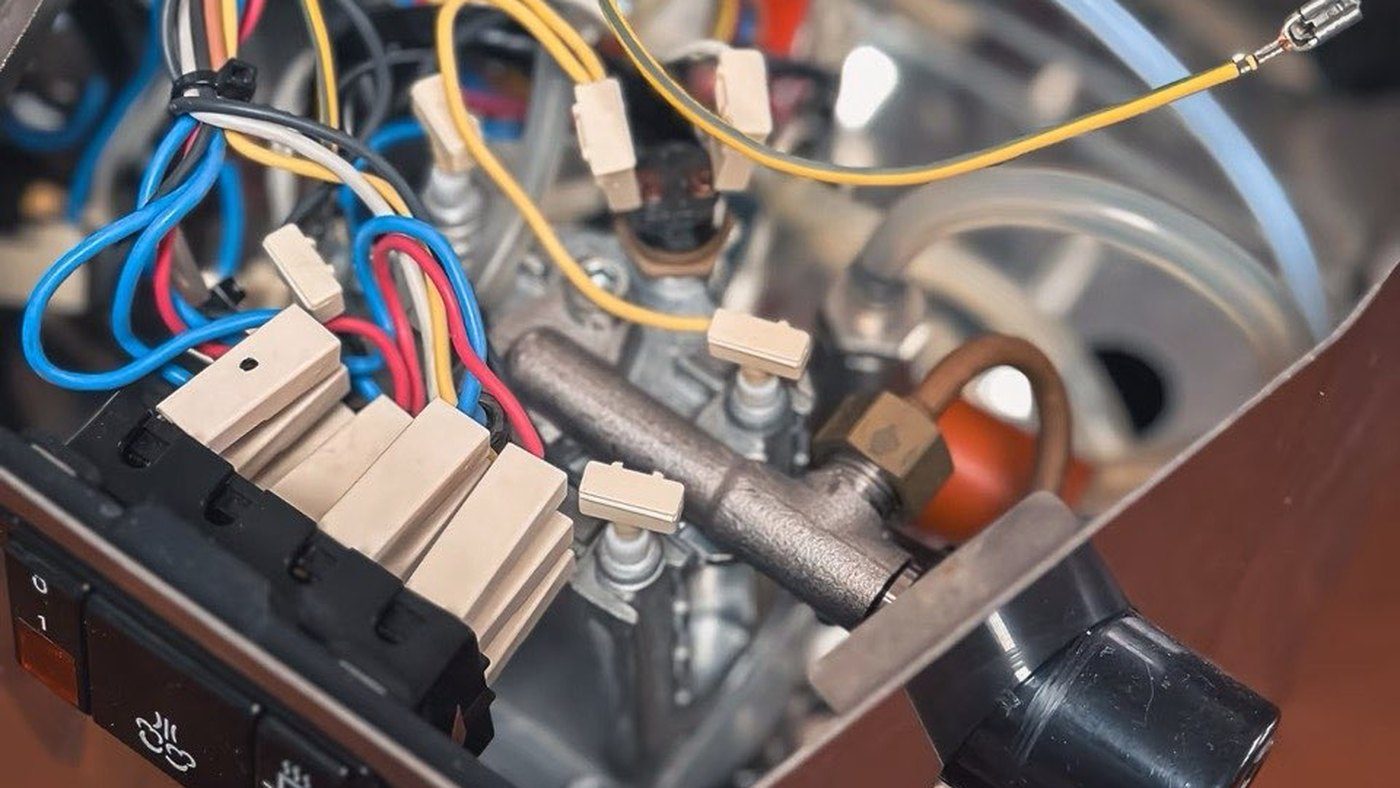
5. What Should You Photograph Inside the Machine?
When practicing how to open gaggia classic e24, photograph the inside before touching connectors, thermostats, switches, or tubes. Your phone becomes the best reassembly tool in the room.
Which areas need photos?
Shoot the whole machine first, then close-ups. This is the good part: photos turn fear into a map.
- Rear ground wire locations
- Switch connector positions
- Boiler top and thermostat area
- Pump and OPV area
- Tube routing
- Any leak mark or loose screw
How should you label parts?
Use labels before removing any connector. Do not trust memory. Memory works well until three white connectors look the same.
Key Takeaway: If a part may move, photograph it first. If a wire may disconnect, label it first.
6. How Can You Identify the E24 Brass Boiler Without Guessing?
You can use how to open gaggia classic e24 to confirm the internal boiler area, but you may also identify brass through other visible clues before deeper disassembly. Do not remove more than needed.
What are you trying to confirm?
Owners often open the case because they worry about Evo coating issues or replaced stickers. Keep it specific: confirm model evidence, not every rumor.
- E24 model label
- Brass boiler appearance
- Seller documentation
- Purchase page specification
- Visible internal layout
When should you stop?
If the only question is “Do I have an E24?”, official manuals, product labels, and seller documentation may be enough. If you see leaks, loose screws, or unknown wiring, photos help support explain the next move.
Key Takeaway: Open only as far as the question requires. More disassembly does not always create better proof.
7. How Should You Handle Wires and Connectors?
The safest way in how to open gaggia classic e24 is to look first, label second, and disconnect last. High-voltage wiring deserves calm hands and a clear reason.
What should never happen?
Do not pull connectors by the wire. Do not leave bare connectors loose. Do not mix high-voltage and low-voltage paths during a mod. Serious little rule: the machine is small, but mains voltage is not small.
- Pull on connector bodies, not wires.
- Label before removal.
- Insulate any disconnected wire during testing.
- Reconnect grounds before closure.
- Stop if a connector feels stuck.

What if you see monoblock connectors?
Some E24-related installation guides mention monoblock connector layouts. They can make wiring look cleaner, but labeling still matters.
Key Takeaway: Wires are not puzzle pieces. They are safety-critical connections.
8. What Should You Inspect Before Closing the Case?
After how to open gaggia classic e24 gives you access, inspect only the areas tied to your original reason. Look for water marks, loose screws, pinched tubes, disconnected grounds, and signs of heat damage.
What does a useful inspection include?
Keep the check visual unless you have service experience. Look before touching: many problems can be documented without moving parts.
- Fresh water around boiler or fittings
- Loose screw or washer
- Brown heat marks near connectors
- Tube kink or rub point
- Wire resting against hot metal
What should you document for support?
If the machine is new and leaking, take photos and stop. Do not create extra changes that make the case harder to explain.
Key Takeaway: Inspection should make the next decision clearer. It should not become uncontrolled repair work.
9. How Do You Reassemble and Test the E24?
The final part of how to open gaggia classic e24 is reassembly: reconnect grounds, seat the top cover, tighten screws gently, prime the machine, and test for leaks. Closure deserves as much care as opening.
What is the safe closing order?
Reverse your photos. Do not rush the last step: most mistakes happen when the job feels finished.
- Reconnect ground wires.
- Seat the cup warmer flat.
- Tighten rear screws gently.
- Reinstall tank and tray.
- Fill tank and prime if needed.
- Test with the cover fitted.
What should the first test prove?
Run a simple water test before pulling espresso. Watch for leaks. Listen for strange pump sounds. Check that switches behave normally.

Key Takeaway: A successful close means the machine works normally, not just that the screws are back.
10. When Should You Stop and Ask for Help?
Stop during how to open gaggia classic e24 if you see live-wire uncertainty, active leaks, burnt connectors, warranty risk, or parts that do not match your photos. Stopping early is a good technical decision.
What signs mean pause?
Some problems need support, not courage. Here is the line: if you cannot explain the risk, do not continue.
- New machine with leak
- Burnt connector smell
- Missing ground wire
- Water near switch wiring
- Unknown previous mod
- Boiler or group part removal needed
What help should you use?
Use official manuals, parts diagrams, seller support, and careful local service. If you plan a mod, read safety notes before buying parts. Our Gaggia Classic Pro mod safety matrix can help you sort visual checks from electrical work.
Key Takeaway: The best DIY habit is knowing when DIY should pause.
الأسئلة الشائعة
Q1: Can I open a Gaggia Classic E24 without voiding warranty?
Maybe. Simple top-cover removal may not always create an issue, but warranty handling depends on seller policy and what you touch inside. If the machine is new and faulty, document before changing anything.
Q2: What is the best tool for opening the E24 case?
A correctly sized Phillips screwdriver is usually enough for the top cover. You also need labels, a screw tray, and a phone camera so reassembly stays clean.
Q3: How do I know if I should open it or contact support?
Contact support first if the machine is new, leaking, burnt-smelling, or under warranty. Open only if photos or light inspection will help answer a clear question.
Q4: Can I touch wires after removing the top cover?
No, not casually. Photograph and label first. Disconnect only when required, and never work on a plugged-in machine.
Q5: What is the safest first test after closing the machine?
Run water through the machine before pulling espresso. Watch for leaks, check normal switch behavior, and confirm the pump primes correctly.
Final Takeaway
Opening the Gaggia Classic E24 is a careful access workflow, not a race. You now know how to prepare the machine, lift the cover, photograph the layout, protect ground wires, inspect common trouble spots, and close it again with proof.
If you want help planning a safe E24 inspection, PID path, or internal layout check, contact us today. Our view is simple: a home espresso mod should make the machine easier to understand, not harder to trust.
References
- Gaggia North America: Classic Pro/Evo/E24 Manuals
- GaggiaMate: Gaggia Classic Pro/Evo/E24 machine preparation
- Whole Latte Love: Gaggia Classic Pro Boiler Cleaning and Replacement
- Reddit: Loose screws in new Gaggia E24
- Reddit: Gaggia E24 flakes and model discussion
Image Credits
- Featured image adapted from a project-local Gaggia Classic photo asset.
- Internal machine photo adapted from a project-local Gaggia Classic internal service photo asset.