Your shot runs fast. The spring looks cheap. You start shopping. Pause before blaming pressure.
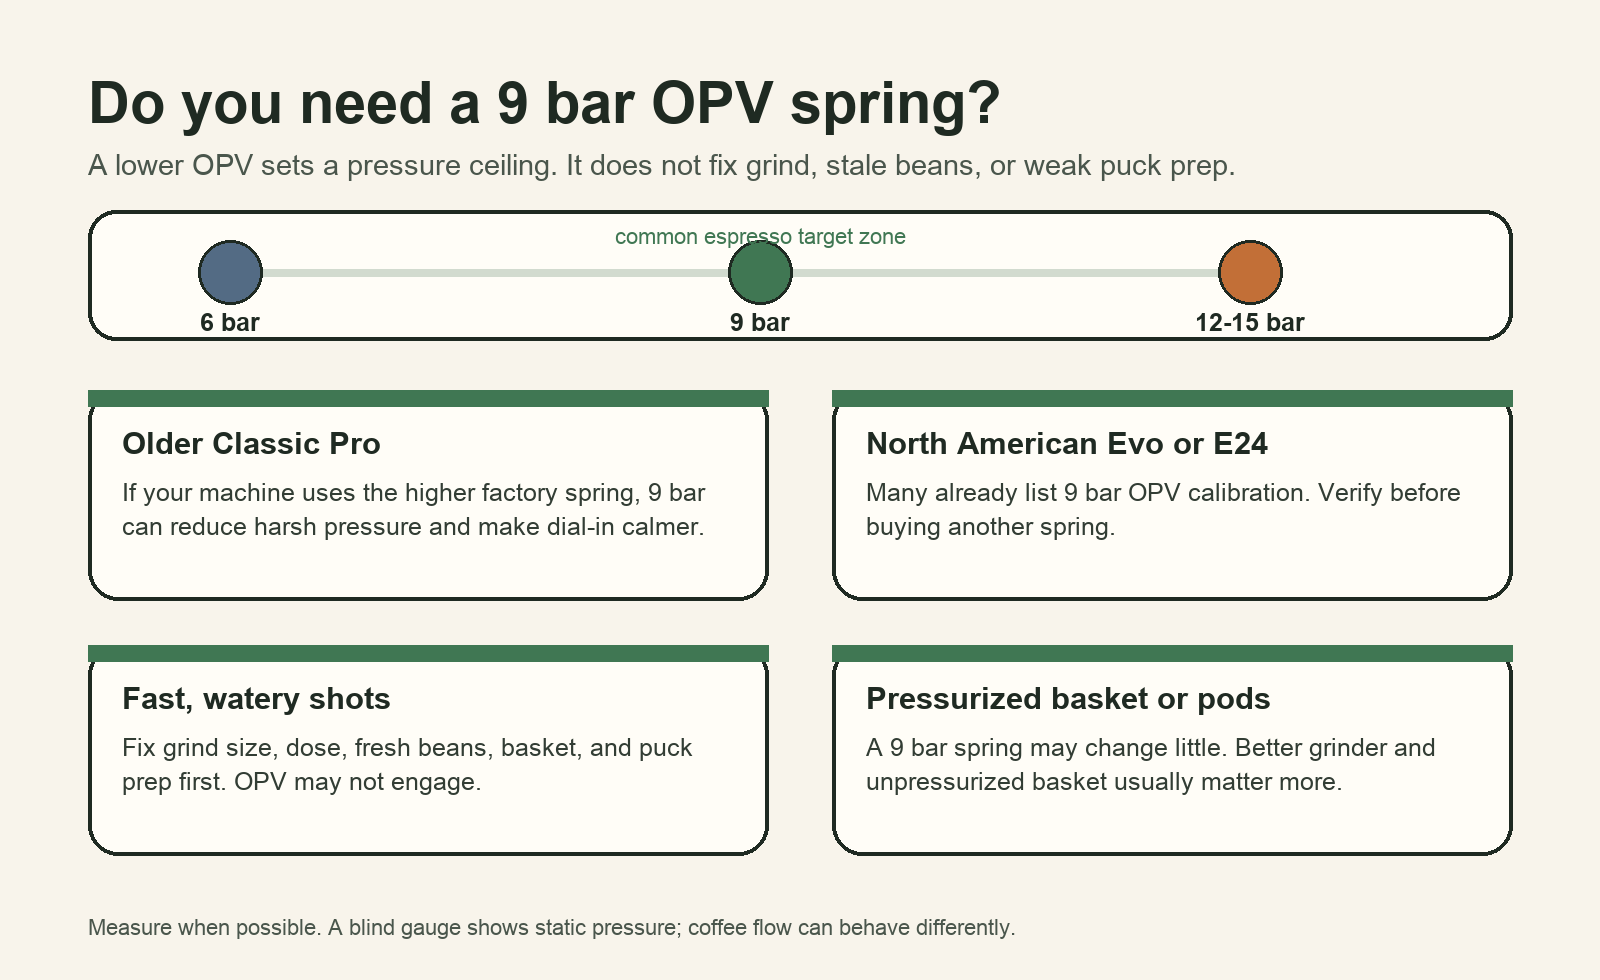
A 9 bar OPV spring helps some older high-pressure Gaggia Classic Pro models by limiting maximum brew pressure. It does not fix stale beans, coarse grind, pressurized baskets, or weak puck prep. North American Evo and E24 machines may already list 9 bar calibration.
This upgrade can be useful. It can also be misunderstood. The little spring has one job. It sets a pressure ceiling.
Table of Contents
- What does a 9 bar OPV spring actually change?
- Which Gaggia Classic models may already have 9 bar pressure?
- Will a 9 bar spring fix fast shots?
- When is the 9 bar spring a smart first upgrade?
- How should you test pressure before replacing parts?
- What can go wrong during the OPV spring mod?
- How does OPV fit into the upgrade order?
- domande frequenti
What does a 9 bar OPV spring actually change?
The spring feels important because pressure feels important. It is important, but not in an automatic way.
A 9 bar OPV spring lowers the machine’s maximum brew pressure before excess water is returned through the over-pressure valve. It makes pressure less aggressive when the coffee puck creates enough resistance.
The OPV is a pressure limit. It is not a flow control knob. When pump pressure climbs above the OPV setting, the valve opens and sends excess water away from the brew path. That can reduce harsh extraction pressure and make the machine easier to dial in with normal espresso baskets.
But the OPV does not create resistance. The coffee puck creates resistance. The basket, dose, grind size, bean freshness, and puck prep decide how much resistance the water meets. If the puck is weak, water passes through before pressure reaches the OPV limit. In that case, a lower spring may do very little.
Use this simple split:
This is why two owners can install the same spring and report different results. One owner has a good grinder and a normal unpressurized basket. The 9 bar spring makes the shot calmer. Another owner uses stale beans and a coarse grind. The shot still runs fast. The spring did its job, but the puck never gave it a real job to do.
So the best short answer is this: a 9 bar spring can help if pressure is really the limiting problem. It cannot replace the grinder.
Which Gaggia Classic models may already have 9 bar pressure?
Model version matters. Region matters too. A Berlin buyer and a New York buyer may not receive the same pressure setup.
Some 2019-2022 Classic Pro machines are common candidates for a 9 bar OPV spring. Whole Latte Love says the North American Classic Evo Pro received a new OPV for 9 bar extractions. Gaggia North America lists the Classic Pro E24 with 9 bar OPV calibration.
This is where owners get confused. They read that “the Gaggia Classic Pro needs a 9 bar spring.” Then they buy a newer regional version that may already be calibrated differently. Or they buy a used machine and cannot tell whether a previous owner already changed the spring. The machine history becomes unclear.
Use this model table before buying:
Whole Latte Love’s Evo Pro review says the North American version uses an updated OPV that is different from Evo Pro machines sold elsewhere. Gaggia North America’s E24 product page lists a 15 bar pump and a 9 bar OPV calibration. Those two details can both be true. The pump rating is not the same as the pressure limit at the OPV.
This is the main buyer lesson. Read the exact model page. Check the region. If you cannot confirm the pressure setup, measure it or ask support before opening the machine.
Will a 9 bar spring fix fast shots?
Fast shots feel like a pressure problem. Often they come from weak puck resistance first.
A 9 bar spring will not automatically slow fast shots. If the puck does not create enough resistance, brew pressure may never reach the OPV setting. Fix grind, beans, dose, basket, and puck prep first.
Forum replies repeat this point because it catches many beginners. A user says the shot runs too fast, so they want a 9 bar spring. More experienced owners then explain that the OPV only engages near its pressure limit. If water passes through the puck too easily, the OPV cannot rescue the shot.
This matters most when the shot is very fast. If espresso appears in two seconds and the cup fills in twelve seconds, the first suspects are not always pressure. The grind may be too coarse. The beans may be stale. The basket may be pressurized. The dose may be too low. The puck may have channels. The grinder may not produce fine, stable espresso grind.
Check this before ordering parts:
This does not mean the 9 bar mod is bad. It means it should not be blamed for work that belongs to the grinder. A spring is small. It has boundaries. Do not expect more from it.
If your first shots swing wildly before any mod, read the Gaggia Classic Pro First-Shot Checklist before you open the machine. A repeatable recipe gives pressure changes a fair test.
When is the 9 bar spring a smart first upgrade?
The upgrade makes sense when the rest of the setup is ready. It should not be the first bandage for every bad shot.
A 9 bar spring is a smart first upgrade when you use an older high-pressure Classic Pro, an unpressurized basket, fresh beans, and a grinder that can choke the machine if set too fine.
Here is the useful version of the recommendation. If your machine is a likely high-pressure version and your puck prep is already good, lowering the pressure ceiling can make extraction less harsh. It may reduce channeling risk. It may make recipes easier to repeat. It may help lighter roasts behave with less aggression.
It is especially sensible when you already understand your baseline. You know your dose. You weigh yield. You can adjust grind in small steps. You use fresh beans. You can tell the difference between sour, bitter, thin, and astringent. In that case, the OPV spring gives you a cleaner pressure environment.
Use this “yes, maybe, no” matrix:
This also explains why the mod became popular. It is inexpensive, simple for careful owners, and directly related to espresso extraction. That combination creates strong value. But value still depends on fit. A good upgrade in the wrong order is still the wrong order.
How should you test pressure before replacing parts?
Guessing can work. Measuring works better. The machine gives clearer answers when the test is clean.
Use a portafilter pressure gauge or verified model documentation before replacing the spring. Remember that a blind gauge shows static pressure, while real coffee flow can produce different pressure behavior.
A pressure gauge can help you avoid replacing a spring that is already correct. It can also catch installation problems after the mod. If the machine suddenly has almost no brew pressure, the spring may not be seated correctly, the valve disc may be displaced, or water may be returning through the OPV path too soon.
Testing has limits. A blind basket or portafilter gauge blocks flow. That creates static pressure. Real espresso has flow through coffee. So do not treat the gauge number as the full story. Treat it as a safety and calibration check.
Basic test logic:
If you do not own a gauge, you can still make a careful decision from model, region, and symptoms. But if the machine is used, modified, or region-confusing, a gauge saves time. It also prevents the classic mistake: changing a part twice because the first change was never verified.
What can go wrong during the OPV spring mod?
This is a small job, not a zero-risk job. Small parts can create large symptoms.
The OPV spring mod can go wrong if the valve disc shifts, the spring seats poorly, tubing leaks, the boiler loses prime, or the machine is opened without safe electrical practice.
Forum troubleshooting posts show the pattern. Someone installs the spring. Then water flow becomes weak. The owner panics. Other users ask them to check OPV discharge water, tube routing, leaks, and steam-wand flow. That is useful advice because a bad install can imitate a bigger failure.
Before you start, take photos. Label tubes if needed. Work with the machine unplugged, cool, and depressurized. Keep the small valve parts in order. Do not rush because the job looks easy on video. Video time and kitchen time are not the same time.
Common mistakes:
If the machine has no group flow after the mod, do not keep running the pump forever. Check priming and water path logic. The no-water diagnostic guide can help separate pump, solenoid, and water-path issues.
For internal work, use the Gaggia Classic Pro mod safety matrix before touching anything inside. Safety is not a boring footnote. It is the part that lets you keep making coffee.
How does OPV fit into the upgrade order?
OPV sits early, but not above basics. The order still matters.
Do grinder, basket, recipe, and puck prep before blaming pressure. Then consider 9 bar OPV, temperature stability, and workflow upgrades based on the problem you can prove.
The best upgrade order is not “cheap first” or “popular first.” It is “remove the largest proven limit first.” For many older Classic Pro owners, pressure can be one of those limits. For many beginners, grind and puck prep are larger limits. For milk-drink users, steam workflow may matter more. For light-roast drinkers, temperature stability may become more important after pressure is sane.
Use this order:
- Fresh beans and a repeatable recipe.
- Espresso-capable grinder.
- Unpressurized basket and consistent puck prep.
- Confirm your machine’s OPV setup.
- Install or verify 9 bar OPV if needed.
- Improve temperature stability if taste still swings.
- Add workflow upgrades only when they solve daily friction.
This is why OPV and PID discussions often appear together. OPV controls the upper pressure behavior. PID improves temperature control. They solve different problems. A 9 bar spring will not make the first shot heat-soaked. A PID will not lower high brew pressure. The machine is simple, but the variables still have job descriptions.
For the full sequence, use Il primo buon colpo arriva. Poi svanisce. Comportamento molto scortese da parte di una piccola macchina.. If your main issue is temperature, read Decisione before adding pressure parts.
domande frequenti
Does every Gaggia Classic Pro need a 9 bar spring?
No. Older high-pressure Classic Pro machines are common candidates. North American Evo and E24 machines may already be listed at 9 bar.
Will a 9 bar OPV spring make espresso slower?
Not always. It limits maximum pressure. If the puck has low resistance, the shot can still run fast.
Is 9 bar better than 12 or 15 bar?
For normal espresso, 9 bar is a common target. Higher pump ratings do not mean better extraction. They can make dial-in harsher.
Can I install the spring without a pressure gauge?
Many owners do, but a gauge reduces guessing. It is especially useful on used, modified, or region-specific machines.
Should I install OPV before PID?
If your machine truly runs high pressure, OPV can come before PID. If your pressure is already correct, temperature stability may be the better next topic.
A 9 bar OPV spring is useful when pressure is the real limit. Verify your model, fix the puck first, and let the small spring do only its own job.
References
- Gaggia North America: Gaggia Classic Pro E24 specifications
- Whole Latte Love: Introducing the Gaggia Classic Evo Pro
- Reddit: Where to buy 9 bar spring?
- Reddit: Gaggia Classic Pro OPV 9 bar mod error
- Reddit: Does the Gaggia Classic Pro E24 come with a 9 bar OPV?
- CoffeeSnobs: Home made adjustable OPV for Gaggia Classic Pro
If your model already has 9 bar calibration, spend the next upgrade dollar where it will actually show in the cup.