Brewster teen voice
If you want to learn how to make espresso with Gaggia Classic, start with a repeatable workflow, not random fixes.
Use fresh beans, a capable grinder, a warm machine, a dry basket, a consistent dose, an even puck, and a measured yield. Start near 18g in, 36g out, and 25-30 seconds. Then adjust by taste, one variable at a time.
The Gaggia Classic can make strong espresso at home. The hard part is that it does not hide mistakes. If the grind is coarse, the shot runs fast. If the basket is wet, the puck can break. If the machine is cold, the first shot can feel thin. If you change dose, grind, yield, and tamp at the same time, the cup cannot teach you anything.
This guide gives you a practical routine. It is based on real owner confusion from forums, older Gaggia Classic guides, current home-barista workflow advice, and common "People also ask" questions around using the machine.
How do you use the Gaggia Classic espresso machine?
You use the Gaggia Classic by warming the machine, grinding fresh coffee, preparing an even puck, pulling a measured shot, and cleaning the group after brewing.
That sounds basic, but the order matters. A new owner often wants to fix taste by changing everything at once. The better approach is slower and calmer. Build a baseline. Repeat it. Then make one change.
Here is a simple first workflow:
If your first shot changes a lot from day to day, use the Gaggia Classic Pro first-shot checklist before you buy more tools. It helps you separate machine readiness from recipe problems.
What should you prepare before pulling a shot?
Prepare beans, grinder, scale, basket, tamper, cup, towel, and a warm portafilter before you start.
The Gaggia Classic rewards station discipline. If the machine is warm but the basket is wet, you add a new variable. If the grinder is not ready, the coffee sits in the basket while the machine cycles. If the cup is not under the group, the shot starts with a small kitchen panic. A calm setup protects the shot before water touches coffee.
Use this small checklist:
The grinder is the big one. Jon Worth's older Gaggia Classic guide makes the same point clearly: grind is the most important variable for getting a good espresso from this machine. The machine can only work with the puck you give it.
How long should the Gaggia Classic warm up?
Warm up the Gaggia Classic long enough for the boiler, group area, portafilter, and basket to become stable.
Some older guides mention very short warm-up times. That can work in a hurry, especially if you flush water through the group. But for learning, a longer and more repeatable warm-up is easier. Many workflow-focused users prefer 15-30 minutes with the portafilter locked in. The exact time matters less than repeating the same method each day.
The Gaggia Classic is a small single-boiler machine. The boiler heats faster than the surrounding metal. That is why the ready light alone does not prove the whole brew path is settled. If your first shot is often sour and the second is better, warm-up may be part of the issue.
Warm-Up Options
If temperature keeps confusing you, read what a PID changes in daily brewing. A PID is not required for every user, but it can make the machine easier to read.
What dose, yield, and time should beginners start with?
Beginners should start near 18g in, 36g out, and about 25-30 seconds, then adjust by taste.
This is not a law. It is a baseline. A baseline helps because it gives your brain one stable place to stand. If the shot runs in 12 seconds and tastes sour, grind finer. If the shot takes 45 seconds and tastes bitter or harsh, grind coarser. If the time looks fine but the taste is still wrong, check puck prep, water, temperature, and the roast.
The important idea is ratio. A common double espresso starting point is a 1:2 ratio. That means 18g of ground coffee produces about 36g of liquid espresso. Some beans taste better shorter. Some taste better longer. The first job is not perfection. The first job is repeatability.
Starter Recipe
What is the 30 second rule for espresso?
The 30 second rule means many espresso recipes aim for a shot around 25-30 seconds, but taste matters more than the timer.
This question appears often because the timer feels objective. It gives you a clean number. But espresso is not solved by a stopwatch alone. A 29-second shot can taste bad if the puck channeled. A 22-second shot can taste good with a different coffee and ratio. A 35-second shot can work if the cup is balanced.
Use time as a diagnostic clue:
The Meticulist workflow guide makes a useful point here: learn the signs of blonding and texture change, not only the time. When the stream turns pale and thin, the pleasant part of extraction may already be ending.
How should you prepare the puck?
Prepare the puck by grinding fresh, distributing evenly, tamping level, and keeping the basket rim clean.
Puck prep is where many Gaggia Classic shots are won or lost. The pump sends water where resistance is weakest. If one side of the puck is loose, water rushes through that side. The shot may look fast, sour, and thin even if the grinder setting is almost right.
Use a simple method:
How do you dial in by taste?
Dial in by changing grind first, keeping dose and yield stable, and judging the cup after each shot.
This is the part that turns a beginner into a calmer brewer. Do not change five things. If the shot is sour and fast, grind finer. If it is bitter, dry, and slow, grind coarser or stop earlier. If it is good once and bad next time, the issue may be routine, warm-up, or puck prep.
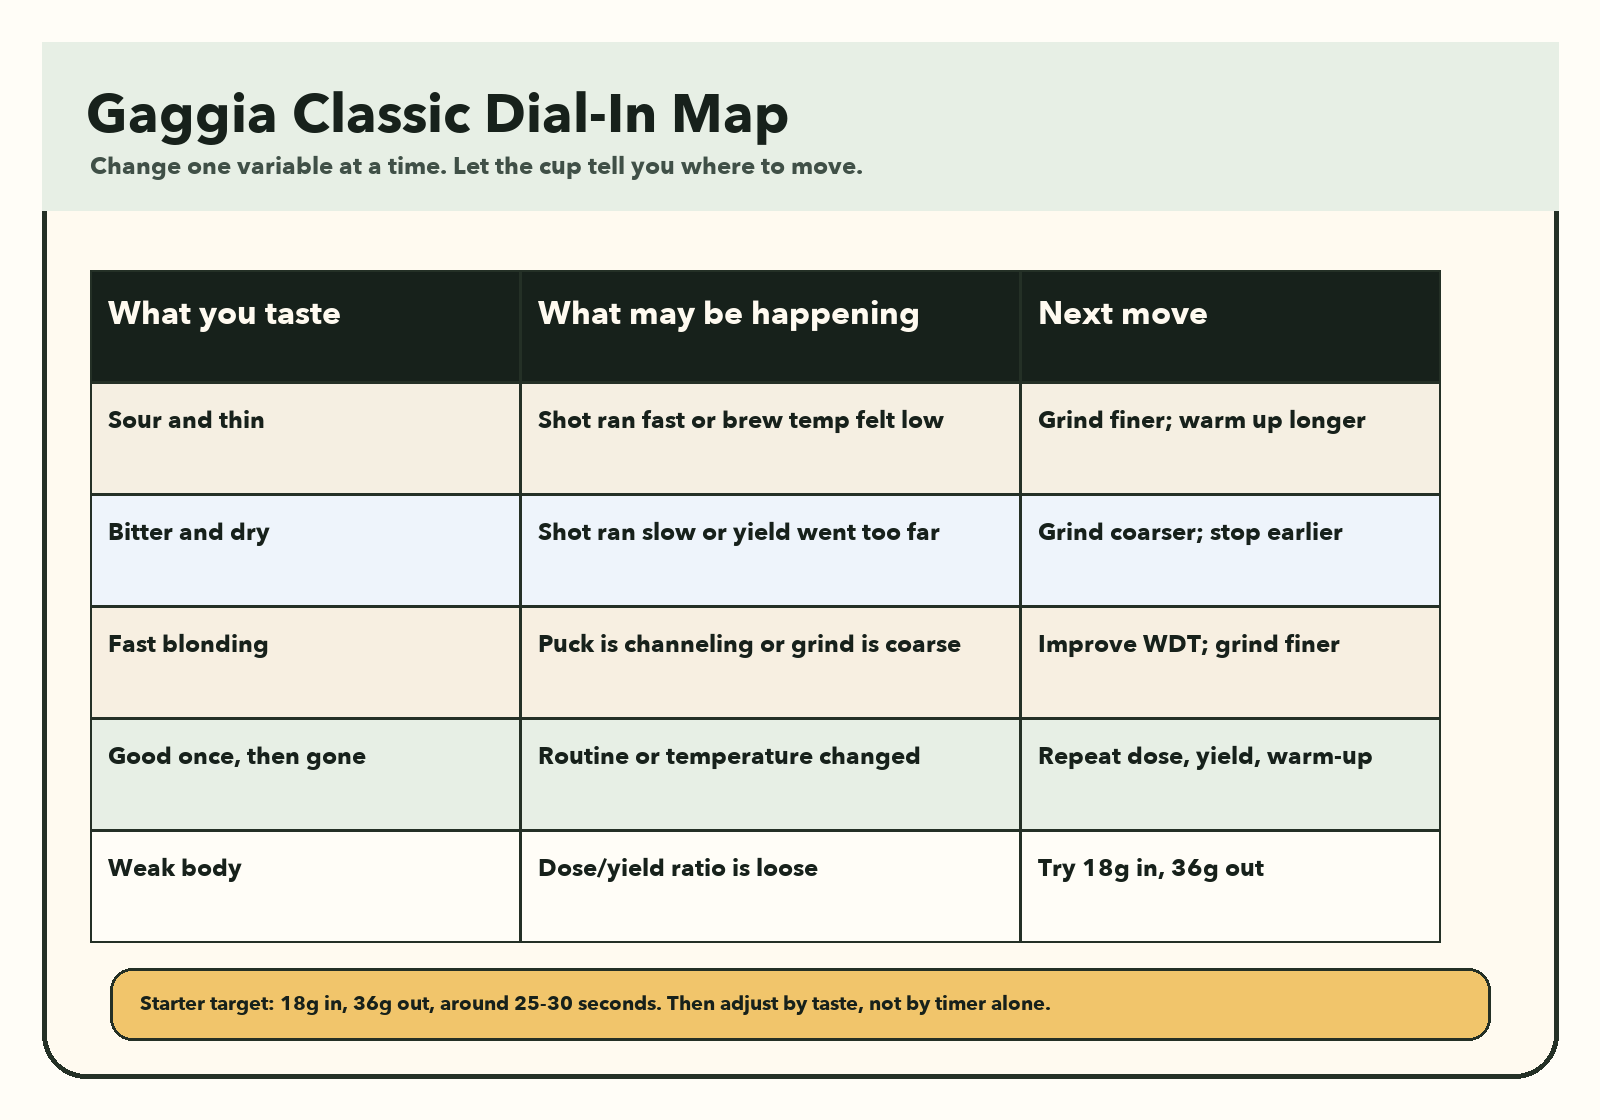
This map is intentionally simple. Real espresso can be more complex, but simple beats confused. The goal is to make the next shot more informed than the last one.
If the problem feels like pressure rather than grind, the 9 bar OPV decision guide explains when pressure changes help and when the grinder still matters more.
Is the Gaggia Classic a good espresso machine?
Yes, the Gaggia Classic is a good espresso machine when you pair it with a good grinder and a repeatable workflow.
It is not a fully automatic cafe machine. It is a compact single-boiler machine. That means it asks more from the user. You manage warm-up, grind, dose, puck prep, shot yield, steam timing, and cleaning. The reward is that the machine can teach you real espresso skills.
The Gaggia Classic is strong for:
It is weaker for users who want no learning curve. If you want press-one-button convenience, this machine may feel demanding. If you want to learn, it is still one of the more useful home platforms.
If you are still choosing a model, start with which Gaggia Classic to buy before learning the workflow. Model choice and daily routine belong together.
How do you make milk drinks after espresso?
Make the espresso first, then switch to steam, purge water from the wand, texture cold milk, and refill the boiler afterward.
This order matters because the Gaggia Classic is single boiler, dual use. It brews and steams with the same boiler at different temperatures. After steaming, the boiler is too hot for brewing and may contain steam. You need to cool and refill the boiler before another shot.
Milk Workflow

If milk performance is your main daily frustration, compare this workflow with the practical upgrade order for the Gaggia Classic Pro. It helps you decide whether the next improvement should be grinder, pressure, temperature, steam workflow, or comfort.
How should you clean after brewing?
After brewing, knock out the puck, flush the group, wipe the shower screen area, rinse the basket, and purge the steam wand if you used milk.
Cleaning is not a separate hobby. It is part of flavor. Old coffee oils create bitter, stale taste. Grounds on the gasket can affect the seal. Milk left in the steam wand can become a real mess fast. A 30-second cleanup protects tomorrow's shot.
Use this basic routine:
Use the Gaggia Classic backflush guide for coffee oil cleaning. Use the safe descaling guide for mineral scale. These are different jobs, and mixing them creates bad maintenance habits.
What should you fix first when shots taste bad?
Fix grind, dose, yield, puck prep, warm-up, and water before you blame the machine.
A lot of new Gaggia Classic owners feel the same panic: "I bought the machine, but I have no idea how to make it taste right." That is normal. The machine gives honest feedback, and honest feedback can feel rude at first.
Start with this order:
- Keep dose fixed.
- Keep yield fixed.
- Adjust grind until the time is close.
- Improve distribution if the flow looks uneven.
- Repeat the warm-up method.
- Check water if scale, flow, or taste keeps drifting.
- Consider upgrades only after the routine is stable.
If flow from the group head becomes weak or stops, use the no-water diagnosis guide. That is a troubleshooting problem, not a recipe problem.
FAQ
How to use the Gaggia Classic espresso machine?
Warm the machine, grind fresh coffee, dose into a dry basket, distribute evenly, tamp level, pull a measured shot, and clean the group after brewing. Repeat the same baseline before adjusting.
What is the 30 second rule for espresso?
It is a starting range, not a law. Many espresso recipes aim for 25-30 seconds, but taste, yield, flow, and puck quality matter more than the timer alone.
Does espresso help digestion?
Coffee can stimulate bowel movement for some people, and caffeine or coffee acids may also trigger reflux for some people. Espresso is not a digestion treatment. If you have reflux, IBS, or stomach symptoms, follow medical advice rather than coffee advice.
Is the Gaggia Classic a good espresso machine?
Yes, if you want to learn real espresso workflow. It is compact, repairable, and capable, but it needs a good grinder and a repeatable routine.
Can you make cafe-quality espresso with a Gaggia Classic?
Yes, but cafe-quality results come from the whole setup: fresh beans, grinder, warm-up, puck prep, yield control, water quality, and cleaning. The machine is only one part of the system.
Final workflow
Warm the machine. Keep the dose stable. Pull by weight. Taste before changing anything. The Gaggia Classic rewards repeatable hands.
References
- Reddit: I bought a Gaggia Classic Pro but have no idea how to use it
- Jon Worth: The simple guide to good espresso with a Gaggia Classic
- The Home Baristas: How to get cafe-quality espresso from your Gaggia Classic at home
- Meticulist: How to use Gaggia Classic / SBDU Workflow Guide
- Cleveland Clinic: Why coffee can trigger bowel movements
- Cleveland Clinic: Coffee and acid reflux
Image Credits
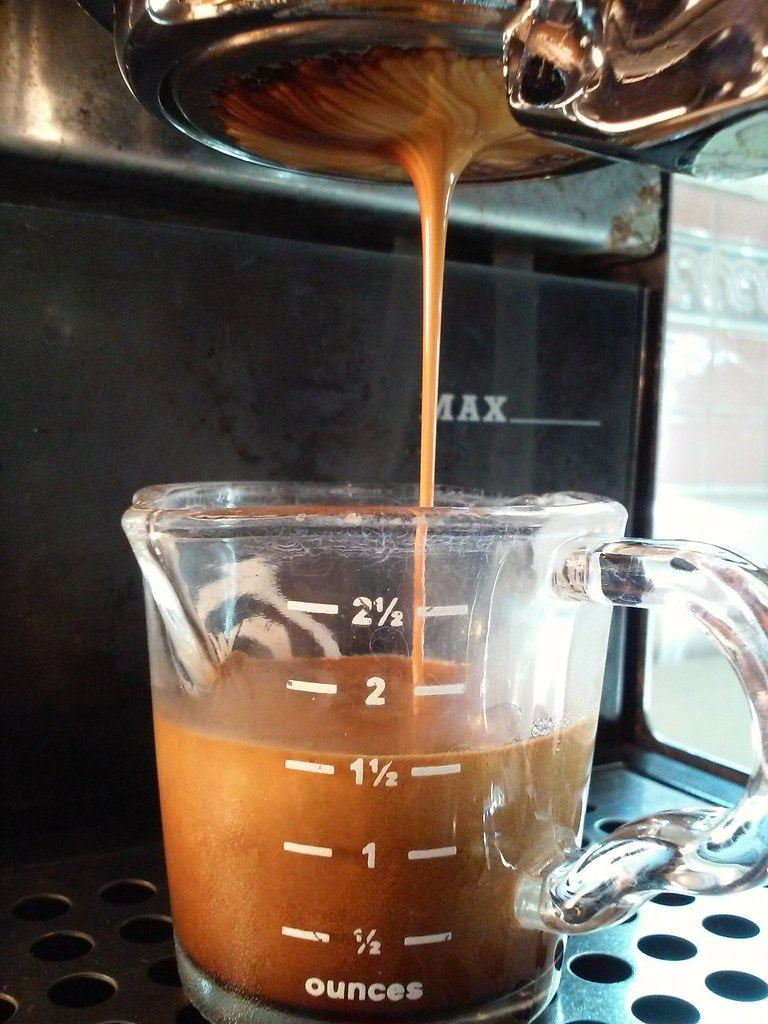
- Featured image adapted from "An espresso pull. #homecafe #homebarista" by insidious_plots, licensed under CC BY 2.0.
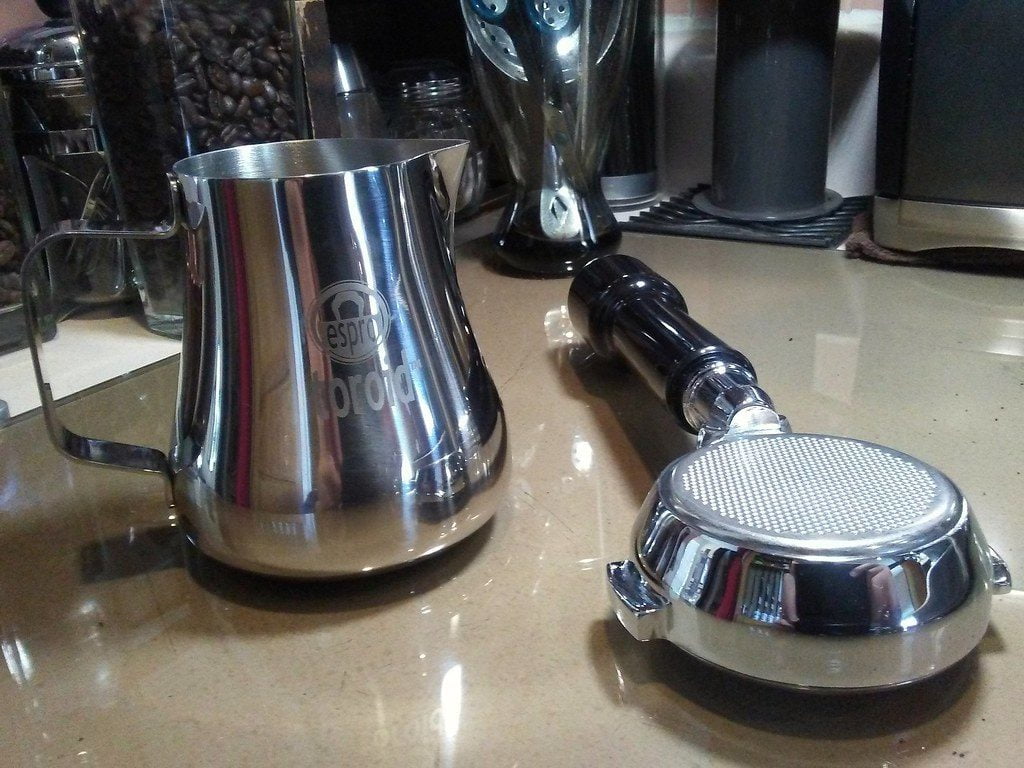
- Workflow tools image adapted from "New coffee equipment!!" by insidious_plots, licensed under CC BY 2.0.
 English
  Italiano
  Deutsch
  Español
  Français
  العربية
  日本語
日本語  한국어
한국어  香港中文
香港中文  Nederlands
  Português