
Rancilio Silvia mods: is the brass boiler worth it?
Everything worth doing to a Rancilio Silvia - Auber PID, OPV calibration, V3 steam wand, flat shower screen, Gaggiuino. Written by someone who's rebuilt these for years.
The Italian brass-boiler classic, built like a tank. Marine-grade brass boiler, built like a tank, two decades of benchmark status. This guide covers Auber PID, OPV calibration, pump damping, steam wand upgrade, flat shower screen mod, Gaggiuino, and the Silvia vs Gaggia showdown.
The Rancilio Silvia is a 300ml brass-boiler workhorse. It needs three mods before anything else matters: Auber PID for thermal control, OPV recalibration to 9 bar, V3 steam wand. Stock, it wastes good coffee.
A modded Silvia holds brew water at 228-229°F within ±1°C, delivers 9 bar at the puck, and microfoams milk through a commercial single-hole wand. Build chain: Auber PID with PT100M RTD in steam thermowell, SSR on chassis left panel. OPV flow-calibrated to 130ml per 30 seconds, V3 ball-joint wand, countersunk M5 flat shower screen. Gaggiuino on STM32U585 adds flow profiling for builders who handle high-voltage isolation.
I've rebuilt more Silvias than I can count. Every one needed three fixes before anything else mattered. Walk through each mod in order, from thermal foundation up through digital frontier.
Do I need a PID on my Silvia?
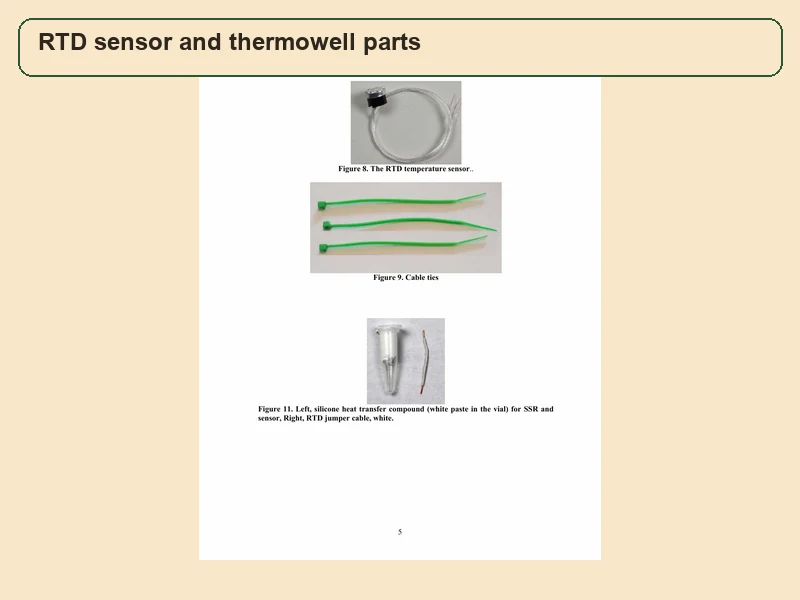
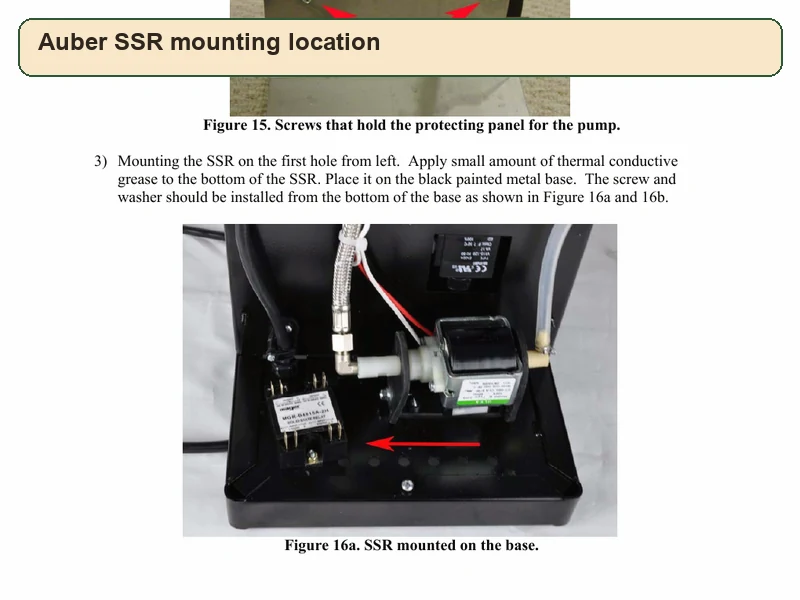
Yes, you need one on any Silvia. Without a PID you're surfing a bimetal thermostat with roughly 30°F deadband, guessing when 93°C lands inside a mechanical hysteresis loop. I've poured more inconsistent shots down the drain from stock Silvias than from any other machine I've owned. Auber's PID with pre-infusion and steam temperature control compresses brew water fluctuation to within ±1°C. A solid-state relay takes over AC switching from factory mechanical thermostat logic. Installation starts by cutting main power, draining water tank, removing top panel and rear baffle. SSR mounts on its pre-drilled hole on the left-side pump protection panel. Apply thermal conductive grease evenly under its base, then secure from underneath with screws and washers. Electrically, SSR splits into two independent control domains. Left handles steam via two black output wires plus main input. Right handles brew water via two thick red output wires plus main input. Our Silvia PID install walkthrough covers every screw with photos.
The precision temperature probe is this system's nerve ending. Silvia's boiler top has two factory thermostats: left (red mark) handles brew, right handles steam. For zero-delay water temperature data, PT100M RTD sensor goes into right thermowell, closest to cold water inlet. Use a flathead screwdriver to remove factory steam thermostat and relocate it left into brew position. At PID control box terminals, power gets tapped from main power switch's black wire via piggyback connector, strictly preserving factory polarity. All sensor and relay control wires pass through back panel rubber grommet into control box. Terminals 1 and 2 accept main power; 2 and 4 bridge brew pump jumper. Terminals 7 and 8 receive RTD analog signal; 9 and 10 output control level to SSR. Pre-infusion tuning: before full pump power, low-pressure water wets half to two-thirds of puck thickness. Dry coffee particles swell, fill voids, build dense puck resistance that eliminates channeling from direct high-pressure jet impact. Set SV to 228-229°F since thermowell reads about 3.5°F lower than actual top temperature. Set P at 1.8-3.5, Td at 2.5s, and Tb at 25s. Tp runs at 0.7s single or 1.2s double.
| Parameter | Physical Meaning | Recommended Value (RTD) |
|---|---|---|
| SV (Set Temperature) | Target boiler water control temperature. Thermowell reads about 3.5°F lower than actual top temperature, requires compensation. | 228–229°F |
| P (Proportional) | Output power ratio in response to temperature difference. Too low speeds up post-shot recovery but invites oscillation. | 1.8–3.5 |
| Tp (Pulse Injection) | Brief pump-on time that delivers the first low-pressure wetting flow. Too long makes the puck muddy and float. | Single 0.7s / Double 1.2s |
| Td (Soak Rest) | Pump-off wait time; capillary action lets water permeate the mid-to-lower puck. | 2.5s |
| Tb (Full Extraction) | Pump at full power under the 9 Bar golden pressure for flavor extraction. | 25s |
For owners who refuse solid-state conversion, temperature surfing still works on mechanical thermostats. Factory deadband runs roughly 210°F reheat to 240°F cut. On V1 through V4 models, when heat indicator light cuts out, boiler water sits overheated and brewing immediately will scorch coffee. Standard surf protocol: open brew switch, discharge water, force temperature down until thermostat closes (light turns on), then shut off pump. System now heats at full power. When light turns off, start a timer and wait 60-90 seconds. Peak heat from boiler shell dissipates outward and internal water temperature smoothly falls into 91-93°C golden window. On V5 and V6 machines with stainless steel heating element and factory boiler insulation jacket, community test data shows different timing. You only need 2-30 seconds of rest after forcing light on and waiting for it to turn off. Efficient insulation holds water at target brew temperature using residual heat.
Key takeaway: Auber PID with PT100M RTD in the steam thermowell delivers your biggest shot-quality leap. Set SV at 228-229°F, P at 1.8-3.5, Tp at 0.7s.
How do I calibrate the OPV to 9 bar?
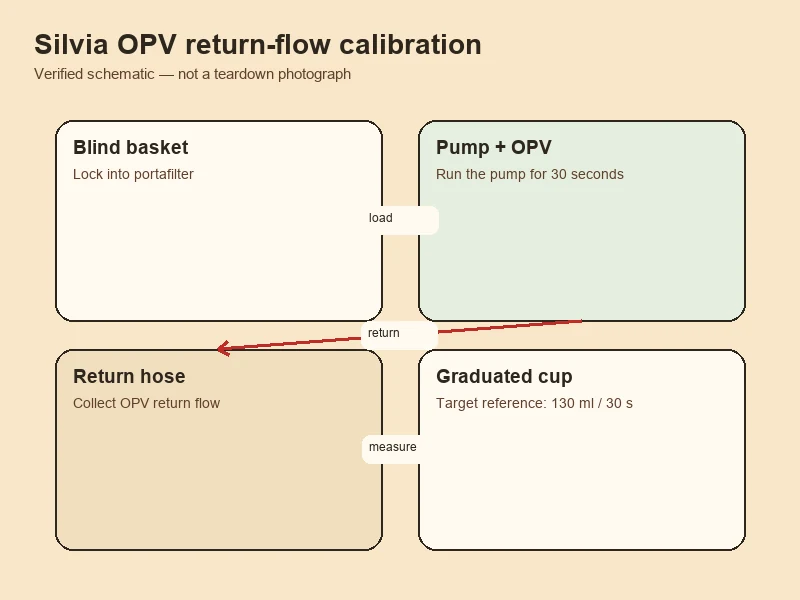
The factory Ulka EX5 vibration pump pushes 15 Bar nominal, a setting meant for ESE pods and pressurized baskets. With a bottomless professional basket, this blunt pressure instantly tears apart puck resistance structure. Over Pressure Valve uses physical preload of an internal spring to set maximum allowed system pressure. When back-pressure from group head flow resistance exceeds spring threshold, valve opens and diverts excess water through a bypass tube back to tank. Lowering this threshold to 9 Bar is mandatory for smooth extraction, reduced splatter, and fewer channeling defects. Without a commercial portafilter pressure gauge, fluid dynamics offers a volumetric calibration method. Ulka vibration pump's PQ curve follows a strict inverse linear relationship between flow and pressure. Remove water tank and route shorter OPV bypass return hose into a precision measuring cup. Install a blind basket in group head to simulate full blockage. Open hot water valve (keep steam valve closed) and run pump for exactly 30 seconds. If collected return volume hits precisely 130ml, back-pressure inside group head sits at 9.0-9.5 Bar golden node per flow chart.
For mechanical adjustment, remove top cover to expose brass OPV assembly on top of boiler. Hold lower valve body steady with a 20mm wrench while loosening top lock nut. If measured 30-second return reads less than 130ml (say 103ml), system holds too much pressure — turn internal adjustment screw counterclockwise to loosen. If return exceeds 130ml, turn clockwise to tighten. Limit each adjustment to half a turn, then repeat volumetric test. Once target reads correctly, hold lower valve body and tighten lock nut. Any blind tightening without holding valve body invalidates spring travel setting and ruins calibration. I've watched builders skip that step and wonder why their pressure wanders shot to shot. Half a turn at a time, measure every time, no shortcuts. This single mod transforms shot texture more than any grinder upgrade you could buy for triple the cost.
Key takeaway: Blind basket in group head, 30-second pump run, 130ml return from OPV hose equals 9 Bar. Half-turn adjustments only, hold valve body with a 20mm wrench.
Is the V3 steam wand upgrade worth it?
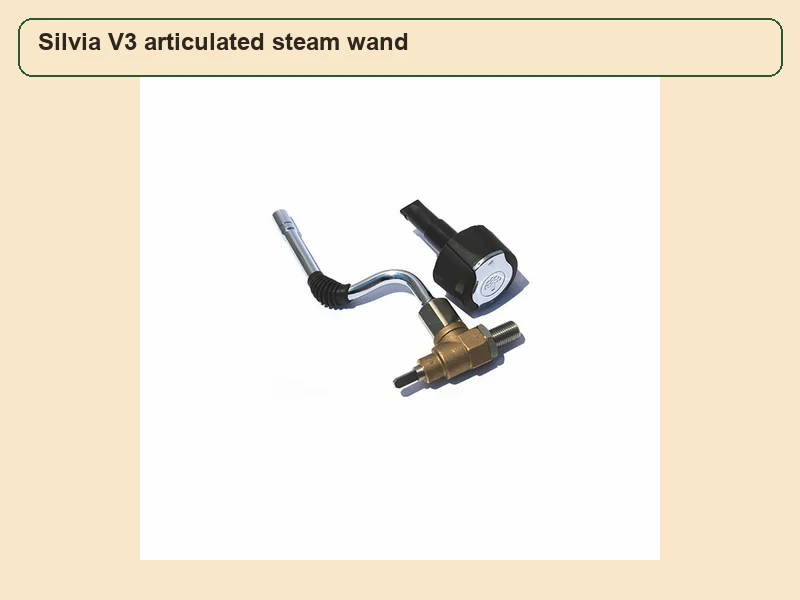
Yes, and anyone who tells you otherwise has never textured milk with a V3. V1 and V2 steam wand uses a fixed nut structure that only sweeps 180° in horizontal plane. Its single-hole metric male hex steam tip has hygienic dead corners where dried milk residue builds up and becomes nearly impossible to remove. Upgrading to V3 ball joint system with full 3D rotational freedom is the core mod for improving milk frothing fluid control. Thermodynamically, V3's commercial-spec detachable single-hole tip focuses steam released from boiler, piercing milk surface with more concentrated joule kinetic energy. Resulting vortex runs far stronger than any multi-hole design — that's your decisive physical condition for producing microfoam. I've poured latte art on V2 wands and V3 wands, and the difference isn't subtle. V3 gives you paint-like microfoam texture. V2 gives you dish soap foam bubbles.
This cross-generation rebuild requires complete V3 upgrade kit including valve core assembly — replacing only external stainless tube won't cut it. After removing chassis top cover, V3 ball joint's large physical volume shifts roughly 2cm upward. It physically interferes with factory rigid brass tube connecting boiler to steam valve. Builder must use a tubing cutter for precise cutting of original copper tube, or bend it with extreme care. Then rebuild rigid high-pressure steam line seal with a 1/8"–3/8" male-thread brass adapter wrapped in high-density PTFE tape. Take your time on this step. Rushed copper work leaks, and steam leaks at 130°C will burn your hand through the chassis gap. Test with cold water pressure before firing up steam — if cold water seeps from a joint, steam will spray from it.
Key takeaway: V3 ball-joint wand with full 3D rotation and commercial single-hole tip transforms milk texture. Buy complete kit including valve core, not just wand tube.
What does the flat shower screen mod actually do?
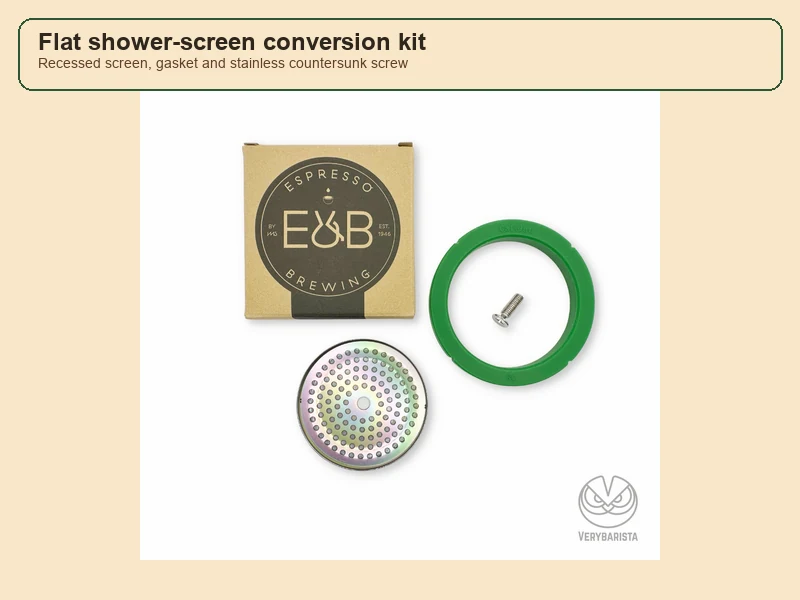
Open your Silvia group head and you'll see a large hex protruding bolt head at center of factory shower screen. When loading 18g or more and locking in portafilter, this bolt head embeds into center of tamped puck like a drill. It physically destroys puck structural uniformity and causes fatal center channeling. It also makes fitting a metal puck screen (typically around 1.7mm thick) impossible — forcing one in warps your expensive screen. Flat Shower Screen mod machines metal parts so bolt sits fully recessed below plane. Countersunk M5 × 14mm screw in A4 (316L) marine stainless steel replaces factory protruding bolt. V1 old models need M5 × 12mm to avoid bottoming. A 12mm high-speed steel countersink bit cuts brass jet breaker to form recess housing conical screw head. Cafelat food-grade high-temp silicone gasket replaces aging factory rubber gasket for better seamless seal and longer service life.
| Component | Spec & Material | Function |
|---|---|---|
| Countersunk Screw | M5 × 14mm (V1 old models need M5 × 12mm to avoid bottoming) | Replaces factory protruding bolt; conical head seats fully flush, eliminating the protrusion. |
| Screw Material | A4 (316L) marine stainless steel | Resists oxidation and seizing under high temperature, high pressure, and coffee acidity. |
| Countersink Bit | 12mm high-speed steel | Cuts the brass jet breaker to form the recess that houses the conical screw head. |
| Secondary Seal | Cafelat food-grade high-temp silicone gasket | Replaces the aging factory rubber gasket; better seamless seal and longer service life. |
Procedure: remove internal brass jet breaker and clamp it in a bench vise. Use 12mm metal countersink bit for slow vertical drilling from bottom center. Continuously drip WD-40 cutting fluid to carry away cutting heat and prevent brass from softening. Stop when countersunk screw head sits flush with jet breaker bottom. After machining, do not install directly on machine. Thread countersunk screw through a new IMS nanocoat shower screen and modified jet breaker, then spin an M5 nut onto back. Use a wrench for heavy torque application, forcing thin stainless screen's center region to plastically deform into countersink recess. Rebuilt group head surface ends up mirror-flat. Water distributes as a fine dead-angle-free raindrop pattern. Top headspace fully frees up for modern extraction aids like puck screens.
Key takeaway: Countersunk M5 × 14mm A4 stainless screw, 12mm countersink bit on brass jet breaker, IMS nanocoat screen stamped flush. Mirror-flat group head, no center channeling.
Is Gaggiuino better than a PID for Silvia?
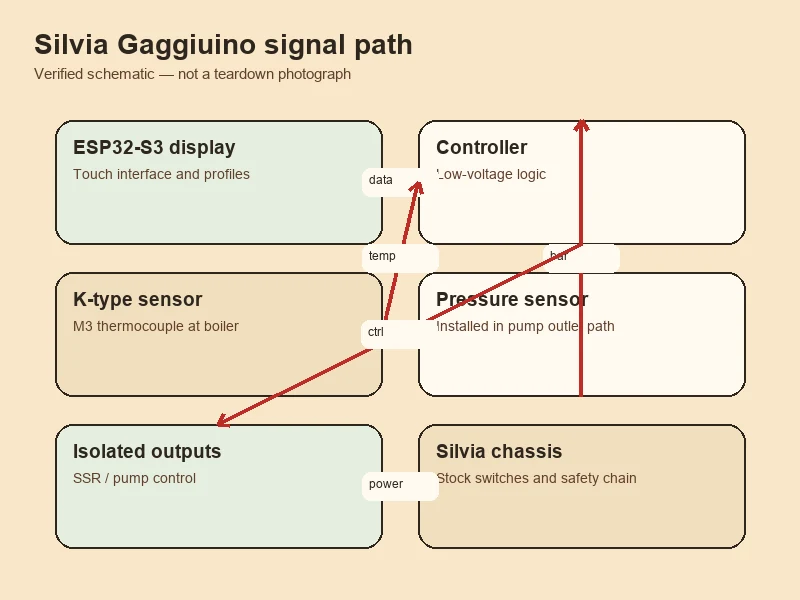
For builders fluent in both hardware and software, Auber PID is just entry-level passive compensation. Gaggiuino from GitHub open-source community is a full digital solution for single-boiler machines, and Silvia's roomy chassis makes it an ideal physical host. Core philosophy: discard all mechanical and simple relay logic by implanting a high-performance microcontroller. Choose STM32U585CIU6 (Gen 3) or ESP32-S3. This turns Silvia into a machine with features normally found only on commercial hardware costing far more. Stop-on-weight, software-driven DreamSteam rapid steam pressure ramp, unlimited-stage pressure profiling, true flow profiling. At thermal control layer, Gaggiuino rewrites traditional water-boiler model into a thermoblock-like algorithm. When system detects very low flow (below 4ml/s, meaning pre-infusion or low-pressure slow extraction), MCU actively predicts heat loss. It commands heating element to engage without boiling, locking output temperature onto target curve. This feedforward control based on differential equations overturns PID's passive lag — no more waiting for actual temperature to drop before slowly compensating.
This open-source build carries high-risk engineering challenges you must respect. Flag terminals on Silvia heating element pins sit in an extreme-heat zone. You must strip original meltable nylon insulation and rebuild with bare terminals plus industrial self-fusing silicone tape. Any negligence can cause short circuit or chassis fire. Unlike Gaggia's M4 thread, Silvia boiler requires a custom M3 ungrounded K-type thermocouple. It also needs an extra tee valve and elbow (PC 6-M5, PLF 6-02). These parallel a 0-1.2Mpa pressure sensor into high-pressure side of water path. Complete digital closed loop requires a 3D-printed magnetic load cell holder implanted under drip tray. It transmits liquid weight data to core board at millisecond latency. I've seen two builds catch fire from skipped insulation work. Both builders survived, both machines didn't. If you can't solder, can't read a schematic, or can't isolate mains voltage, stick with Auber.
Key takeaway: Gaggiuino on STM32U585 adds flow profiling, pressure profiling, and stop-on-weight. But high-voltage isolation and custom M3 thermocouple work make it a build for experienced makers only.
Silvia or Gaggia Classic Pro: which brass boiler wins?
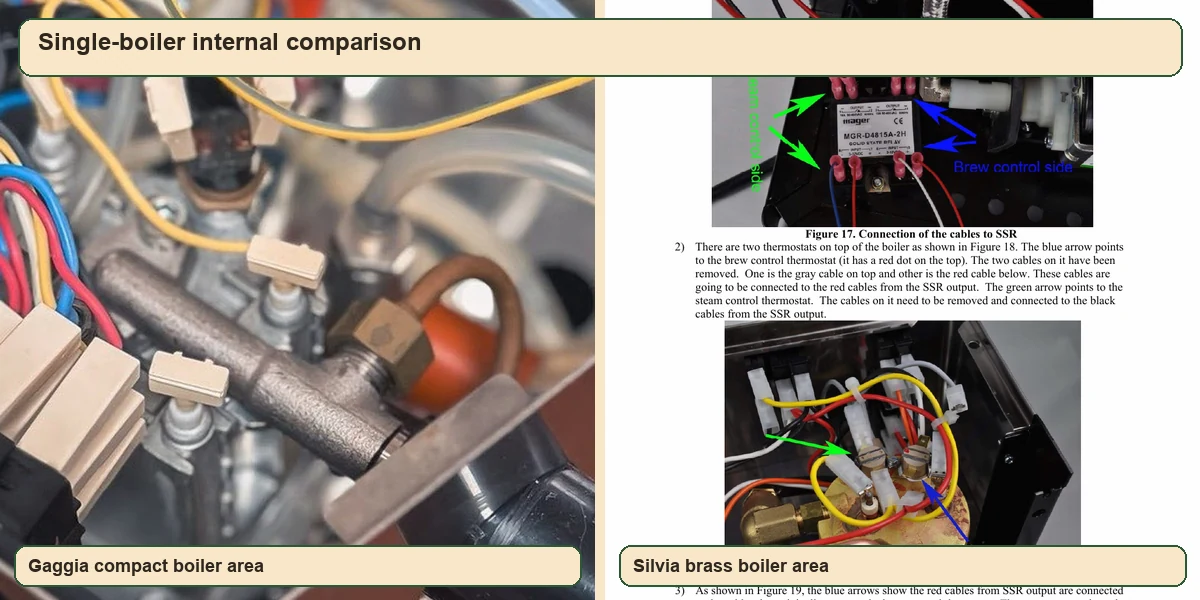
In the $500-$1000 home-upgrade segment, war between Gaggia Classic Pro (GCP, around $449) and Rancilio Silvia (around $995) has run for decades. Underlying architecture of each machine dictates very different ceilings. Silvia carries a 300ml marine-grade heavy forged brass boiler; GCP carries a 100ml light die-cast aluminum boiler. Brass has high heat capacity — very stable temperature but needs 20-minute preheat. GCP aluminum heats fast but suffers serious temperature drop during a 30-second extraction. Steam system: Silvia runs a commercial single-hole ball-joint wand; GCP runs a commercial two-hole fixed axial rotation wand. Silvia's large boiler plus single-hole fluid focus sustains a strong vortex and handles back-to-back large lattes easily. Water path: Silvia ships at 12-15 Bar with physical adjustment nut; GCP ships at 15 Bar, non-adjustable. Silvia owners reach 9 Bar with one wrench. GCP requires buying a third-party spring kit. Net weight: Silvia at 14.0 kg (30.8 lbs) versus GCP at 8.5 kg (18.7 lbs). Silvia's tank-like chassis and spacious internal layout leave excellent room for large relays and complex plumbing mods.
| Core Spec | Rancilio Silvia (V6/M) | Gaggia Classic Pro (GCPE) | Geek Analysis |
|---|---|---|---|
| Boiler | 300ml, marine-grade heavy forged brass | 100ml, light die-cast aluminum | Brass has high heat capacity - very stable temperature but needs 20-minute preheat. GCP aluminum heats fast but suffers serious temperature dive during a 30-second extraction. |
| Steam System | Commercial single-hole ball-joint wand | Commercial two-hole fixed axial rotation wand | Silvia's large boiler plus single-hole fluid focus sustains a strong vortex and handles back-to-back large lattes easily. |
| Water Path | Factory 12–15 Bar, with physical adjustment nut | Factory 15 Bar, non-adjustable | Silvia owners reach 9 Bar with one wrench. GCP requires buying a third-party spring kit. |
| Net Weight | 14.0 kg (30.8 lbs) | 8.5 kg (18.7 lbs) | Silvia's tank-like chassis and spacious internal layout leave excellent room for large relays and complex plumbing mods. |
What reshaped this comparison was a systematic quality disaster that erupted in 2023, known in community as Boilergate. Gaggia released upgraded Classic Pro Evo (GCPE) with a food-grade PTFE-like nonstick coating called EXELIA 3010 on aluminum inner wall. Investigation showed coating suffered defective polymerization at factory. Under 10+ Bar pressure, 130°C+ rapid heating, and aluminum's violent thermal expansion and contraction, coating adhesion collapsed. Thousands of users found black chemical flakes and flocculent debris spraying from steam wand and group head within two to three weeks of ownership. Even running factory descaler accelerated chemical corrosion and large-scale coating detachment. Physical debris clogged precision 3-way solenoid valve. Faced with flood of returns and FDA health concerns, North American distributors issued emergency replacement policies. Whole Latte Love swapped in uncoated older aluminum boilers. This global quality collapse validated Rancilio Silvia's industrial philosophy held for over twenty years. No coatings of any kind inside pressure vessel, only a solid, heavy brass casting. Heavy-metal physical rule guarantees clean, contamination-free hot water through decades of water flow and deep descaling cycles.
Key takeaway: Silvia's 300ml brass boiler outlasts and outperforms GCP's 100ml aluminum. Boilergate proved coatings fail; bare brass doesn't.
How do I silence the Ulka vibration pump?
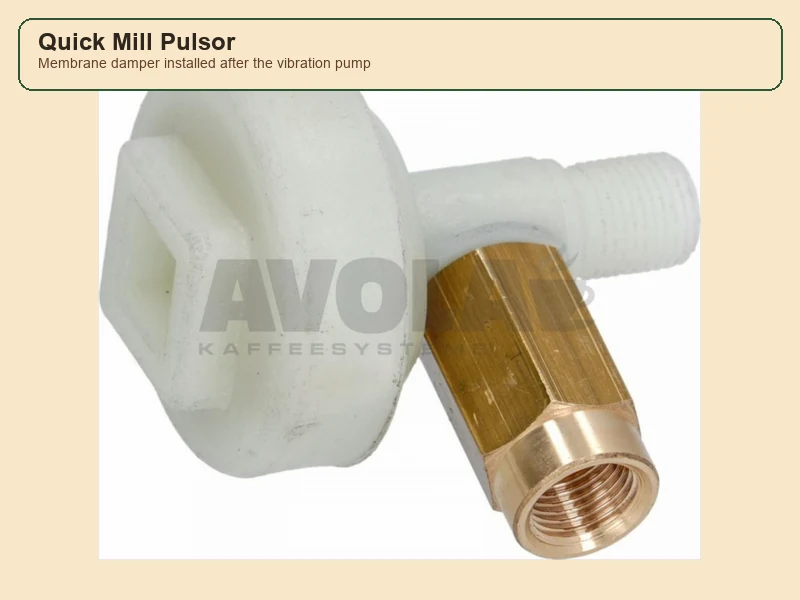
A vibratory pump's piston reciprocates at 50Hz or 60Hz AC line frequency, producing loud metallic scraping noise and strongly pulsed output flow. Even with thermal stability solved, factory pump's mechanically rigid pressure remains a core variable limiting extraction quality. Quickmill Pulsor — a diaphragm damping pulse regulator — is standard passive fluid mechanic buffer used to silence Silvia. Pulsor connects directly to pump output via a standard 1/8" male–female BSP adapter. Its internal sealed elastic diaphragm acts as a shock absorber, dynamically absorbing high-frequency water hammer shockwave produced by each piston stroke. After installation, sharp pump whine drops to a low, soft background tone. More critically, sawtooth pulsed flow gets shaped into a smooth linear pressure ramp. This linear pressure rise greatly weakens mechanical destructive force at moment of puck contact. I installed one on my daily driver and my spouse stopped complaining about morning noise. That's your real-world validation metric right there.
For extreme builds, factory Ulka pump gets replaced with an OLAB K09541 (Silent Green) silent pump. It has superior initial soft-start pressure characteristics, reshaping underlying hydraulic dynamics. Combination of Pulsor plus OLAB pump brings Silvia's acoustic signature below conversation level. You'll hear your grinder more than the machine. Some builders add foam isolation pads between pump chassis mounts and frame rails, but that treats symptoms rather than cause. Fix the hydraulic pulse at its source with a Pulsor before anything else, then decide if you still need acoustic padding. Most builders skip acoustic padding after installing a Pulsor, since underlying hydraulic noise drops below ambient kitchen sound level.
Key takeaway: Quickmill Pulsor on 1/8" BSP adapter shapes pulsed flow into linear ramp and kills pump whine. OLAB K09541 Silent Green pump for extreme quiet builds.
Can I pre-infuse on a mechanical Silvia?
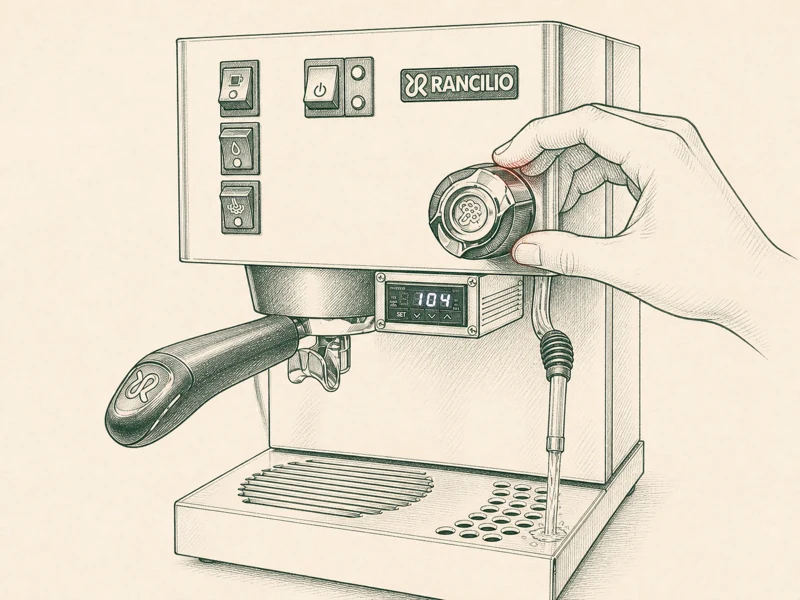
For purists who refuse electronic intervention, Poor Man's Pre-infusion exploits Silvia's single-boiler water path topology as a clever physical hack. Technique uses flow diversion in a resistance network. Just before loading basket and pressing brew switch, turn right steam knob one-quarter to one-half turn counterclockwise. When pump starts, high-pressure cold water that should flow fully to group head finds an easier relief path. It routes through lower-resistance steam line, and a large volume sprays from steam wand. This delays pressure buildup at group head by a multiple. Water seeps through shower screen with only minimal potential energy and gently spreads across coffee surface. After about 3-6 seconds of low-pressure soak, slowly and steadily close steam valve. As relief path closes, hydraulic pressure concentrates at group head and seamlessly transitions to full extraction pressure at roughly 8 seconds. Critics note this forces excess cold water into single boiler and causes local temperature loss. But for darker roasts or grind sizes prone to channeling, this manual-diversion slow pressure ramp often saves a shot that would otherwise fail extraction.
I've used this technique on machines where no PID existed yet. It works, but it wastes water and requires practiced hand timing. You're trading precision for simplicity. If you brew same coffee daily and memorize your knob position, results stay repeatable. Switch beans and you'll need recalibrate. For most builders, a $30 Auber pre-infusion module does this better electronically. But if your machine runs purely mechanical and you want pre-infusion without opening chassis, this is your only option. Keep a towel handy — steam wand will spray cold water across your counter during soak phase.
Key takeaway: Steam knob 1/4 to 1/2 turn open, 3-6 seconds of low-pressure soak, close slowly for 8-second ramp. Works on any mechanical Silvia, no electronics needed.
Why does my Silvia trip the GFCI breaker?
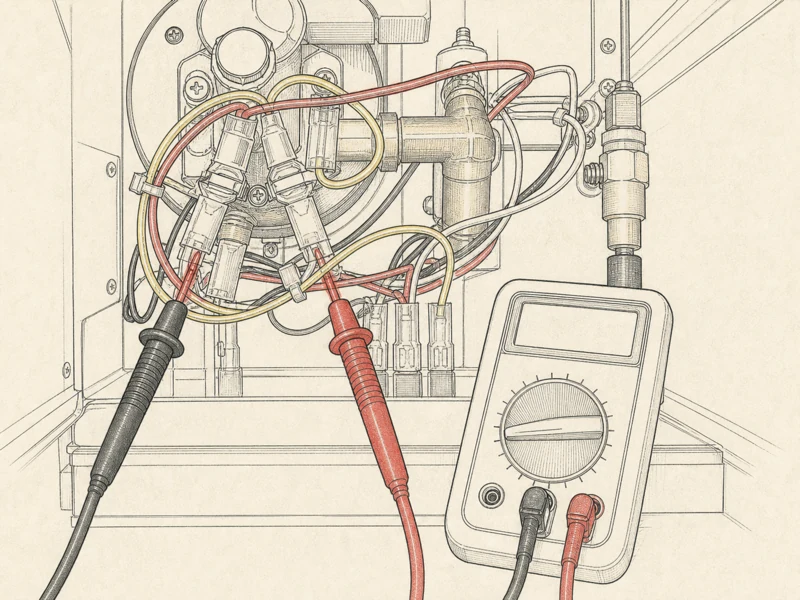
This is most fatal single-boiler insulation failure, and I've diagnosed it dozens of times. In 99% of cases, heating element's outer metal sheath has cracked. Conductive boiler water enters resistance wire network, forming a leakage path to chassis ground. Crack hides from you — invisible at room temperature, sheath surface may look completely intact. Machine trips GFCI instant it powers on or heat light comes on. Talk to us if you need help diagnosing, but here's standard electrical diagnostic procedure you can run yourself. Disconnect physical power before opening chassis. Remove 4 Phillips screws on top cover to expose brass boiler. Unplug two power supply wires from heating element terminals. Set a digital multimeter to continuity beep (diode) mode. Hold black probe firmly against brass boiler shell, touch red probe to each of two heating element terminals in turn. Under normal insulation, meter should show OL or infinite resistance. If meter beeps or displays an erratic few hundred ohms, insulation breakdown is confirmed and heating element must be scrapped and replaced.
Prevention costs nothing and saves hundreds. After every milk session, open hot water valve for 3-5 seconds to pull fresh cold water into boiler and cover element top. This habit extends element life by years. If you run a V1, V2, or V3 Silvia with welded element, a failure means replacing entire boiler assembly — over $200 plus labor. On V4 and newer with removable stainless element, part costs tens of dollars and swap takes 20 minutes. This single maintenance habit is why some Silvias run 15 years without a service call while others eat elements every 18 months. Same machine, same factory parts, different operator discipline.
Key takeaway: GFCI trip means cracked element sheath. Multimeter on continuity, probe boiler shell to element terminal, beep equals replace. Vent hot water after every steam session to prevent dry-fire cracking.
Which used Silvia generation should I buy?
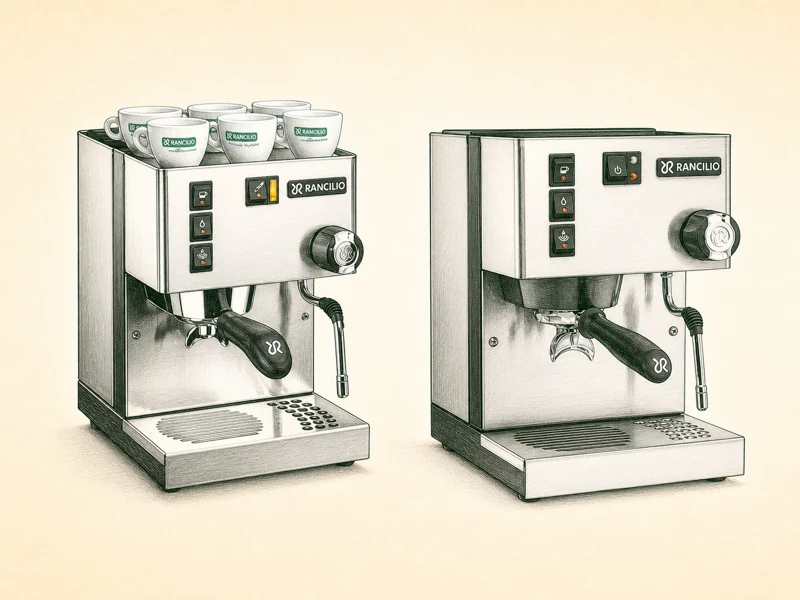
Precise generation ID decides your future maintenance cost, especially due to major boiler construction change running from V1 through V4. V1 (1997) has an all-mesh drip tray with no bar grilles and non-articulating steam wand. Its heating element gets welded into boiler — if it leaks or burns out, you cannot replace it separately. Whole boiler must go, costing over $200. V2 (2000) upgraded drip tray to partial mesh plus partial bar holes, steam knob still all black plastic with no chrome center dot. Late V2 batches introduced adjustable OPV, but element stays integrated with boiler. V3 (2008) is easiest to spot: commercial ball-joint single-hole steam wand comes standard, steam knob center has chrome-plated metal cap. Element still integrated, but its complete steam system makes V3 highly valuable as a used modification platform. V4 (2013) looks nearly identical to V3 — remove top cover for positive identification. V4 introduces an independent, removable stainless steel heating element. This is your most recommended used base model. Element failure only costs tens of dollars for a standalone replacement part, repair cost drops drastically.
| Generation | Year | Appearance & Engineering Differences | Buyer Advice |
|---|---|---|---|
| V1 | 1997 | Drip tray is all mesh, no bar grilles. Steam wand is non-articulating. | Warning: the V1 heating element is welded into the boiler. If it leaks or burns out it cannot be replaced separately - the whole boiler must be replaced, costing over $200. |
| V2 | 2000 | Drip tray upgraded to partial mesh plus partial bar holes. Steam knob is still all black plastic with no chrome center dot. | Late batches introduced adjustable OPV, but the element is still integrated with the boiler - repair cost remains very high. |
| V3 | 2008 | Easiest identifier: commercial ball-joint single-hole steam wand is standard, and the steam knob center has a chrome-plated metal cap. | Element is still integrated. But its complete steam system makes it highly valuable as a used modification platform. |
| V4 | 2013 | Looks nearly identical to V3. Must remove the top cover to identify: introduces an independent, removable stainless steel heating element. | The most recommended used base model. Element failure only costs tens of dollars for a standalone replacement part - repair cost drops drastically. |
| V5 | 2016 | Single orange LED next to the front panel power switch is replaced with vertically stacked orange and green dual LEDs. Factory ships with a black foam insulation jacket around the brass boiler. | The European V5-E version has a motherboard chip that cuts power after 30 minutes of idle - a disaster for systems that need very long preheat. |
| V6 | 2020 | The metallic ring on the front of the group head is replaced with a wear-resistant matte black polymer housing. Internal new-batch stainless steel heating element. | The modern pinnacle - needs minimal prep before mounting a PID or a Gaggiuino open-source module. |
V5 (2016) replaces single orange LED next to power switch with vertically stacked orange and green dual LEDs. Factory ships with black foam insulation jacket around brass boiler. European V5-E version has a motherboard chip that cuts power after 30 minutes of idle — a disaster for systems needing very long preheat. V6 (2020) replaces metallic ring on front of group head with wear-resistant matte black polymer housing, runs internal new-batch stainless steel heating element. V6 is your modern pinnacle, needs minimal prep before mounting a PID or Gaggiuino module. If you find a V4 or V6 on used market at fair price, buy it without hesitation. V3 works if price reflects integrated element risk. Walk away from V1 and V2 unless you want a project shelf queen.
Key takeaway: V4 (2013) is your best used buy — removable stainless element, identical steam system to V3. V6 is your pick for new purchases. Avoid V1/V2 due to welded boiler elements.
Silvia modding questions, answered
Can I backflush my Silvia with Cafiza without damaging the brass boiler?
Yes, Cafiza is safe for brass boilers and 3-way solenoid valves. Run a blind basket with Cafiza for 10 seconds, wait 10 seconds, repeat three cycles. Follow with three clean water backflush cycles. Never run Cafiza through your steam wand — it degrades rubber seals over time. Backflush weekly if you pull daily shots.
What's the best basket for an 18g dose on a modded Silvia?
IMS 200 competition basket (18g nominal, 35mm) pairs perfectly with a flat shower screen mod. VST 18g works too but demands a more precise grind. Both need a bottomless portafilter for full flow visibility. Avoid pressurized double-wall baskets — they hide channeling that your mods exist to prevent.
How do I know if my 3-way solenoid valve needs cleaning?
Two symptoms: little brew output with no pressure buildup, and a large liquid leak at drip tray during extraction. Coffee sludge and calcium clog narrow valve core passages. Remove lower front panel, 14mm box wrench on black drip nozzle, 3mm Allen key on brass valve body bolts. Soak parts in hot citric acid solution, drop descaler into inverted group head valve connection hole until chemical boiling erupts. Rinse, reassemble, pressure returns to peak.
Can I run a Gaggiuino build on a V1 Silvia?
Technically yes, but practically no. V1's welded heating element means any element failure kills your whole build. Gaggiuino also requires custom M3 thermocouple and pressure sensor tee plumbing that adds failure points. Start with a V4 or newer — removable element means you can rebuild for $40 instead of $200 if something fails.
What's the best single upgrade for under $150?
Auber PID is your answer, nothing else comes close. Without thermal control, every other mod chases symptoms of temperature instability. Auber's Silvia kit with pre-infusion runs around $130, mounts in two hours, and converts a guessing machine into a precision tool. OPV calibration costs nothing but wrench time — do both in one weekend.
Ready to mod your Rancilio Silvia?
Stuck on a step or need parts? Talk with us — we've rebuilt more Silvias than we care to admit.
Pick your first mod.
Not sure where to start? Talk to us about your machine and your shots - we'll point you at the mod that actually fixes your problem.
 English
  Italiano
  Deutsch
  Español
  Français
  العربية
  日本語
日本語  한국어
한국어  香港中文
香港中文  Nederlands
  Português