
DeLonghi Dedica EC685 mods: can a cheap machine make real espresso?
Turning a budget Dedica into a real espresso machine - 51mm non-pressurized basket, Rancilio steam wand transplant, preinfusion. The cheapest real-espresso on-ramp.
Your DeLonghi Dedica EC685 becomes a real espresso machine once you ditch that pressurized basket, transplant a Rancilio steam wand, and wire in pressure control. Stock, it ships forgiving but flat. Here is how I mod mine.
Swap the factory pressurized basket for a 51mm IMS non-pressurized basket and a bottomless portafilter, add an espresso-grade grinder, and your shots jump from flat crema foam to real specialty extraction. Pull the Panarello sleeve and transplant a Rancilio Silvia V1 steam wand for microfoam. Wire a dimmer and manometer into the pump line for 9-bar pressure control.
I have rebuilt enough of these compact 15 cm chassis units to know every screw, clip, and failure mode. EC685, EC680, EC785, EC885 all share the same Thermablock, Ulka pump, and 51mm group. Browse the Dedica EC685 parts catalog and let us walk the full mod path.
Why does stock Dedica espresso taste flat?
DeLonghi built the EC685 for people who want a 15 cm footprint and zero learning curve, not for people who chase flavor. The factory ships three parts that kneecap every shot: a dual-wall pressurized basket with a single pinhole exit, a Panarello steam sleeve running on the Venturi effect, and a 15 bar Ulka vibration pump with no over-pressure valve. Each one trades cup quality for forgiveness. That pressurized basket traps water between two metal walls and forces it through one tiny hole, whipping air into a brown foam that looks like crema but carries almost no aroma. The Panarello auto-draws air through a side hole and dumps coarse soap-bubble froth into your milk, which separates the second you stop steaming. Run the pump against a fine puck and pressure spikes past 15 bar because nothing bleeds it off, so the bed channels and the shot blondes early. Siblings EC680, EC785, EC885 carry the same hardware. Aggressive pricing and a tiny chassis earned this machine a huge install base and a high Partner Acceptance Factor on kitchen counters, but none of that fixes the cup. Every mod in this guide attacks one of those three factory compromises.
Key takeaway: Stock EC685 trades flavor for forgiveness; the pressurized basket, Panarello wand, and OPV-less 15 bar pump all hold it back.
Should I swap the pressurized basket?
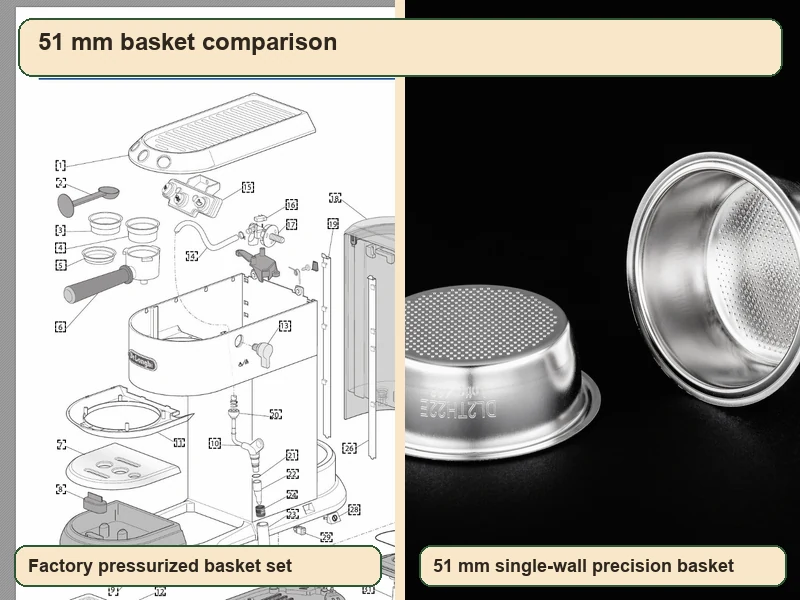
Across every major forum, swapping the factory portafilter for a 51mm bottomless portafilter and a non-pressurized basket is the single most discussed EC685 modification. This is not an accessory swap but a paradigm shift from mechanical flow restriction simulating resistance to real puck resistance built from the coffee bed. The factory pressurized basket uses a dual-wall metal structure with one tiny exit hole at the bottom. Its engineering logic: even with coarse pre-ground coffee and no tamping effort, water is trapped between the two walls and forced through the micro-hole at high pressure, mixing with air to produce a rough, crema-like foam. This masks channeling and grind errors but blocks delicate flavor extraction, producing a flat cup. A precision non-pressurized basket from IMS removes that barrier entirely. Extraction pressure now depends 100 percent on the coffee puck's own resistance. Grind particle distribution, distribution uniformity, and tamp density must reach high geometric consistency. Any weak point in the bed will be blown open under 9-15 bar pump pressure, producing severe channeling. Grab a 51mm IMS precision basket from our shop and pair it with a bottomless portafilter so you can watch the extraction.
Key takeaway: The basket swap is the single highest-impact EC685 mod, but it demands an espresso-grade grinder and real puck prep.
What grind size fits the 51mm basket?
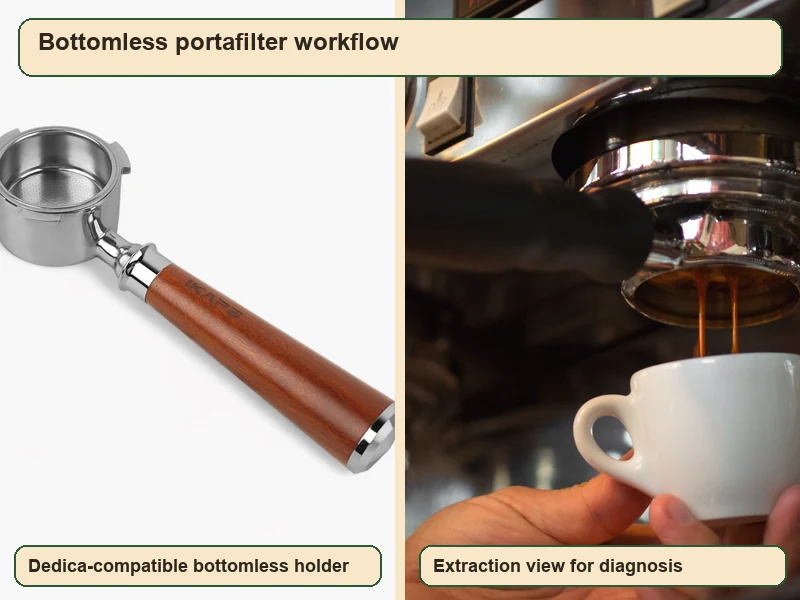
To observe and correct flow defects, the community uses a bottomless portafilter with the dispersion spout removed. Typical construction: food-grade 304 stainless steel head with an ergonomic solid-wood handle, matching the three-lug bayonet of EC680, EC685, and EC885. Exposing the bottom of the basket lets you observe high-pressure liquid extraction at macro scale. Most first-time users see violent spraying or splashing; resolving this requires strict calibration of three variables.
| Variable | Physical Mechanism & Standard | Common Error & Fix |
|---|---|---|
| Grind Size | Non-pressurized systems require micron-fine espresso grinding. Must pair with an espresso-grade grinder (Baratza Encore ESP, Kingrinder K6, or DF54). | Blade grinders or pour-over grinders produce particles too coarse; water runs through in 10s with no crema. Move to an espresso-fine setting. |
| Dosing | The 51mm diameter is smaller than the standard 58mm commercial system, so an equal dose produces a thicker puck and higher flow resistance. | Community testing puts the EC685 double-shot basket ceiling at 16-18g; some dark roasts only fit 14-15g. Overdosing causes the puck to expand into the dispersion screen and destroys bed structure. |
| Puck Prep | Must eliminate clumps and lock in density uniformity. WDT (needle distributor) plus a 51mm calibrated tamper (~30 lb vertical force) is the baseline for eliminating channeling. | Tilted tamp or edge gaps cause high-pressure side channeling. Keep tamper absolutely vertical against the basket. |
When all three variables balance, extraction seeps evenly from the basket bottom, converging toward the center into a viscous, dark rat-tail stream. Total shot time should fall between 25 and 35 seconds. The 51mm diameter is smaller than the 58mm commercial standard, so an equal dose produces a thicker puck, meaning your grind window is narrower than a Gaggia Classic demands. Most dark roasts top out at 14-15g before the puck touches the dispersion screen, and any contact there destroys bed structure the moment the pump hits pressure. Run a WDT needle distributor through every dose, tamp dead vertical with a 51mm calibrated tamper at roughly 30 lb, and watch the bottomless stream converge into a single rat-tail.
Key takeaway: 51mm pucks run thick; dose 14-18g, grind espresso-fine, and WDT every shot or the bottomless will spray.
Is the Rancilio steam wand transplant worth it?
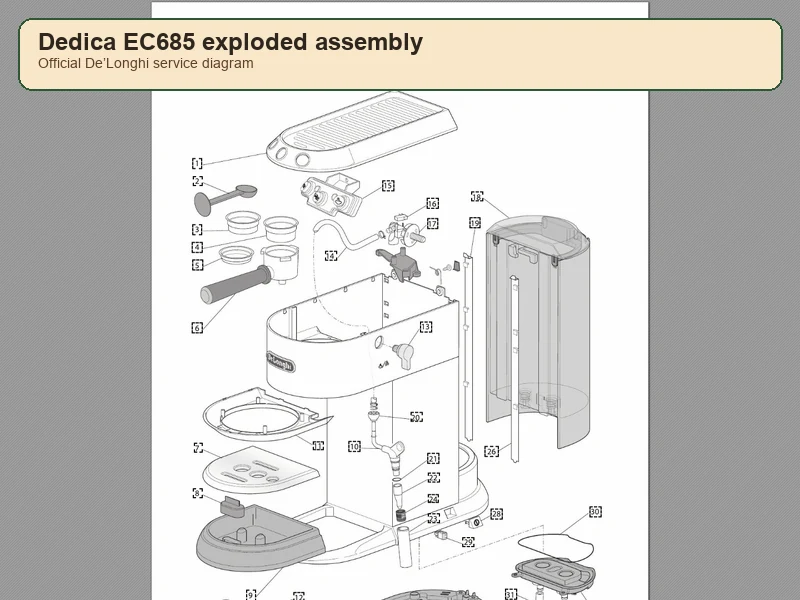
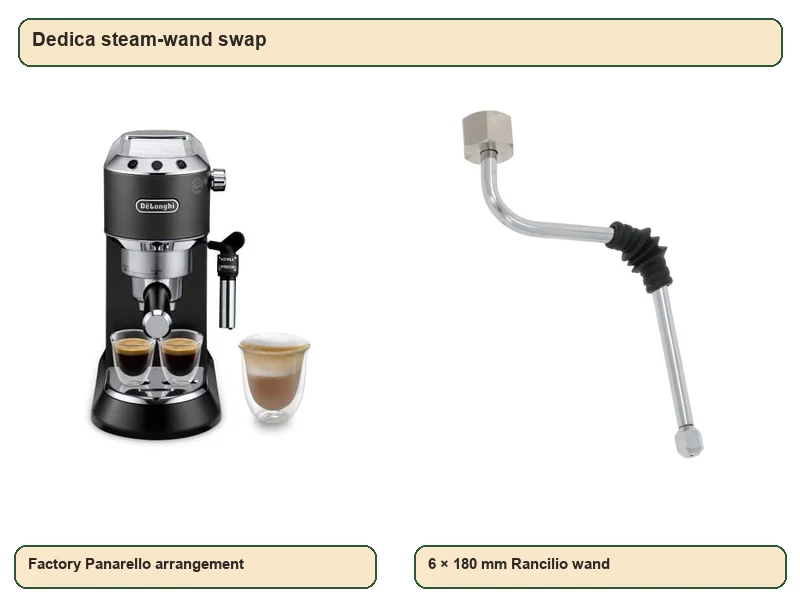
For espresso equipment, milk-system performance directly determines drink structure. The factory Panarello steam sleeve works on the Venturi effect, auto-drawing air through a side hole. Its advantage is near-zero learning curve; its fatal flaw is voluminous, coarse, soap-bubble foam with poor air-milk integration that separates quickly after heating, killing any possibility of fine latte art. The low-cost fix is to pull off the metal sleeve and steam through the short inner rubber tube, secured with a zip-tie so pressure cannot blow it off. Because the tube is too short and steam kinetic energy is insufficient, this still struggles with larger milk pitchers. The definitive solution is a full hardware transplant: a Rancilio Silvia V1 or V2 single-hole stainless steel steam wand, 6 mm outer diameter, 180 mm length. See our Rancilio Silvia guide for the donor machine details.
Fitting the Rancilio wand is not an external swap; it is a micro-surgical procedure involving chassis disassembly and internal fluid-line reorganization. Power off, remove water tank, drip tray, and portafilter. The top cover is the hardest step due to fragile plastic clips: remove two Phillips screws at the rear, then slide the cover backward while lifting, using slight plastic deformation to release the front L-shaped clips. Disconnect the green-yellow ground wire and remove the three button-panel screws. Lay the machine on a soft surface and remove 9 screws from the bottom plate. The rear 7 are T20 Torx tamper-resistant screws with security posts; the front 2 are very short Phillips screws. Installing a long screw in a front hole will punch through the drip-tray chassis. After removing the bottom ground wire and the tank tube, disconnect the high-pressure hose linking the steam knob to the pump, remove the 5 screws around the group head, and the internal cassette slides out of the plastic shell, avoiding the side power switch.
The factory wand is clamped between shell and cassette, held by a metal circlip on a movable ball joint. Remove the circlip with tweezers and pull out the factory tube. DeLonghi and Rancilio joints are logically opposite: DeLonghi's ball slides in from the top; Rancilio's tube has a top retention shoulder, so the ball must be forced in from the bottom, bent end. Lubricate the rubber sleeve and metal tube with cooking oil or dish soap, then apply repeated torsion and axial force until the ball clears the bend and seats against the top shoulder. After the mod, the new single-hole tip has a smaller orifice, producing a concentrated, penetrating jet. Bury the tip about 1 cm below the surface of cold milk, tilt the pitcher, and high-pressure steam drives a vortex that shatters large bubbles and folds them into velvet microfoam ideal for latte art.
Key takeaway: The Rancilio wand transplant is micro-surgery through 9 T20 screws, but it is the only path to latte-art microfoam on a Dedica.
Can I add preinfusion to a Dedica?
In espresso geek-engineering, pressure profiling is the highest-tier challenge. The EC685 uses a standard vibration pump, typically Ulka, that can spike to 15 bar at high flow resistance. Modern specialty theory treats 9 bar as the target extraction pressure, and applying 2-3 bar low pressure at the start of the shot, called preinfusion, lets the puck slowly swell and absorb water, reducing channeling and raising extraction yield. Because the EC685 lacks an OPV, the community engineered the Dimmer mod to reclaim pressure control. Vibration-pump output pressure correlates positively with input voltage amplitude and frequency. The Dimmer mod splices an AC phase-cutting dimmer, a voltage regulator, in series between the mainboard and the pump motor. Turning the knob cuts effective AC voltage, shortening piston stroke and reducing work frequency, which attenuates both flow rate and line pressure. In practice, locate the pump supply wire, typically brown; to verify, unplug the connector and run the machine. If the pump is silent, the wire is correct. Cut and strip it, splice in the dimmer's two leads, then drill a hole in the side of the chassis to mount the potentiometer knob externally. Cheap dimmers can stall the pump at very low voltage; paralleling an aluminum-case resistor is an advanced trick to stabilize low-voltage output. With the knob you can hold 2-3 bar for the opening seconds, then ramp to 9 bar for the bulk of the shot.
Key takeaway: A phase-cut dimmer on the brown pump wire gives you manual preinfusion and pressure profiling, no OPV required.
Can I fit a pressure gauge to the EC685?
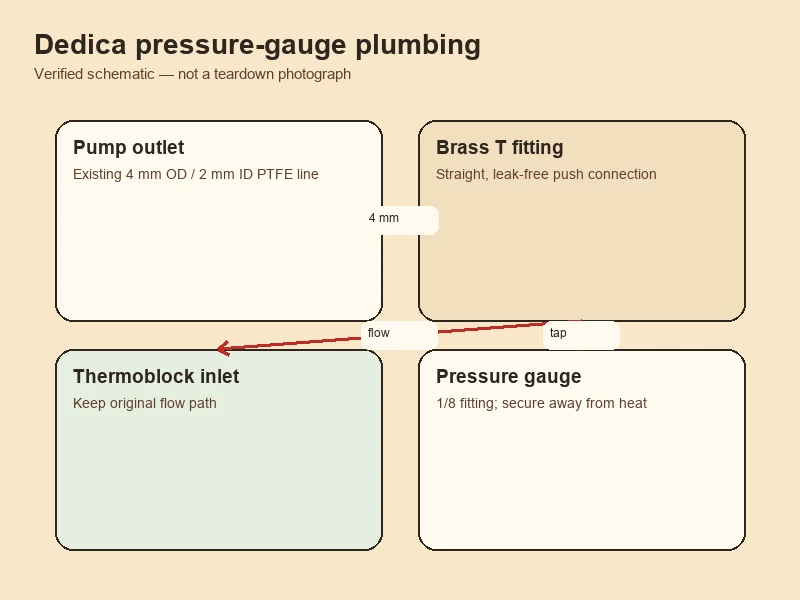
A dimmer without pressure feedback is blind. A mechanical or electronic pressure gauge must be spliced into the hydraulic line. The EC685's high-pressure PTFE tube between Thermablock and pump is unusually small: 4 mm outer diameter, 2 mm inner diameter. The mod requires cutting it and splicing in a high-pressure brass or stainless T-connector, a compression fitting. Because the line runs at up to 15 bar, sealing is everything: wrap at least 7 layers of PTFE tape at every brass joint and make sure the ferrule and O-ring seat correctly. Any tolerance error causes severe internal leaks. The tapped line runs to a mechanical gauge mounted externally; for aesthetics, the community 3D-prints PETG or ABS cases with open STLs on Thingiverse that hang off the machine side with M4 screws or M2.5 threaded inserts. Pair the gauge with the dimmer from the previous section and you can dial in 9 bar by eye, then back off to 2-3 bar for preinfusion without guessing. Check out our Gaggia Classic guide for how a factory OPV compares to this DIY approach.
Key takeaway: Splice a T-fitting into the 4mm PTFE line and mount a gauge; seal every brass joint with 7 layers of PTFE tape or it leaks at 15 bar.
Is the Arduino PID build worth the hours?
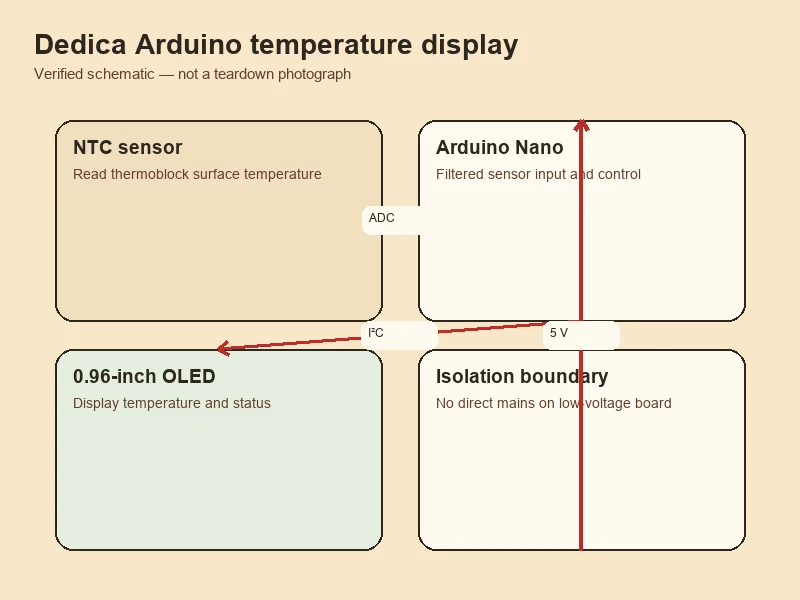
More recent builds replace analog circuits with a digital microcontroller. Open-source GitHub projects use an Arduino Nano to build a full digital closed-loop monitor that taps directly into the machine's sensor network. The Nano runs at 5V logic, powered independently via a 12V-to-5V buck module or directly on the VIN pin. It receives analog voltage signals, processes them, and outputs data frames over I2C to a 0.96-inch OLED display with 128x64 resolution that plots real-time pressure and temperature curves. An ATC Semitec 104GT-2 thermistor, a 100k ohm NTC sensor at 25 degrees C, taps an M4 thread into the aluminum Thermablock with thermal paste for ultra-low-latency temperature sampling. A G1/4 inch analog pressure sensor rated 0-300 PSI splices into the hydraulic line via the high-pressure T-connector and outputs a 0-5V analog signal proportional to pressure.
| Component | Spec & Integration Logic | Signal Flow & Wiring |
|---|---|---|
| Arduino Nano | Compute brain. 5V logic. Powered independently via a 12V-to-5V buck module or directly on the VIN pin. | Receives analog voltage signals, processes, and outputs data frames over I2C. |
| 0.96-inch OLED display | I2C protocol, 128x64 resolution. Plots real-time pressure and temperature curves. | SDA to Arduino A4, SCL to A5, VCC to 5V, GND to GND. |
| ATC Semitec 104GT-2 thermistor | 100kΩ (at 25°C) NTC sensor. Tap an M4 thread into the aluminum Thermablock, apply thermal paste, and mount physically for ultra-low-latency temperature sampling. | Series circuit with a 100kΩ divider resistor. Thermistor: one leg to 5V, other leg to A1 and to resistor to GND. |
| G1/4" analog pressure sensor | 0-300 PSI digital transmitter. Splices into the hydraulic line via the high-pressure T-connector and outputs a 0-5V analog signal proportional to pressure. | Direct in-line on the water circuit. Signal output to an Arduino analog pin. |
Through a 3D-printed custom shell, the OLED and sensor integrate at the factory logo position. You can then execute highly delicate pressure-profile shots under digital guidance, reaching physical control precision normally available only on commercial equipment. Is it worth the hours? If you enjoy soldering and reading GitHub wikis, yes. If you just want better coffee, stop at the dimmer and gauge. Compare with the Lelit Anna guide to see what a factory PID buys you out of the box.
Key takeaway: An Arduino Nano, OLED, and two sensors turn the Dedica into a digital pressure-profiling rig for under $40 of parts, but the build eats a weekend.
How do I read the Dedica LED fault codes?
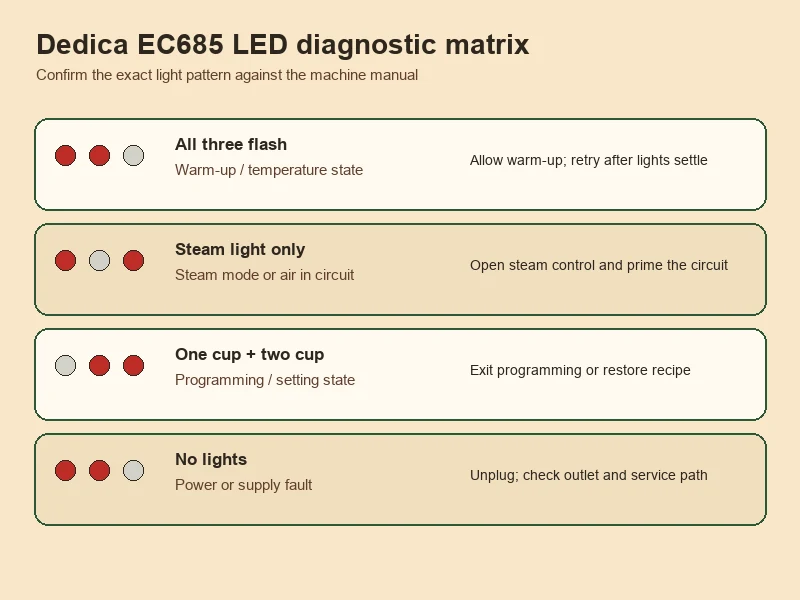
Under high-frequency home use or after deep mods, the EC685 will hit several engineering failures. The mainboard self-diagnostic system signals faults through blink patterns on the three button LEDs. Decoding them is the prerequisite for fast recovery. The most common fault on initial power-up or after long idle is an airlock: pressing the brew button produces an extremely loud, muffled buzzing, a dry-pump resonance, but no water from the group head. Air segments in the PTFE line between pump and Thermablock are the cause. Because air is highly compressible, the vibration pump cannot build enough negative pressure to draw water from the tank without water as the fluid medium. A tank-bottom valve not pushed open is another common culprit. The table below covers the full LED matrix, and the safety note underneath covers the descale trap that catches almost every new owner.
| LED State | Underlying Fault | Response & Recovery |
|---|---|---|
| 1-cup + 2-cup buttons rapid blinking together | Thermal overheat protection. Most common right after high-temp milk steaming; the Thermablock is far above the 93°C brew target, and the mainboard locks the pump to prevent scorching the coffee. | Run forced cool-down: place a container under the steam wand and open the side steam knob fully. The machine auto-runs cold water through the overheated block; boiling water and steam will spray from the line. When the thermistor detects a safe temperature, flow stops automatically and LEDs go steady - close the knob and brew. |
| 1-cup OR 2-cup button slow blinking | Flow-monitoring anomaly. The flowmeter detected water volume below the minimum threshold within the programmed cycle, indicating a severe physical blockage. | First remove the portafilter and run a no-coffee flush. If flow is normal, the fault is excessive puck resistance (adjust grind). If no water flows, treat as airlock or shower-screen clog. |
| Steam button orange/red steady blink or solid | Deep-scale descaling alert. The mainboard integrates flowmeter volume against the user-set water hardness and flags scale risk in the fine heating tubes, forcing chemical descaling. | Do not ignore. Fill the tank with DeLonghi EcoDecalk descaler. Note: many users report the light keeps blinking after descaling because the cycle was interrupted. After the chemical wash, the machine requires at least two fresh-water rinse cycles, and the tank must be filled to the MAX line to trigger the float sensor. Only a complete cycle clears the light. |
| Steam button blinking, others off | Steam valve logic not reset. | The side steam knob is in an open (non-O) position. Close it immediately. |
| All three buttons rapid blinking together | Fatal system error. Usually a thermistor open-circuit or a thermal fuse blown by extreme heat (irreversible physical break). | Unplug and let cool for 30 minutes, then restart. If the alarm persists, deep-disassemble and use a multimeter to measure resistance and replace the failed component. |
If the pump sound is not an idle buzz but a weak, choked tone, coffee will not drip, and pulling the portafilter off releases a loud gas blast and sprays slurry, the cause is physical blockage. On the factory pressurized basket, the single bottom hole clogs easily with ultra-fine grounds or sucked-back oils; disassemble the plastic and rubber support parts, clear the hole with a fine needle, and flush with no coffee. In any basket, a grind too fine or a dose too high at 18g plus touching the dispersion screen chokes the puck; coarsen the grind or reduce the dose. Long-term failure to backflush seals the shower screen with coffee oils and scale; remove it with a screwdriver and soak in Cafiza. See our Flair 58 guide for how a manual lever avoids these pump faults entirely.
Key takeaway: The three button LEDs encode five fault classes; learn the blink patterns before you open a single screw.
How do I prime a dry pump on the Dedica?
The dry-pump airlock is the single most reported Dedica fault, and nine times out of ten the fix takes under a minute with no tools. Remove and re-seat the water tank firmly so the bottom spring valve is fully opened by the base. Place a large container under the steam wand. Start the brew button or steam mode and immediately rotate the side steam knob fully to the left, open. The system seeks the path of least resistance; the steam line is far less resistive than the group dispersion screen. After roughly 10 seconds of continuous pump run, compressed air is expelled and water flows steadily from the steam wand. Close the steam knob quickly and stop the brew button. Fluid lubrication is restored, the airlock is cleared, and the machine is back in service. If this does not work, check that the tank-bottom valve is physically depressed, then inspect the PTFE line for a kink introduced during a mod. A pump that buzzes dry for more than 30 seconds risks overheating the Ulka coil, so do not let it run endlessly.
Key takeaway: A dry buzz means air in the PTFE line; open the steam knob fully and run the pump until water flows, usually under 10 seconds.
How long does a Dedica last with mods?
Beyond reactive repair, the EC685 exposes a full parameter-customization system. Long-press the steam button for about 10 seconds to enter the hidden settings menu. Three variables are adjustable: water temperature at low, medium, or high; auto-off standby time at 9 minutes, 30 minutes, or 3 hours; and water hardness. In hard-water regions, set hardness higher so the machine prompts descaling more frequently, protecting the aluminum Thermablock from calcification. The EC685 also supports volumetric dosing: long-press the 1-cup or 2-cup button to enter record mode, and when the cup reaches the target weight, say 36 g on a precision scale, release the button and the mainboard stores that flow volume on-chip. For long-term care, internal soft tubing and plastic parts age under repeated heat cycling. Community reports show machines several years old losing steam volume not from scale but because a plastic diverter inside the milk-frothing unit embrittles and snaps under high-temp, high-pressure steam, jamming the air hole. The modding path has a chain-reaction character: the basket swap exposes excess pump pressure, which forces the dimmer and manometer, which invites the Arduino PID. Deeply modding a roughly $150 machine with grinder, basket, dimmer, gauge, and 3D-printed parts plus hundreds of hours far exceeds the price of a purpose-built machine like a Rancilio Silvia or Gaggia Classic Pro. Yet the ecosystem keeps growing. If you hit a wall, talk to us and we will point you at the right next step.
Key takeaway: Modded Dedicas run for years, but soft tubing and plastic diverters embrittle; inspect them annually and use the hidden menu for water hardness.
Related espresso machine guides
Dedica EC685 modding FAQ
Can I use a 58mm basket in my Dedica?
No. The Dedica group head uses a 51mm three-lug bayonet, shared across EC680, EC685, EC785, and EC885. A 58mm commercial basket will not seat, seal, or lock into the portafilter. You need a 51mm precision basket, which IMS manufactures for this family. The smaller diameter means an equal dose produces a thicker puck, so dosing ceilings run 16-18g and dark roasts top out at 14-15g. Anyone selling you a 58mm basket for a Dedica does not know the machine.
What's the best grinder for a modded EC685?
Community consensus lands on three: Baratza Encore ESP, Kingrinder K6, and DF54. All three hit espresso-fine particle distribution without blade-grinder dust. Blade and pour-over grinders produce particles too coarse for a non-pressurized 51mm basket; water runs through in 10 seconds with no crema. The Encore ESP is the cheapest reliable entry, the Kingrinder K6 is the hand-grinder pick for zero retention, and the DF54 is the flat-burr choice. Budget at least as much for the grinder as you spent on the Dedica.
How do I know if my Dedica needs descaling?
The steam button turns orange or red and blinks steadily or goes solid. The mainboard integrates flowmeter volume against your water hardness setting, and when cumulative volume crosses the threshold it flags scale risk in the fine heating tubes. Fill the tank with DeLonghi EcoDecalk descaler and run the full program. Many users report the light keeps blinking because they interrupted the cycle; after the chemical wash, run at least two fresh-water rinse cycles with the tank filled to MAX to trigger the float sensor. Skipping descaling calcifies the aluminum Thermablock and shortens the machine's life.
Can I leave the Dedica on all day?
You can, but you should not. The hidden menu offers auto-off at 9 minutes, 30 minutes, or 3 hours. The Thermablock heats instantly, so there is no warm-up penalty worth leaving it energized. The Ulka pump and Thermablock both cycle under standby heat maintenance, and internal soft tubing and plastic diverters age faster under continuous heat. Set auto-off to 30 minutes for daily use, 3 hours only if you are hosting. Long-press the steam button for about 10 seconds to enter the menu.
How do I know if my dimmer mod is stalling the pump?
The pump goes silent or makes a labored, stuttering buzz instead of its normal rapid hammer. Cheap AC phase-cut dimmers can stall the Ulka vibration pump at very low voltage because the piston stroke shortens past the point where it can overcome spring return force. Two fixes: raise the dimmer voltage until the pump recovers, or parallel an aluminum-case resistor across the output to stabilize low-voltage operation. A pressure gauge makes this diagnosis trivial. Never leave the pump stalled for more than a few seconds, since the Ulka coil relies on water flow for cooling.
Ready to mod your DeLonghi Dedica EC685?
Pick your first mod.
Not sure where to start? Talk to us about your machine and your shots - we'll point you at the mod that actually fixes your problem.
 English
  Italiano
  Deutsch
  Español
  Français
  العربية
  日本語
日本語  한국어
한국어  香港中文
香港中文  Nederlands
  Português