
Lelit Anna mods: is the 57mm niche worth it?
Stock PID at entry price, but 57mm parts are scarce. IMS baskets, multi-hole steam tip, F.04 offset tuning, Elizabeth wand transplant - the 57mm long-tail mods.
The Lelit Anna PL41TEM ships with a native PID, a 250ml brass boiler, and a 57mm group head that starves you of ready-made parts. Most owners quit at a stock basket and blame their beans. This guide walks every mod path I have personally wrenched through.
You mod an Anna in five moves. Fit a precision 57mm basket (IMS B642TH22N or Normcore 18g), size a 57.35mm tamper, calibrate a PID F.04 offset by flash-boil test, drop an OPV from 12 bar toward 9 bar, and add a Pulsor or OLAB silent pump. An Elizabeth PL92T cold-touch wand ranks as your comfort upgrade. Gaggiuino stands as an endgame.
I have rebuilt enough Annas on my bench now, and I know where this chassis bites back. Every section below answers a real owner question pulled from r/espresso and Kaffee-Netz threads, with part numbers and safety stops. An Anna product page lists full stock specs for reference.
Why is 57mm a problem?

A 57mm group head defines this machine's hardware identity. Against a 58mm commercial standard that dominates prosumer equipment, a 57mm design produces engineering consequences nobody warned you about at purchase. For a matching 16g dose, a 57mm basket yields a thicker puck than a 58mm basket. That deeper bed provides higher vertical resistance against pressurized water flow, tolerating a slightly coarser grind and forgiving a beginner who would otherwise choke a shot. But every trade-off cuts both ways. A deeper puck complicates internal flow-channel distribution. Any microscopic density inconsistency lets high-pressure water find a path of least resistance, and you get channeling. A stock Lelit basket makes this worse, because its holes do not fully cover a puck edge, creating dead zones that produce severe under-extraction. In light roasts this manifests as harsh, astringent acidity. A high-precision, high-impact basket ranks as your single most consequential upgrade.
Key takeaway: 57mm is not a flaw. It is a constraint that demands a precision basket and micron-matched tooling, or your puck channels and your light roasts taste permanently sour.
Which precision basket fits the Anna?
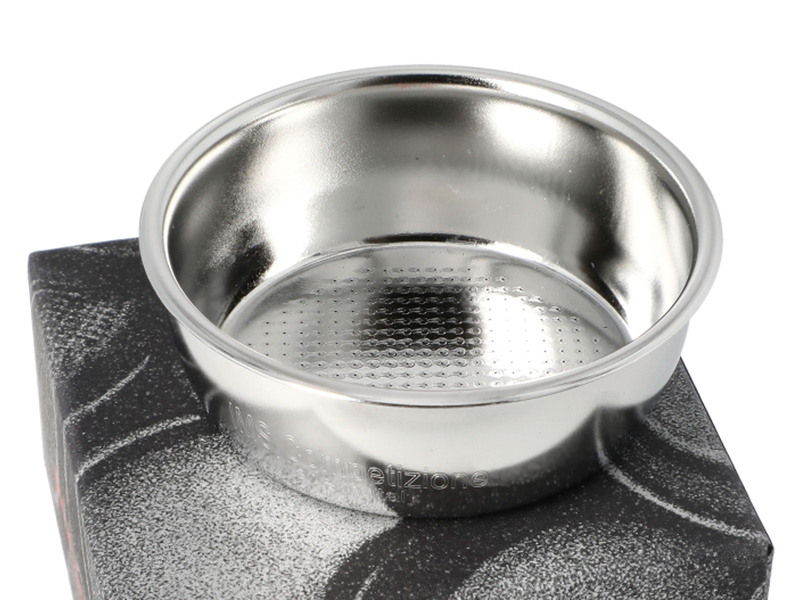
Italian manufacturer IMS produces a Competition Series precision basket for a 57mm market. A B642TH22N (14-16g capacity) and a B642TH19.5N (7-12g capacity) stand as community-recommended models. A B642TH22N uses a 22mm height that optimizes puck base-to-height ratio. Its rim measures 64mm/65mm with a 58mm body, fully compatible with an Anna group head. Pair it with a 57mm-57.4mm precision tamper. This basket carries 349 holes in an M-type array, delivering uniform flow-resistance distribution for consistent velocity across a puck base. Hole diameter sits at 0.30mm with a conical cross-section. A small bore filters fines, and a conical profile prevents particles from lodging in holes. Electro-polishing gives an extremely smooth high-gloss surface that lowers surface-tension adhesion of coffee oils and grounds. AISI 304 food-grade stainless steel handles sustained high-temperature, high-pressure flow without corroding.
| Specification | Value & Engineering Impact |
|---|---|
| Core model | B642TH22N (double shot); 22mm height optimizes the puck base-to-height ratio |
| Rim / body diameter | Rim 64mm/65mm, body 58mm; fully compatible with the Anna group head; pair with a 57mm-57.4mm precision tamper |
| Hole count & array | 349 holes, M-type array; uniform flow-resistance distribution for consistent velocity across the puck base |
| Hole diameter & geometry | 0.30mm, conical cross-section; the small bore filters fines, and the conical profile prevents particles from lodging in the holes |
| Surface finish | Electro-polished; an extremely smooth high-gloss surface that lowers the surface-tension adhesion of coffee oils and grounds |
| Material | AISI 304 food-grade stainless steel; high corrosion resistance and mechanical strength under sustained high-temperature, high-pressure flow |
A ridgeless design with a cylindrical body and truncated-cone base maintains ideal puck height even at lower doses. Electro-polishing gives a key advantage: a smooth surface reduces grounds adhesion and drastically lowers any chance of old coffee clogging 0.30mm micro-holes, keeping initial extraction resistance constant and improving shot-to-shot repeatability. As modern espresso trends toward light roasts, high-extraction baskets have become dominant in a 58mm market. Normcore answered community demand for a 57mm equivalent. Flow analysis of stock Ascaso and Lelit 57mm baskets showed holes that do not fully cover an edge, creating flow dead zones at a puck periphery. A Normcore basket extends porosity fully outward, eliminating a peripheral blind spot and noticeably balancing acidity while improving sweetness on light roasts. For channeling diagnostics beyond a basket swap, our Lelit fault diagnosis reference walks through pressure-gauge readings and flow-pattern interpretation.
Q: The Normcore 18g basket won't lock into my stock Anna portafilter - why?
This is a widely reported physical-interference problem. The root cause is small bayonet-track tolerance differences across Lelit group-head batches (early Anna vs. newer Grace models), combined with a stock portafilter's insufficient internal clearance for a Normcore basket's thicker rim. Community consensus says abandon a stock portafilter and pair a basket with a Normcore 57mm bottomless portafilter, or a newer straight-sided Lelit 57mm bottomless portafilter. This eliminates bayonet interference and provides irreplaceable visual flow feedback for dialing in a high-extraction puck.
Key takeaway: An IMS B642TH22N ranks as a safe precision upgrade. A Normcore 18g is an aggressive high-extraction choice, but it demands a bottomless portafilter for bayonet clearance.
What tamper size matches 57mm?

Once a precision basket sits in place, your entire 57mm tooling ecosystem must match at micron level. Standard 58mm tools will not fit, and I have watched too many beginners learn this an expensive way. Cheap 57mm tampers often carry large tolerances, measuring only 56.5mm actual diameter against a claimed spec. This leaves an uncompressed low-density doughnut ring at a basket edge that 9 bar water instantly blows out, causing edge channeling you cannot diagnose without a bottomless portafilter. I have measured enough discount tampers with calipers now, and I stopped trusting any label that does not state a four-decimal diameter. Use a precision tamper sized at 57.35mm or 57.4mm. Lelit PLA471 series, Motta, and several third-party precision tools hit this tolerance band. Combine it with fine-gauge WDT needles for deep distribution, and you build a flat, density-uniform puck that resists high-pressure flow without folding. A tamper ranks as a wrong place a frugal buyer saves money.
Key takeaway: Buy a 57.35mm or 57.4mm precision tamper from a named brand. A discount 56.5mm tool leaves a doughnut ring that 9 bar water blows out instantly.
Can the 250ml boiler steam microfoam?
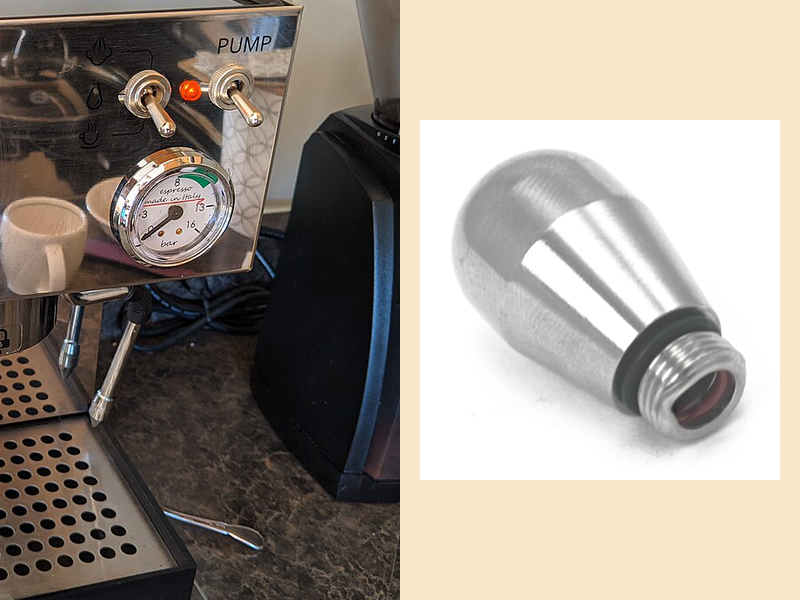
A PL41TEM carries a 250ml brass single boiler. Boiler volume directly caps total steam output and pressure endurance during a milk cycle. A steam tip's hole count, bore, and internal flow geometry determine kinetic-energy distribution of a jet, which in turn drives microfoam quality and your working window. Stock, an Anna ships with a single-hole steam tip. For a 250ml micro-boiler, a single-hole design ranks as not merely a safe compromise but arguably an ideal fluid-dynamic choice. Through a 1.0mm single orifice, a machine limits steam mass flow rate, sustaining a relatively high steady-state pressure inside a boiler across a steaming cycle of many seconds. This throttling extends a milk-surface pulling phase and a subsequent rolling-integration phase, giving beginners a wide tolerance window for emulsifying proteins and fats into glossy, stretchable microfoam. I tell every new Anna owner a same thing: learn on a stock tip before you change anything.
Some advanced users upgrade a 2-hole tip (Lelit OEM part 2200100) or third-party 3- or 4-hole tips. On large commercial machines, multi-hole tips inject energy from multiple angles, instantly forming strong multi-directional vortex flow. Transplanted onto an Anna's 250ml boiler, this logic causes a severe pressure stall. A high release rate far exceeds a heating element's ability to replenish steam. You get a strong initial vortex for a few seconds, followed by a cliff-edge pressure crash, leaving milk slowly heated with no incorporated air. For a vast majority of users, keeping a single-hole tip or upgrading a higher-quality single-hole tip with better flow geometry stands as a best fluid-dynamic choice for raising a microfoam floor. For a completely different approach to milk drinks, our Flair 58 guide covers a manual lever workflow.
Key takeaway: Keep a single-hole tip. A 250ml boiler cannot feed a multi-hole tip without a pressure crash that kills microfoam and leaves milk flat.
Which steam wand thread do I have?

A biggest trap when buying a replacement steam tip: Lelit silently changed a wand's thread direction across production years. This unannounced change makes accessory selection error-prone, and I have seen too many owners order a wrong tip and blame a vendor. Female-thread wands on newer batches have internal threads. You must buy a male-thread tip, such as Lelit part 2200107 (single-hole). Male-thread wands on older batches have external threads. You must match a female-thread tip, such as Lelit part MC742-4 (single-hole). Pull your stock tip with a wrench before spending any money, and read a thread polarity off a bare wand-end. Some hardcore users fit adapter rings, converting 1/4-inch internal threads toward a Rancilio Silvia 3/8-inch spec, but this usually requires forcibly enlarging a machine's panel with pliers and carries high irreversibility risk.
Q: How do I confirm my wand's thread polarity before ordering a tip?
Before any steam upgrade, use a wrench, unscrewing a stock tip and inspecting a wand-end mechanical structure for confirming thread polarity (male vs. female). Some hardcore users fit adapter rings, converting 1/4-inch internal threads toward a Rancilio Silvia 3/8-inch spec, but this usually requires forcibly enlarging a machine's panel with pliers and carries high irreversibility risk.
High-pressure steam and fluid-line sealing depends entirely on a set of precision O-rings. Under sustained high temperature and pressure, silicone or fluororubber seals undergo irreversible thermal aging and hardening, losing airtightness and causing side leaks and pressure loss. Knowing exact dimensions ranks as key to maintaining peak machine condition. I keep a labeled bag of MC044 and MC742-5 spares in my tool kit because these two fail earliest on every Anna I service. When replacing steam-line O-rings, dimensions must match to sub-millimeter precision. Apply a trace of food-grade high-temperature silicone grease before installation to reduce friction tearing during assembly and extend a rubber polymer's service life.
| Position | Lelit Part No. | Dimensions | Material & Application |
|---|---|---|---|
| Swivel joint / rotation coupling | MC044 | Inner dia. 6.07mm × wire dia. 1.78mm | At the wand ball joint; maintains high-pressure dynamic seal during multi-directional wand movement |
| Steam tip side-leak seal | MC742-5 | Fits MC742-4 and similar female-tip heads | At the wand-tip thread interface; withstands extreme thermal shock; prevents condensate and high-temp steam from jetting sideways |
| Group head dispersion screen seal | MC752-8 | Inner dia. 47.29mm × wire dia. 2.62mm | For 58mm systems (e.g. Elizabeth) dispersion screen; heat-resistant silicone |
| Group seal (brew head gasket) | Brew-head gasket | Outer dia. 71.5mm × inner dia. 54mm × thickness 4mm | Static seal between portafilter and boiler base; holds 9 bar extraction pressure; replace the silicone version annually |
Key takeaway: Pull your stock tip and read a thread before ordering. Lelit switched thread polarity mid-production, and no vendor can guess for you.
How do I calibrate the F.04 offset?
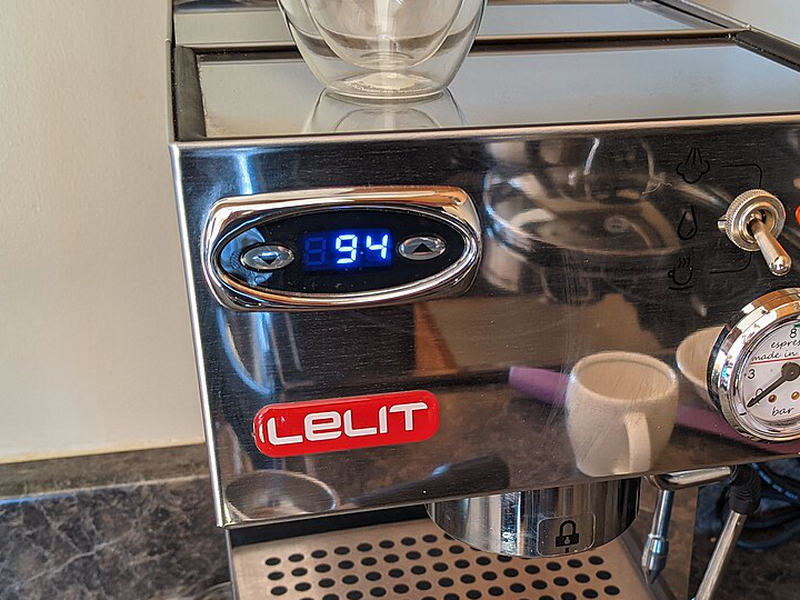
A PL41TEM ranks as one of few machines in its price class to ship with a native digital PID controller. Entry-level machines typically rely on bimetallic mechanical thermostats, whose physical deadband causes boiler-water swings of 8-10°C between cutoff and restart, leaving every shot's temperature to chance. A PID reads a thermistor and pulse-drives a solid-state relay at high frequency to predict heat-loss trends, locking static brew-water fluctuation within ±1°C. For advanced users, a PID screen functions as not a read-only thermometer. A key-combination opens a hidden advanced engineering menu, granting low-level rewrite and overclock access to a machine's thermodynamic behavior.
Power off a physical switch, press and hold UP and DOWN arrows on a PID panel simultaneously, and keep holding while flipping a main power lever on. A screen skips a normal boot sequence and shows engineering parameter codes. Use DOWN for cycling between variable categories, UP for incrementing or modifying a current value. After tuning, release all keys for about 3 seconds. A microprocessor writes a new value into non-volatile memory and returns to a normal display. Base system parameters include F.03, which toggles temperature unit between °C and °F. F.05 functions as a boiler maximum safety alarm threshold, factory-set at 108°C. If a sensor detects a spike at this value, a display flashes to warn of an overheating hazard and prevent dry-fire damage.
F.04, a temperature offset, ranks as a single most influential and most misunderstood variable in a PID matrix. A PID probe mounts on or shallowly inside a brass boiler wall, measuring boiler water's absolute temperature. But as that water leaves a boiler, travels through metal tubing, and reaches a puck, metal plumbing's heat absorption and ambient air cooling cause inevitable thermal loss. F.04 bridges that gap. It tells a microprocessor: when a user sets 93°C on a screen, a control system must actually heat a boiler at 93°C + F.04. Lelit factory-sets F.04 at an empirical 8°C, but this value does not read as universally accurate. Community reports indicate some Anna 2 batches shipped with a software-burn error that defaulted an offset at an absurd 30°C, leaving brew water wildly out of control. A physics-based flash-boil test ranks as mandatory for any serious owner.
Flash-boil test and F.04 calibration procedure:
- Thermal saturation: Power on, lock in an empty portafilter, and let a machine sit for 20-30 minutes so a heavy brass group head reaches full thermal equilibrium.
- Record baseline: Enter an advanced menu and record a current F.04 value (assume 8). Exit a menu.
- Induce physical boiling: In normal mode, raise a PID target brew temperature at 98°C. Wait a few minutes for a reading to stabilize. Lift a brew lever and release a small amount of water; observe a flow. A smooth liquid column means water sits below 100°C.
- Probe a threshold: Raise a target 1°C at a time (99°C, 100°C, 101°C), waiting for a temperature to fully stabilize each time.
- Catch a critical point: Repeat a water-release test until water from a group head violently vaporizes the instant it hits ambient-pressure air, with sharp steam and violent sputtering hiss. This ranks as a flash-boil phenomenon.
- Reverse-calculate an offset: At standard atmospheric pressure, water's physical boiling point sits fixed at 100°C. If a screen reads 108°C when flash-boil initially appears, water reaching a group head reads as exactly a true physical 100°C.
- Write a final parameter: Compute a difference (108°C − 100°C = 8°C). Re-enter an advanced menu and set F.04 strictly at 8.
Only after this physics-based calibration does a PID display carry absolute reference value, enabling data-driven responses to different roasts. True 95°C for very light roasts brings out floral and fruit acidity. True 88°C suppresses charred bitterness in very dark roasts. For PID retrofit options on a different chassis, our Gaggia Classic guide covers an Auber and Gaggiuino wiring path.
Key takeaway: Flash-boil test a F.04 offset. A factory 8°C reads as a guess, and some Anna 2 batches shipped at 30°C, which makes every shot a lottery.
Should I touch Kp, Ki, or Kd?

Beyond base calibration, an advanced menu allows deep intervention into three mathematical constants driving a PID algorithm. Non-engineering users should keep factory defaults. Typical Lelit defaults on a Victoria run Kp=10.0, Ki=0.00, Kd=10.0. In extreme environments, a cold outdoor coffee cart or unstable supply voltage, fine-tuning these can materially improve dynamic response. Kp governs a controller's response strength against a current temperature error. Raising Kp steps on a heating element's accelerator. SSR pulse frequency rises sharply, and a machine heats aggressively from cold start or post-shot recovery. Excessively high Kp introduces large thermal inertia and severe overshoot, sending water temperature past a setpoint. Ki primarily addresses steady-state static error. It increases a frequency of micro-heating cycles during long idle periods. A slightly higher Ki helps hold water dead-on a setpoint during extended downtime, preventing drift. Kd functions as a predictive mechanism. When boiler temperature drops rapidly, a brew pump engages and forces a large volume of ambient cold water into a hot boiler. A higher Kd makes a microprocessor output heating pulses more aggressively and earlier, countering incoming cold-water cooling. In a 250ml micro single-boiler system, raising Kd ranks as a core strategy for suppressing mid-to-late-shot temperature stall. I nudged Kd from 10 up to 12 on my own bench Anna, and a mid-shot temperature dip shrank by nearly a degree.
Key takeaway: Leave Kp, Ki, and Kd at factory defaults unless you operate in extreme conditions. Kd ranks as a one to nudge if your shots stall thermally mid-pull.
Anna or Silvia as your entry machine?
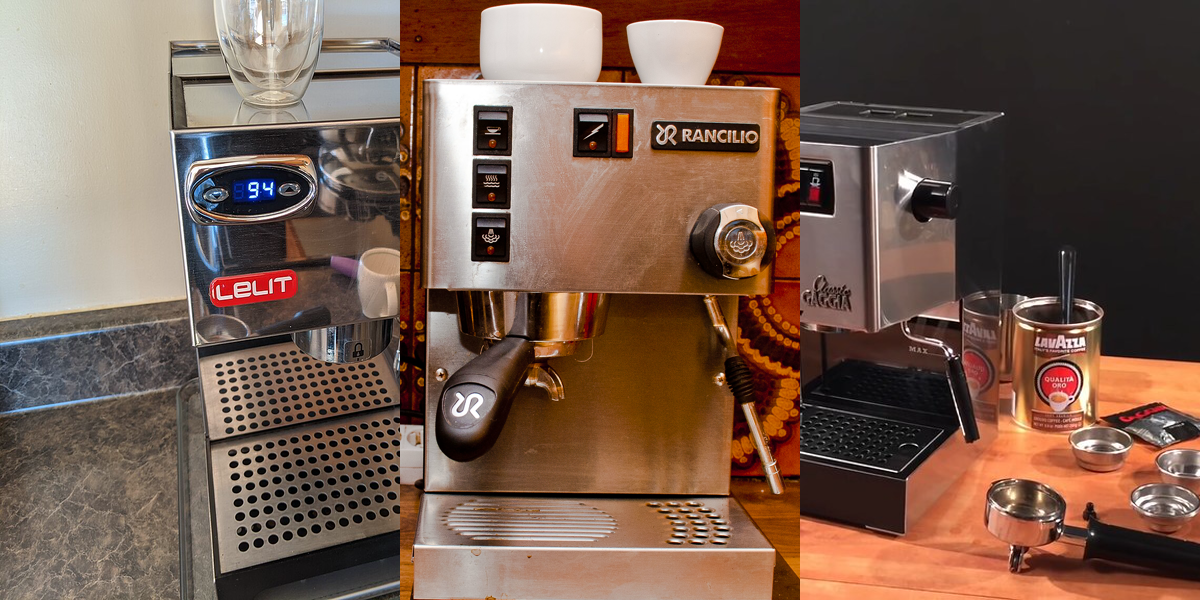
In an entry-to-prosumer budget band, an Anna PL41TEM and a Rancilio Silvia V6 stand as unavoidable rivals. Two machines embody fundamentally different Italian engineering philosophies and market logics. A Silvia carries nearly double a mass, a bigger boiler, and a commercial 58mm group head. An Anna counters with a native PID, a front-panel pressure gauge, and a fraction of a warm-up time. I have pulled shots on both for years, and neither machine wins across every category. A table below maps real engineering differences that matter at a purchase decision.
| Dimension | Lelit Anna PL41TEM | Rancilio Silvia V6 (E/M) | Engineering Difference & Impact |
|---|---|---|---|
| Group head spec & compatibility | 57mm non-standard brass | 58mm commercial-standard brass | Silvia's 58mm gives an endless third-party ecosystem (VST/IMS baskets, force-calibrated tampers); Anna's 57mm is restricted but offers slightly higher grind tolerance in a deeper puck |
| Boiler capacity & heat exchange | 250ml brass | 300ml lead-free brass | Silvia's 20% more volume gives decisive steam dryness and endurance; Anna's smaller boiler means less thermal reserve but far faster heating response after cold-water injection |
| Thermal control | Native digital PID | Traditional bimetallic thermostat | Decisive divide. Anna offers sub-degree water-temp monitoring out of the box; Silvia's wide deadband demands temperature surfing or a costly, labor-intensive third-party PID retrofit |
| Metal thermal mass & net weight | 7.5 kg | 14.0 kg | Silvia's nearly double mass means massive metal components and huge thermal-mass inertia, resilient under back-to-back shots; Anna is comparatively light |
| Cold-start warm-up time | ~5-8 minutes | ~15-20+ minutes | Anna's small thermal mass plus aggressive PID step-heating reaches target fast; Silvia requires patience to fully heat 14kg of steel or shots run sour |
| Brew-to-steam mode switch | ~30-45 seconds | Over 2 minutes | Anna's small boiler reaches steam temperature quickly post-shot; Silvia's long climb fragments the latte workflow |
| Pressure monitoring | Front-panel backlit pressure gauge (standard) | None | Anna lets you directly monitor pump backpressure to reverse-diagnose channeling and calibrate grind; Silvia relies on observing flow morphology as a black-box guess |
Choose an Anna if you rank as a data-driven modernist who wants variables digitized. Your daily drinks center on straight espresso or americano with limited milk drinks. Your counter space runs tight, and you need fast morning warm-up. A native PID and live pressure gauge fully satisfy an advancing hobbyist's need for closed-loop data feedback. Choose a Silvia if you rank as a heavy milk-drink user who steams large latte volumes daily. You carry a pure geek soul and bought a machine to strip a case, cut wires, and install an Auber PID or wire in a Gaggiuino module. Or you value near-pathological mechanical durability and want a 14kg brass-and-steel heirloom to run for a decade. For a closer look at a rival chassis, read our Silvia guide.
Key takeaway: Anna for data and speed. Silvia for steam volume and a decade of mechanical abuse. A 57mm vs 58mm divide decides your accessory ecosystem for years.
How do I drop OPV from 12 to 9 bar?
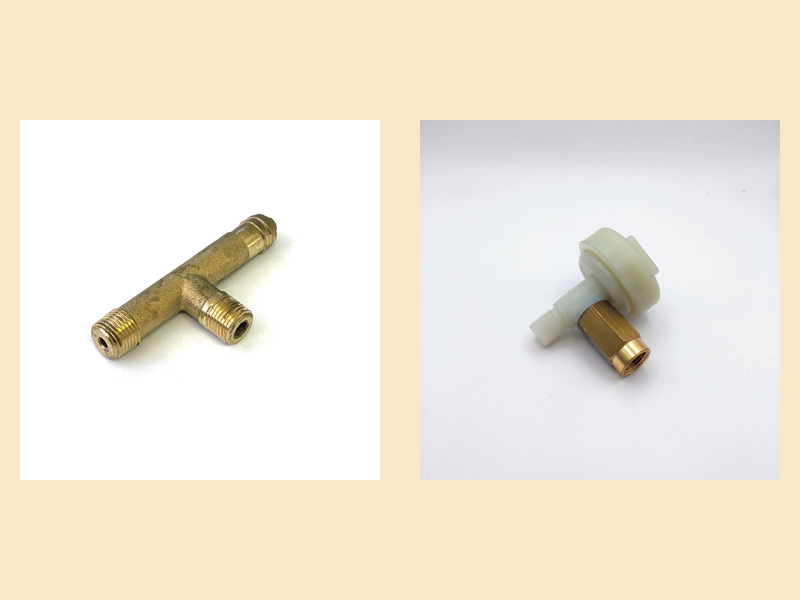
A classic espresso extraction backpressure sits at 9 bar. Lelit factory-sets an OPV relief threshold at 11 bar, even 12 bar. This compromise serves a non-specialist market, accommodating ESE pods and stale commercial pre-ground coffee, which cannot generate sufficient flow resistance and rely on excess machine pressure to force extraction. For users with fresh light-roast single-origin beans and a high-end grinder, 12 bar ranks as a disaster. It over-compresses a fragile puck, destroys an internal micro-pore structure, forces massive channeling, and produces severely uneven shots with dry, bitter, numb off-flavors. I have yet to meet an Anna owner who regretted this mod.
9 Bar OPV re-regulation procedure:
- Power off and cool: Unplug and cool ≥30 minutes; empty the rear tank.
- Case removal: Remove the top and rear metal fastening screws. Wear cut-resistant gloves - the stainless edges are sharp.
- Locate the hydraulic hub: From the rear, the OPV sits in front of or to the right of the vibratory pump - a brass cylindrical valve with a clear silicone return hose on top routing over-pressure water back to the tank.
- Pull the fluid line: Place a highly absorbent towel under the OPV. Pull the top silicone return hose off with controlled force; expect residual water spillage.
- Break the threadlocker (core difficulty): Lelit doses the OPV's internal flat adjustment screw with heavy threadlocker (Loctite) to prevent vibration loosening. Forcing it with a flat-head will instantly strip the soft brass head. Geek method: Use a small heat gun or high-power hair dryer to evenly heat the brass valve body for several minutes. The heat breaks the threadlocker's chemical crosslinks, softening it so torque can be applied.
- Pressure adjustment: Insert a tight-fitting flat-head screwdriver and turn counter-clockwise to weaken spring preload and lower the threshold. Rule of thumb: a quarter-turn counter-clockwise drops system max pressure ~1 bar. Do not make large blind turns.
- Dynamic pressure test: Re-seat the silicone return hose. Do not reinstall the case yet. Fill and power on. Load a blind (blank) basket in the portafilter, lock it in, and engage the pump. The blind basket forms an absolute dead-head with zero flow, so the static pressure reading is what you adjust - target ~9.5 bar. Under real extraction with normal flow, hydraulic loss drops it naturally to the ideal 9 bar range.
- Verify and reassemble: If pressure is still high or low, make small incremental turns. Once calibrated, reassemble the panels. The result is visible flow-quality change: smooth "mouse-tail" extraction streams, markedly improved crema thickness, deeper sweetness, and eliminated channeling spray.
Q: The OPV screw won't budge - am I doing something wrong?
Almost certainly threadlocker (Loctite) Lelit applies at a factory. Do not force a brass screw - it will strip. Heat a brass valve body with a small heat gun or high-power hair dryer for several minutes for breaking threadlocker chemical bonds, then apply torque. Only turn counter-clockwise, a quarter-turn at a time (~1 bar per quarter-turn).
Once an OPV reads true, address a noise problem. An Anna's power source runs a standard ULKA vibratory pump. It drives fluid via an electromagnetic piston making 50-60 violent reciprocations per second. A compact chassis lacks adequate suspension isolation and dense sound-deadening, so these high-frequency oscillations transfer unimpeded to a stainless case, then through hard feet into a kitchen counter. A result drills your ears and sends cups dancing on a cup warmer. Passive damping breaks a solid-coupling vibration path. Place a thick, high-density silicone tamping mat under a machine. High-polymer silicone absorbs at least 30% of downward low-frequency standing waves. Zip-tie a loose PTFE tank inlet hose against an inner chassis wall, killing secondary tank rattle. For geek-tier active filtration, install a QuickMill Pulsor (part PL0800PU) on a pump output side. Its high-elasticity airtight rubber bladder uses fluid-dynamic damping to iron violent pulses into smooth, steady-state constant-pressure flow. Or swap in an OLAB Silent Green pump (Lelit part 4000034 or 4000040) from a flagship Mara X. Community testing shows that combining a Pulsor and OLAB pump via 1/8-inch threaded copper tubing, plus butyl-rubber sound-deadening mat inside a shell, physically transforms an Anna's acoustic character from a sharp shriek into a deep, refined low hum.
Key takeaway: Drop an OPV to 9.5 bar static (9 bar under flow) with heat and patience, not brute force. A Pulsor plus OLAB silent pump kills a drill noise and smooths a puck pressure profile.
Is the Elizabeth wand transplant worth it?
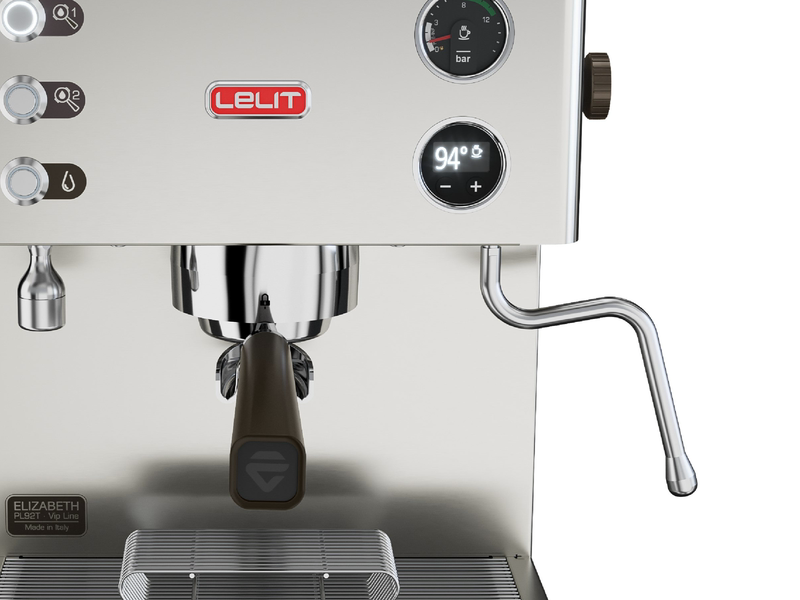
A stock Anna steam wand runs a simple single-layer polished stainless tube. Steaming milk at 60°C, 120°C-plus steam conducts fully through a metal wall, causing whey proteins to denature and sinter onto a surface. This requires aggressive scraping for cleaning and causes burn injuries among unprepared users. I have scarred a knuckle on a hot wand more times than I'd like, and I now refuse service on an Anna without a cold-touch upgrade if an owner steams milk daily.
Order an anti-burn steam wand assembly from a higher-end Lelit Elizabeth PL92T (Lelit part 1000168). This assembly uses a tube-within-tube design. Inside a rigid stainless outer tube, a high-temperature Teflon insulating gas tube hangs suspended. Teflon blocks thermal conduction from steam to an outer metal wall. After a swap, even at full-power steam output a wand's outer surface stays only warm. Sintered milk residue no longer forms. A wipe with a damp bar cloth restores it. Is it worth a cost? If you steam daily, absolutely. If you drink straight espresso, skip it and spend that money on a better basket. For a simpler entry-level modding platform, our Dedica guide covers a cheaper chassis with a larger accessory ecosystem.
If hardware mods fall short, Gaggiuino stands as an absolute endgame. It ranks as a most-watched open-source espresso-machine intelligence project across GitHub and Discord hardware-hacker communities. A vision implants a cheap microcontroller, an Arduino Nano or a more powerful ESP32-C6, with a high-precision pressure transducer and scale module to give aging mechanical machines pressure profiling, precise flow control, weight-based stop logic, and a modern color touchscreen (Nextion LCD) UI rivaling multi-thousand-dollar Decent machines. A project bears a Gaggiuino name and was built for a high-volume Gaggia Classic and Rancilio Silvia, but it theoretically covers any single-boiler espresso machine because underlying physical logic reads as identical across all of them: control an SSR for managing a heating element, and phase-chop a pump's AC sine wave for digitally regulating flow and pressure. An Anna's biggest stock advantage, a native PID and control board, becomes a biggest obstacle to a Gaggiuino transplant. You must abolish a factory microcontroller and LCC logic board, cut every control wire, and hand everything over to a third-party microcontroller board (PCBv3 or v4, or a Lego-style component build). A cramped internal space makes mounting a step-down transformer, new board, and touchscreen a serious 3D-printed structural and custom-wiring-harness challenge. Despite difficulty, a Discord community has documented successful Lelit-to-Gaggiuino integrations.
Key takeaway: An Elizabeth cold-touch wand (part 1000168) earns its cost if you steam milk daily. Gaggiuino ranks as an endgame, but you gut a stock PID to get there.
Frequently asked questions
Can I use 58mm baskets on the Anna?
No. An Anna group head measures 57mm. A 58mm basket will not seat or lock. An IMS B642TH22N and a Normcore 18g 57mm stand as your precision options, and both demand a matched 57.35mm tamper.
What's the best steam tip for a beginner?
A stock single-hole tip. It throttles steam flow, matching a 250ml boiler's recovery rate, giving you a wide window for learning microfoam. Do not buy a multi-hole tip until you can stretch and roll consistently on a single hole.
How do I know if my F.04 offset is wrong?
Run a flash-boil test. Set a PID at 98°C, stabilize, and release water from a group head. If water vaporizes violently, your offset reads too high. If it runs cold and flat at 98°C, an offset reads too low. Reverse-calculate from a true 100°C boiling point.
Can I run Gaggiuino on the Anna?
Yes, but you must remove a factory PID and LCC board, rewire every control line to a third-party microcontroller, and fabricate custom mounts for a board, PSU, and touchscreen. A Discord community has documented successful transplants, but this does not rank as a weekend project.
What's the best mod budget for long-term ownership?
OPV re-regulation to 9 bar, an IMS B642TH22N basket, a 57.35mm precision tamper, and a thick silicone damping mat under a feet. This combo costs less than a single premium accessory and transforms a machine more than any single high-ticket mod. I run exactly this setup on my bench Anna, and it holds its own against flagship dual-boiler machines costing ten times as much.
Ready to mod your Lelit Anna?
Want a second opinion on your Anna build? Talk to us - we have rebuilt enough of these to steer you past expensive mistakes.
Pick your first mod.
Not sure where to start? Talk to us about your machine and your shots - we'll point you at the mod that actually fixes your problem.
 English
  Italiano
  Deutsch
  Español
  Français
  العربية
  日本語
日本語  한국어
한국어  香港中文
香港中文  Nederlands
  Português