
Gaggia Classic mods: how far can I push this machine?
Everything worth doing to a Gaggia Classic - OPV, PID, dimmer, steam, Gaggiuino - and the order to do it in. Written by someone who's wrenched on these for years, not a parts catalog.
The open-source mod motherboard. 58mm commercial group, Ulka pump, three-way solenoid - great bones, factory-tuned for E.S.E. pods. This guide covers OPV, PID, dimmer preinfusion, steam upgrades, Gaggiuino, channeling diagnostics, and the Boilergate material crisis.
You can push a Gaggia Classic surprisingly far - OPV, PID, dimmer pre-infusion, Gaggiuino, brass boiler swap. Factory ships it at 15 bar with a 17°C thermostat swing; we rebuild it into a commercial-grade espresso tool, one mod at a time.
The Gaggia Classic is a 58mm commercial group head on a 100ml aluminum boiler with a mechanical bimetal thermostat swinging 17°C and an Ulka pump rated to 15 bar. Rebuild it by clamping the OPV to 9 bar, adding a PID with an SSR-40DA, and routing a Gaggiuino MCU for closed-loop pressure profiling. Each fix targets a specific factory compromise.
Read this and you will know which mod belongs on your Gaggia Classic, which ones deserve a skip, and which one turns a 300-dollar entry machine into something rivaling a Decent DE1.
Why does the Gaggia Classic take mods so well?
Since 1990, Gaggia's Classic family - traditional, Pro, Evo - has set the prosumer benchmark with a 58mm commercial group head, solid metal chassis, and 3-way solenoid valve. Those three parts are why we bother modding. A 58mm group means you share baskets, tampers, and screens with commercial machines; a solenoid dumps pressure after each shot, keeping your puck dry; that solid chassis gives real metal for grounding and mounting.
What the factory gets wrong
Cost-controlled factory settings leave real engineering limits in thermal stability, fluid control, and extraction pressure. Stock Ulka vibration pumps output up to 15 bar, far above a 9 bar SCA standard, and a 100ml aluminum boiler paired with a mechanical bimetal thermostat swings more than 17°C across each heating cycle. Every mod in this guide attacks one of those three compromises.
This guide reconstructs core electrical, thermodynamic, and hydraulic systems. It covers OPV mechanical calibration and spring replacement, PID integration with SSR routing, dimmer phase-cut pre-infusion and pressure profiling, steam wand and tip upgrades, the full-stack Gaggiuino MCU closed-loop rebuild, bottomless portafilter channeling diagnostics, routine 3-way solenoid maintenance, and the Evo Pro Boilergate coating failure.
Key takeaway: Commercial-grade bones wrapped in cost-cut factory settings - every mod unwraps a different layer of that potential.
Do I need to drop my OPV from 15 to 9 bar?
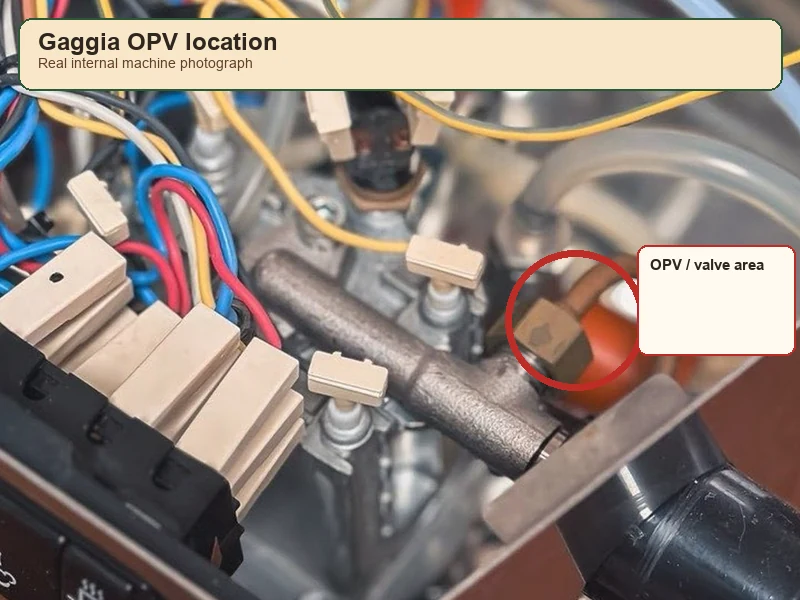
Yes - clamping maximum pressure from 15 bar down to 9 bar is the prerequisite for every other modification. Espresso extraction is pressurized water forced through a compacted, porous coffee puck. When applied pressure exceeds puck structural limits, fluid finds the path of least resistance and causes destructive channeling. Factory 12–15 bar settings pierce the puck and drive over-extraction bitterness. Check our pressure control parts before you start.
Adjustable OPV static calibration (2015 and earlier)
Pre-2015 Gaggia Classics use a brass OPV with a hex adjustment. No hardware swap needed - the relief threshold moves by changing spring preload. Static pressure (no flow through the puck, sealed system) runs about 1 bar higher than dynamic pressure (actual extraction backpressure), so your target is 10 bar static (~145 PSI) for 9 bar dynamic.
Disconnect power, remove the top panel, and locate the brass OPV behind the boiler with its plastic return tube. Pull off the silicone return tube, loosen the top locknut with an adjustable wrench, and expose a 5mm hex adjustment screw. Lock a bottomless portafilter or blind basket fitted with a 3/8-to-1/4 NPT brass adapter and a 200 PSI gauge into the group head, then start your pump. Counterclockwise rotation releases spring tension and lowers pressure - empirically, 1.5 turns drops factory 14 bar down to 10 bar. Fine-tune until stable, retighten the locknut, and reconnect the silicone tube.
Fixed spring replacement (Pro / Evo)
The 2018/2019 Gaggia Classic Pro and later Evo replace that adjustable brass valve with a fixed black plastic OPV module mounted on top of the pump with a dual-return-tube design. Mechanical adjustment is no longer possible; the internal compression spring must be physically swapped. Precision 304 stainless springs target different extraction philosophies:
| Spring rating | Dynamic pressure behavior | Target extraction scenario |
|---|---|---|
| 9 bar | Industry standard | Restores standard extraction resistance, reduces channeling, balanced sweetness and body. Suits medium-dark to light roasts. |
| 6.5 bar | Turbo shot | Lower mechanical force on the puck allows finer grind, shorter time, higher extraction yield (EY%), fewer bitter large molecules released. |
| 5 bar | Extreme low-pressure pre-infusion | Approaches drip/pour-over style (Sprover). Very slow flow, suited to extreme fruit acidity, floral structure, and ultra-light roasts. |
Use a 10mm wrench on the brass high-pressure tube fitting atop the pump, supporting the plastic valve body underneath. Withdraw the stock spring, insert your target-pressure stainless spring, and reassemble. Because flow resistance drops after this mod, extraction speeds up - grind finer and rebuild that 25–30 second target flow. I mean it: if you skip the grind adjustment, your shots will run fast and taste thin.
Key takeaway: Drop the OPV before anything else - 15 bar shatters the puck, 9 bar lets every subsequent mod actually work.
Do I need a PID on my Gaggia Classic?
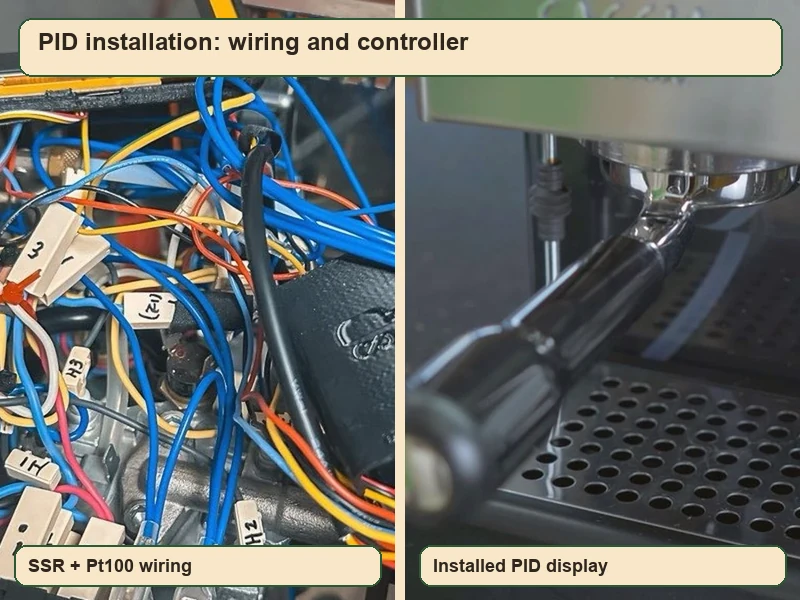
The core thermal flaw is a 100ml aluminum boiler: very fast heating response but low thermal mass, unable to hold heat when cold water injects. A physical bimetal thermostat opens at 107°C (225°F). Its mechanical and conductive hysteresis produces up to 17°C (30°F) of swing across each cycle, forcing operators into "temperature surfing" - counting seconds after a heater light toggles, guessing water temperature. Temperature surfing is for amateurs; bolt on a PID and stop counting.
PID working principle
A PID controller replaces the mechanical thermostat with microprocessor-driven logic. It reads a high-precision temperature sensor in real time and dynamically adjusts PWM duty cycle to your heater, predicting and suppressing overshoot, holding water temperature within a 0.3°C band.
Mainstream kits - Shades of Coffee, Auber Instruments - contain three modules: a 1/32 DIN PID head unit, a solid-state relay (SSR), and a precision sensor (K-type thermocouple or Pt100 RTD). The stock brew thermostat is replaced by an M4-threaded Pt100 thermocouple. Thermal paste must be applied between thermocouple and boiler surface; any thermal delay corrupts PID integral terms and breaks temperature control.
High-voltage routing and heat sink
An SSR takes over high-power heater loops. That AC main cable feeding the old thermostat reroutes to an SSR (typically a 40A SSR-40DA) AC load side; your PID drives it with a 12V DC pulse. For independent steam temperature control, a second SSR (e.g. SSR-40AA) can be paralleled, driven by the PID's alarm relay.
Terminal map: PID terminals 1 and 2 take AC mains for instrument power; 4 and 5 send DC control to the SSR; 6 and 7 carry the thermocouple's millivolt signal. SSR and thermocouple polarity must be exact.
Key takeaway: A PID flattens 17°C thermostat swing into a 0.3°C band - temperature surfing ends here, and shot consistency jumps immediately.
Can I add pre-infusion to a Gaggia Classic?
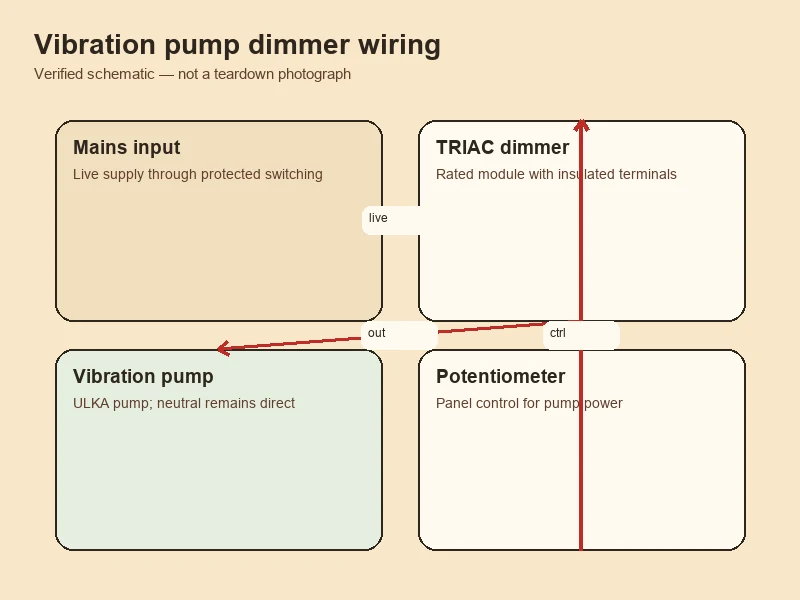
OPV replacement caps maximum pressure but cannot reshape the steep ramp from zero up to peak when the pump starts. A potentiometer dimmer wired into the pump circuit is a cost-effective way to achieve progressive low-pressure pre-infusion and later pressure profiling. If you want full digital control instead of an analog knob, check our PID install guide - but the dimmer mod stands on its own for under 30 dollars.
Ulka pump and AC phase chopping
The Ulka pump contains a magnetic piston on a return spring inside a high-turn inductor coil. On the AC positive half-cycle, an electromagnetic field pulls that piston back, drawing in cold water; on the negative half-cycle an internal rectifier diode blocks current, and a return spring drives it forward, forcing water past a check valve into the boiler.
A dimmer - Westek 6077B for 120V North American mains, or a TRIAC module - does not reduce absolute voltage. It phase-cuts the AC sine wave (leading or trailing edge) to lower RMS voltage and current reaching the pump. This shortens the piston's physical stroke; against puck flow resistance, reduced output manifests as a nonlinear drop in extraction pressure.
Bypassing the 3-way solenoid
The 3-way solenoid and pump sit wired in parallel, both controlled by the brew switch. If the dimmer is placed in series between brew switch and main harness, chopped voltage hits both. Below roughly 60% travel the solenoid chatters violently ("machine gun" noise) and may close early, dumping pressurized water straight to the drip tray instead of through the puck.
Correct routing bypasses the solenoid circuit entirely. Locate an Ulka pump at rear-left, unplug its original supply wire (usually red or grey) from the pump terminal, and wire a dimmer in series between that wire and a pump terminal. Extend with 17 AWG high-temperature wire routed out through chassis vents, and mount the dimmer on the side or rear.
For 230V European and other regions, plain TRIAC dimmers often cannot cut enough energy - your floor usually stalls around 60% flow. For full 0–100% linear control, fit a 3.3 kOhm 25W bypass bleed resistor across the pump's line and neutral terminals, absorbing residual leakage current so the pump stops completely at very low potential. Don't waste money on a dimmer if you run 230V without that bleed resistor.
Building a variable pressure curve
- Pre-infusion: With the dimmer held near 0, flip the brew switch. Zero-pressure water gently wets the puck by capillary action and the coffee blooms, filling micro air gaps from uneven distribution and densifying the bed against later breakthrough.
- Ramp and main extraction: Watching the bottomless portafilter, once dark drops evenly cover the screen, smoothly and quickly bring the knob to 100% for the high-energy dissolution phase.
- Tail decay compensation: Late in the shot, roughly 20% of the puck's soluble mass has been removed, the bed loosens, and flow resistance drops fast - without intervention, flow runs away exponentially. Gradually dial the dimmer back down to suppress flow and avoid over-extracting tannins and other bitter compounds.
Key takeaway: A dimmer wired past the solenoid gives you analog pre-infusion and tail decay control for under 30 dollars - no MCU required.
How do I get microfoam from a Gaggia Classic?
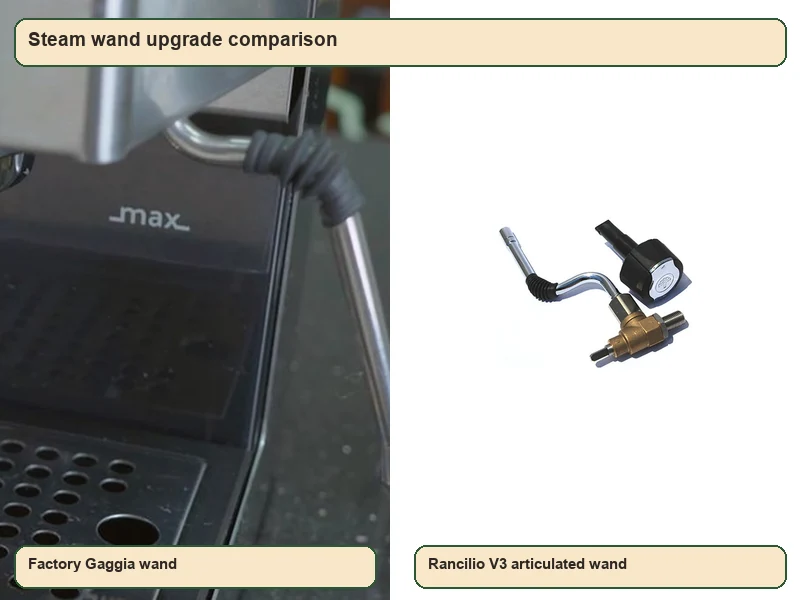
The stock steam subsystem has long-standing flaws. Older units (e.g. 2015) ship with a plastic Panarello wand that forces air in through a side hole, producing coarse inflated foam with no control - aerodynamically incapable of latte-art microfoam. That factory Panarello belongs in the bin. The Pro/Evo upgrade to a commercial stainless wand is unbalanced: a two-hole tip against the micro boiler drops steam pressure too fast.
Rancilio Silvia wand transplant (older models)
- Silvia V2 wand: Best cost-to-benefit, easiest install. Hex single-hole tip with horizontal rotation. Loosen the bolt joining the stock plastic tube to the brass tube, slip the V2 wand's top nut onto the brass tube, and retighten. Sometimes the tube bend must be lightly tapped to widen its radius so the nut passes - avoiding destructive cutting.
- Silvia V3 ball-joint wand: Full vertical and horizontal articulation for better vortex geometry, but destructive and hardcore. The ball-joint nut needs more internal clearance than stock, so you must open the chassis, cut and rebend the high-pressure copper steam tube to shorten it, fit a 1/8-to-3/8 brass adapter (inner diameter at least 11.89mm / 12mm to clear the ball tension spring), and seal heavily with PTFE thread tape. Snapping the copper tube is a real risk. Kits like Ferrari Espresso replace the copper tube with a high-temperature Teflon hose to avoid breakage.
"The One" single-hole tip (Pro / Evo)
On the Pro/Evo the bottleneck shifts to heat-loss rate: the 100ml boiler's stored steam energy depletes fast at full output. A stock two-hole tip's total orifice area is too large, so pressure dumps quickly, boiler temperature crashes, a thermostat cuts your heater early, and the usable microfoam window shrinks.
A custom precision single-hole tip - Shades of Coffee's "The One" or Distro Coffee Labs equivalents - reduces total orifice area. Two aerodynamic and thermodynamic gains follow:
- Heat retention and heater lock-on: The optimized orifice sets steam mass flow rate at or just below the element's recharge rate. The boiler still warms with the valve open, the heater light stays on continuously, and steam flow stays sustained instead of falling off.
- Jet kinetic energy: By Bernoulli's principle, at equal backpressure a single constricted orifice produces higher velocity and kinetic energy than two larger holes. The concentrated jet shears the milk surface harder, drives a strong vortex in the pitcher, incorporates air, and shatters coarse bubbles into tight, reflective, free-pouring microfoam.
Key takeaway: A single-hole tip matches steam mass flow to a 100ml boiler's recharge rate - your heater stays on, the jet stays fast, microfoam stays within reach.
Is Gaggiuino worth the full rebuild?
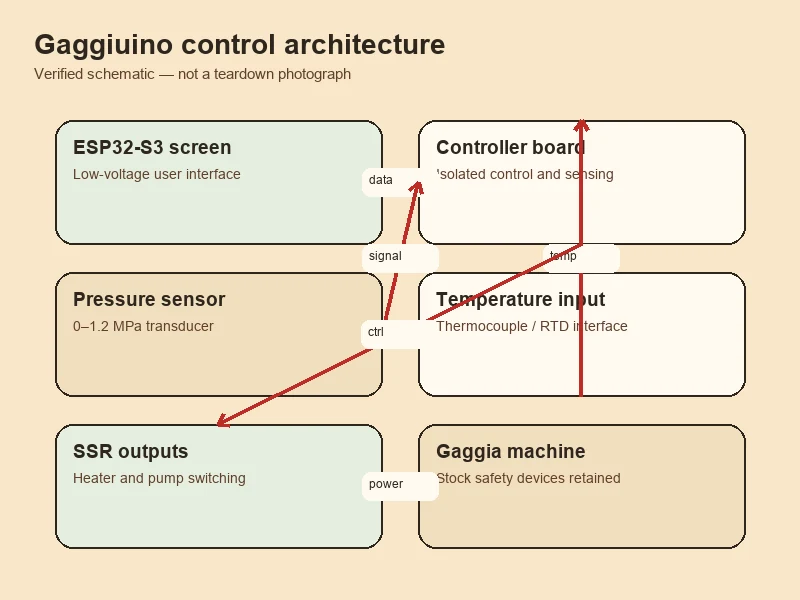
To break past limits of scattered modules - standalone PID meter, analog dimmer knob, external scale - the open-source Gaggiuino project takes your machine to a full digital rebuild. An embedded microcontroller directly owns every sensor input and actuator output, turning the mechanical Gaggia into a high-resolution pressure, flow, and temperature terminal rivaling multi-thousand-dollar variable-pressure machines like a Decent Espresso DE1. Our Gaggiuino Gen 3 planner confirms your machine's compatibility before you buy parts.
Silicon and firmware evolution
Gaggiuino is built on a closed-loop feedback system. Its MCU has evolved through three generations:
- Gen 1: 8-bit AVR Arduino Nano with basic C++ firmware - initial PID temperature control and fixed pressure curves, but too little compute for high-frequency sensor polling.
- Gen 2: 32-bit ARM Cortex-M4 STM32F411 (the "Blackpill" board). Overclocked community firmware (lego-ncp.bin, lego-pca.bin for different hardware) delivers very low-latency pressure-sensor response - currently the most compatible stable platform.
- Gen 3: STM32U585 or dual-core ESP32-S3. The extra compute unlocks higher-resolution Nextion touchscreen animation, predictive weighing algorithms, and dynamic flow-profiling models. Dedicated firmware (performance-pcb-gsk.bin) drives these advanced boards.
Closed-loop sensor network
- Temperature and feed-forward: An M4-threaded K-type ungrounded thermocouple reads brew temperature; the millivolt signal goes through a MAX6675 amplifier to the MCU, which drives a 40A SSR-40DA via high-frequency PWM. The advanced PID also monitors the temperature fall rate and applies feed-forward compensation for the cold-water hit at shot start.
- Pressure and ultra-high-frequency pump control: The mechanical spring OPV is removed entirely. A custom 6mm T-fitting and a length of 4x6mm high-temperature PTFE tube between pump outlet and boiler feed a 0–1.2MPa electronic pressure transducer. The transducer reports pressure at millisecond scale; the MCU drives a zero-cross AC dimmer (e.g. RobotDYN) to microsecond-chop the Ulka pump waveform, achieving digital stepless variable pressure. Users can set any 1–9 bar ramp, hold, and decay curve on the touchscreen.
- Weight and flow: Dual high-precision load cells on an HX711 ADC sit under the drip tray. By reading the live mass increase in the cup, the system runs a stop-on-weight / dose function accurate to 0.1g, and from that derives flow-based (not pressure-based) control logic. An auxiliary ToFnLED module uses a time-of-flight laser sensor for tank water level and drives an RGB LED over I2C.
Lego vs. integrated PCB builds
The Gaggia's cramped, hot, EMI-heavy interior makes electrical isolation and layout hard. Two assembly schools exist:
- Lego build: Budget builders use discrete off-the-shelf modules (12V buck supply, Arduino shields, standalone dimmer, bare relays) in 3D-printed PLA/PETG cases. Mounting screws are held to 6.5mm–12.7mm (e.g. M2.9x6.5) to avoid piercing the chassis. Modules link through a rat's nest of Dupont or silicone jumper wires that act as antennas for AC-line EMI, causing touchscreen freezes and sensor drift. Crimping 6.3mm straight and 90° spade connectors in tight space is error-prone, and bad crimps are hard to trace.
- Custom PCB (GaggiaBoard V3/V4, Gaggiuino Lego PCB): Two- or four-layer boards integrate the STM32/ESP32 socket, HX711, ADS1115 ADC, and optocoupler isolation on one board. JST XH connector arrays cut cross-module wiring, and a wide ground plane with optical isolation physically separates the 220V AC region from the 3.3V/5V digital region, lifting signal-to-noise ratio and longevity under extreme thermal and electromagnetic stress.
If you are not ready to strip the factory wiring harness, start with a Lego build and upgrade later. A partial Gaggiuino on a Lego board still beats every standalone module combined.
Key takeaway: Gaggiuino replaces four scattered modules with one closed-loop MCU - pressure, temperature, and flow all answer to a single controller.
Why is my bottomless portafilter spraying?
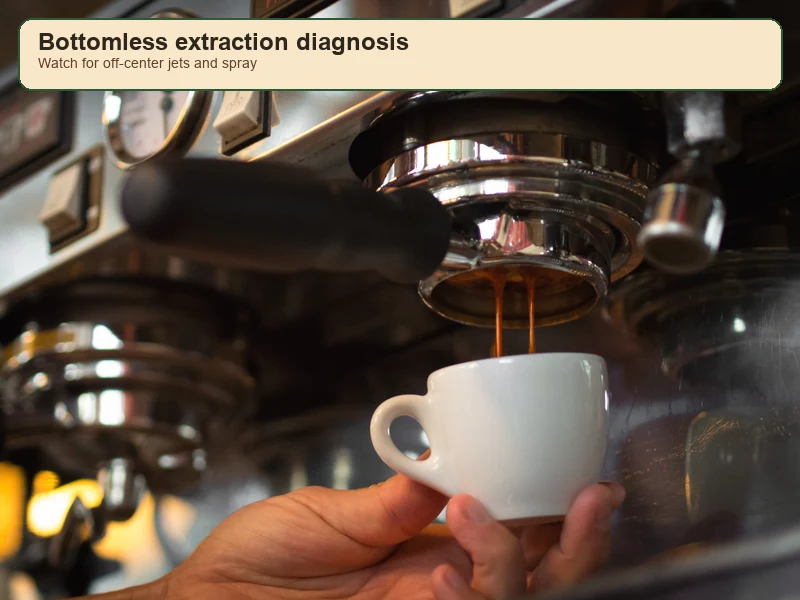
Q: Does a bottomless portafilter change the flavor in the cup?
No. A bottomless portafilter is a diagnostic instrument, not a flavor upgrade - it exposes hidden three-dimensional mass-transfer inside the basket as a two-dimensional visual for you. It will not fix your shots; it just shows you what is wrong.
Channeling symptoms
The ideal extraction: high-pressure fluid seeps uniformly and synchronously from thousands of micro-holes in the basket, then converges slowly toward center under surface tension into a viscous, dark, bubble-free "mouse-tail" column. When channeling occurs, that steady laminar flow breaks. 9–15 bar water finds and pierces a weakest density point in your puck, shortcuts through it, splitting extraction locally - a flooded zone gets stripped instantly (sour, under-extracted) while a dry zone faces over-extraction (tannin dryness and bitterness).
| Symptom | Fluid-dynamic interpretation | Severity |
|---|---|---|
| High-pressure side jets / spritzing | Liquid sprays at high kinetic energy from a single edge or center hole. | Severe - local structural crack/collapse in the puck; fluid escaping at abnormal velocity through one gap. |
| Multiple uneven streams | Three to four independent thin columns that refuse to converge, fast flow. | Moderate - dense clumps distributed unevenly; no uniform downward laminar network. |
| Local early blonding spots | One side of the basket turns thin and pale (blonde) earlier than the other mid-shot. | Regional bias - usually a tilted tamp; that zone is already stripped of coffee solids. |
Physical causes
- Grind inconsistency and clumps: Mid-range grinders produce static clumps that form high-density nodes surrounded by low-density gaps; water dodges the clumps and concentrates on the gaps. Worn or poorly designed burrs generate excess fines that migrate down and block basket micro-holes, causing local pressure buildup and rupture.
- Uneven tamping and dosing: Wrong dose (too much collides with the shower screen; too little loses hydraulic headroom) is primary. Tamping applies roughly 30 lb of downward force to remove air gaps, but the real requirement is absolute level - a 2° tilt lets hydraulic pressure find the shallower side and carve an irreversible channel. Poor basket-to-tamper tolerance also drives edge channeling along the basket wall.
- Shower screen clog plus high pressure: A screen blocked by coffee oils and residue stops diffusing like a showerhead and concentrates into hard columns that hammer the puck. Combined with an OPV still at 15 bar, the puck surface shatters instantly.
Puck densification fixes
- WDT (Weiss Distribution Technique): The most effective low-cost channeling blocker. A tool with 3 to 6 medical-grade stainless needles, 0.3–0.4mm thick, is raked through the bed to cut and disperse static clumps, equalizing particle density from bottom to top and edge to center.
- Leveling tools and precision tamping: After WDT, tap to settle, optionally use a rotating distribution tool to skim the surface without vertical pressure, then tamp precisely. Self-leveling tampers with tight edge tolerance (e.g. Pullman Big Step or Weber Workshops tampers paired with VST baskets) remove the human level-error variable and eliminate edge gaps.
- Puck screen: A final buffer - typically 1.7mm thick, sintered 316 stainless mesh - placed on the tamped puck. It absorbs the high-kinetic-energy group-head stream, breaks up the concentrated center jet, redistributes it through its internal network, and presses water into the puck as thousands of tiny vertical droplets, widening tolerance and isolating the surface from impact fracture.
Key takeaway: A bottomless portafilter is a diagnostic tool, not a flavor upgrade - if you see jets, fix your distribution and pressure before blaming the machine.
Why does my pump run but no water comes out?
Q: Pump runs but no water from the group head?
A 3-way solenoid valve (mounted under the boiler) is physically blocked by scale. Nine times out of ten, this is a scale problem, not a pump problem.
Diagnosis: verify the pump before anything else - open the steam switch and knob, press brew, and if the steam wand flows, your pump is fine. Once blockage is confirmed, disconnect power and drain. Regular descaling prevents this - scale buildup in the 3-way solenoid orifice is the cause nine times out of ten.
Remove the top cover and pull the silicone drain tube off the solenoid. Use a 13mm wrench or socket on the coil retaining nut, withdraw the square black coil. Then use a 4mm or 5mm Allen wrench to remove brass valve-body screws from the bottom or side of the boiler and separate the valve body - expect trapped water.
Under magnification, the blockage usually sits in a very fine orifice connecting to the boiler circuit, which carries a micro O-ring. Clear it with a fine needle and citric-acid descaling solution. Puncturing alone is often not enough - scale fragments can re-seal the channel under pressure - so flush with compressed air or a syringe for full calcium carbonate removal. Replace any aged O-rings and reassemble in reverse order to restore normal brew flow.
Key takeaway: No water from the group head with a running pump means a scaled 3-way solenoid - 90% of the time, a needle and citric acid fix it.
Should I worry about Boilergate on an Evo Pro?
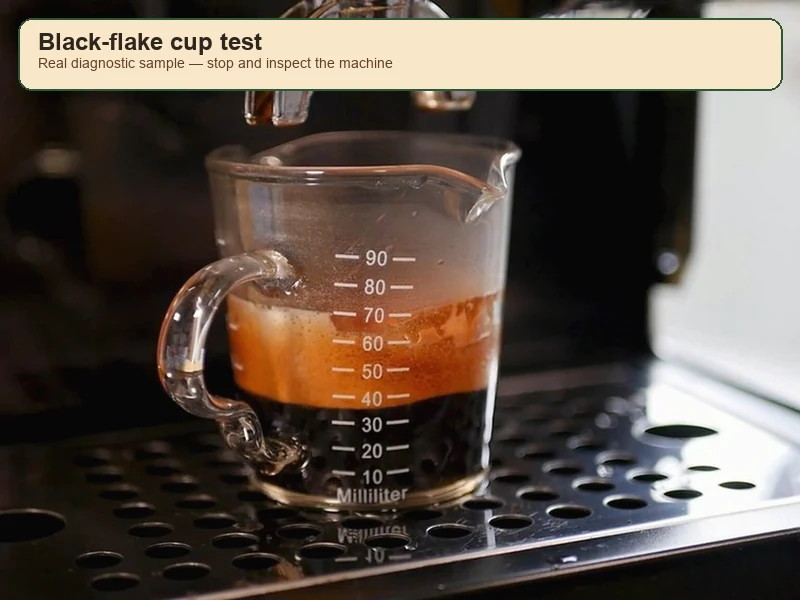
Late 2023 through 2024 Gaggia Classic Evo Pro batches triggered the widely discussed "Boilergate" event. If you bought an Evo Pro in that window, read this section carefully - do not panic at black specks, but do not ignore them either.
Exelia 3010 coating failure
The traditional bare aluminum micro-boiler has long been criticized: it grows dense calcium carbonate scale in hot hard water and suffers electrochemical corrosion, and aggressive descalers like citric acid dissolve bare aluminum into pits. To extend service life, Gaggia lined the Evo Pro aluminum boiler with an Exelia 3010/B242 black polymer non-stick coating - essentially a modified food-grade Teflon composite.
During mass production the coating suffered defective polymerization and bonding failure. Repeated thermal cycling from ambient up to 140°C (steam mode), under continuous 9–15 bar pressure, destroyed its adhesion. Coating fractured into fine black specks and flakes that ejected through your steam wand and group head, contaminating extraction water and risking irreversible blockage of silicone tubing and a 3-way solenoid.
Response and long-term fix
After the issue spread on Reddit, Gaggia released third-party (Eurolab) reports claiming Exelia 3010 meets FDA (CFR 21 175.300) and EFSA (EU 1935/2004) standards, and that incidental ingestion of small flakes poses no direct toxicological risk. For specialty-coffee equipment, this remains a serious quality failure.
Gaggia stopped producing coated boilers by the end of May 2024. Users can check the production date on the bottom label (e.g. an August 2024 unit is a safe batch) or verify the serial number. Remedies from Gaggia and major distributors (e.g. Whole Latte Love):
- Full machine replacement: Return the affected unit for one with a reverted uncoated polished aluminum boiler, or the E24 update batch fitted with a new heavy brass boiler.
- DIY brass boiler upgrade: Because aluminum is irreversibly corrosion-prone, many advanced users refuse any aluminum boiler and fit a heavyweight brass boiler (free from the distributor, or a few hundred dollars self-purchased). Brass is immune to corrosion and coating loss, tolerates harsh descaling, and its far larger thermal mass cuts the cold-water injection temperature drop. Paired with PID closed-loop control, this turns a machine with a base-material defect into a commercial-grade temperature-stable brewer.
Key takeaway: If your Evo Pro was built before June 2024, check for black specks - a brass boiler swap turns a defective machine into a commercial-grade brewer.
How far can a modded Gaggia Classic really go?
The Gaggia Classic is not just an entry-level appliance. Its large modding headroom, transparent minimalist electrical architecture, and 58mm commercial-standard parts make it an open experimental platform for fluid dynamics, thermodynamics, and microelectronic control. Nearly every cost-driven compromise can be reconstructed. Our upgrade order by symptom guide maps which mod solves which complaint.
Clamping OPV pressure from a destructive 15 bar down to 9 bar removes any risk of your puck blowing apart. A PID system routed through a high-frequency SSR flattens temperature swing into a stable extraction band. Dimmer pre-infusion and the full-stack Gaggiuino open-source project move past volumetric limits, letting phase-chopping and closed-loop hydraulic algorithms reshape every drop. Single-hole steam tips apply aerodynamic intervention to boiler weakness, bottomless portafilters plus WDT give micro-scale channeling diagnostics, and a brass boiler swap answers the Boilergate material crisis directly. Together these turn a single-boiler machine with real factory shortcomings into one that can reliably rival commercial multi-boiler espresso equipment.
I have rebuilt enough of these - a fully modded Classic pulls shots next to machines costing ten times more. The platform rewards patience and precise wrench work; it punishes shortcuts and skipped grind adjustments.
Key takeaway: A fully modded Gaggia Classic - OPV, PID, dimmer, Gaggiuino, brass boiler - pulls shots in commercial multi-boiler territory for a fraction of the cost.
Quick answers
Can I run a Gaggia Classic without ever descaling?
No. Calcium carbonate scale chokes your 3-way solenoid and pits the aluminum boiler; a blocked solenoid means no water from the group head.
What's the best mod order for a stock Gaggia Classic Pro?
OPV spring swap, then PID, then dimmer or Gaggiuino depending on budget. Pressure control comes before temperature control because 15 bar blows apart any puck regardless of brew temperature.
How do I know if my Evo Pro has the Boilergate coating?
Check the production date on your bottom label. Units built before June 2024 may carry an Exelia 3010 coating; August 2024 and later are safe batches.
Can I pull turbo shots without Gaggiuino?
Yes. A 6.5 bar stainless OPV spring gets you there mechanically, no electronics needed. You will need a finer grind for 25–30 second flow.
What's the best steam wand upgrade for a pre-2015 Classic?
Rancilio Silvia V2 wand for cost and ease. A V3 ball-joint gives full articulation but requires cutting and rebending your copper steam tube.
Ready to mod your Gaggia Classic?
Not sure which part fits your machine? Talk to us - we rebuild these every week and can point you at the right kit.
Pick your first mod.
Most owners start with a 9 bar OPV spring and a PID. If you're stuck on what to do first, talk to us about your machine and your shots.
 English
  Italiano
  Deutsch
  Español
  Français
  العربية
  日本語
日本語  한국어
한국어  香港中文
香港中文  Nederlands
  Português