

If your steamed milk looks like bath foam instead of glossy microfoam, the first suspect is usually technique, not the steam wand. The most common pattern is adding too much air at the surface and then failing to roll that air back into the milk with a stable vortex.

What should silky microfoam look like?
Good microfoam should look glossy and remain fluid enough to pour. You should not see a separate layer of stiff foam sitting on top of thin hot milk. When you swirl the pitcher, the surface should move as one integrated liquid rather than exposing a dry foam cap.
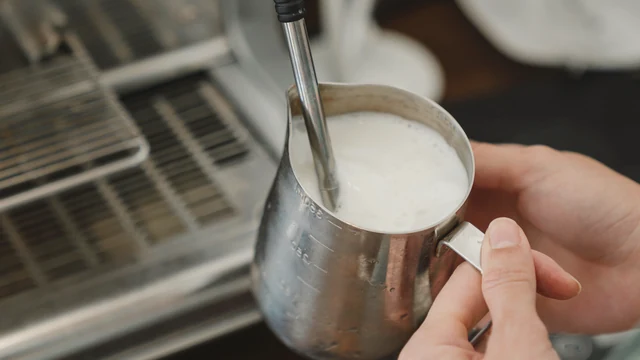
This matters before latte art. A heart or rosetta is not the first goal; repeatable milk texture is. If the milk is too stiff or full of large bubbles, the pour will be difficult even when the espresso underneath is good.
Why does steamed milk become dry, bubbly or too foamy?
Manual steaming has two different jobs: add air, then integrate and heat. Problems usually happen when the first phase lasts too long, the steam tip sits too high above the surface, or the second phase never creates a strong vortex.
Dry foam vs silky microfoam
Large bubbles + a separate foam cap = too much air and not enough rolling.
Fine bubbles stay mixed through the milk, so the surface moves as one glossy liquid.
| What you see or hear | Likely cause | What to change next time |
|---|---|---|
| Large soap-like bubbles | Steam tip is too high or too much air is entering. | Keep the tip closer to the surface and shorten the aeration phase. |
| Thick dry foam sitting on hot milk | Too much air was added and the foam was not rolled back into the milk. | Stop adding air earlier and hold a stronger vortex. |
| Loud screeching with very little foam | The tip is usually too deep for air to enter. | Bring the surface closer to the tip until a gentle air-intake sound begins. |
| Hot milk but almost no texture | The milk heated before enough air was introduced. | Add a small amount of air earlier, while the milk is still cold. |
| No stable whirlpool | Wand position, pitcher fill or steam output is preventing rotation. | Move the tip off-center, avoid overfilling, and verify full steam output. |
| Texture looks good, then separates quickly | The milk was left sitting after steaming. | Swirl the pitcher and pour promptly. |
How do you steam milk for silky microfoam step by step?
The exact timing changes with steam power, pitcher size and milk type, so use the visual and sound cues more than a stopwatch. Breville and De’Longhi both teach the same core pattern: cold milk, purge, surface aeration, then a deeper vortex to integrate the foam.
The five-part milk-steaming workflow
1. Start with cold milk and the right fill level
Use refrigerated milk and leave room for expansion. Breville’s current guide suggests roughly 4 oz / 120 ml as a practical minimum in many pitchers, or filling to around the start of the spout. De’Longhi likewise recommends cold milk and warns against overfilling because the volume increases while steaming.
2. Purge condensation before the pitcher goes under the wand
Run the steam wand briefly over the drip tray until you get steam rather than trapped water. This prevents the first seconds of steaming from diluting the milk.
Steam-tip position: too high, stretch, then roll
Tip breaks the surface too much → loud popping and large bubbles.
Tip sits right near the surface → controlled air intake while milk is still cool.
Move slightly deeper and off-center → rotate the milk to integrate the foam.
3. Put the tip just below the surface and slightly off-center
Breville’s manual guidance commonly places the steam tip about 1–2 cm below the surface and toward one side of the pitcher. The goal is to create rotation, not to point the jet straight down into the center.
4. Add air only while the milk is still relatively cool
Bring the tip close enough to the surface that it draws in small amounts of air. You want controlled, fine aeration, not violent popping. Breville describes this as the stretching phase and notes that the amount of air depends on the drink you are making.
5. Move slightly deeper and keep the vortex spinning
Once you have added enough air, stop trying to grow the milk. Lift the pitcher slightly so the tip sits a little deeper while the milk continues to rotate. This second phase folds the fine bubbles through the liquid and is what turns loose foam into a more uniform microfoam texture.
6. Stop at the machine or milk maker’s recommended temperature
A common dairy target in current manufacturer guidance is around 60–65°C / 140–150°F. Breville’s general guide cites about 145°F, while its cappuccino recipe uses roughly 140–150°F. Different milk alternatives and automatic systems can use different targets, so do not treat one number as universal.
Turn steam off before removing the wand, wipe the wand immediately with a damp cloth, purge it again, then tap the pitcher to collapse any larger bubbles and swirl until the surface looks glossy.

How much air should you add for a flat white, latte or cappuccino?
Think in relative texture rather than rigid percentages. A flat white usually needs the least visible expansion, a latte needs a little more, and a cappuccino can take more aeration. The important rule is that even a foamier drink should still have fine bubbles and an integrated texture rather than a spoonable dry cap.
If you are learning, keep the milk brand, pitcher and drink style the same for several sessions. Breville explicitly recommends practicing with the same type and brand of milk because different products texture differently.

Does the type of milk change the result?
Yes. Different dairy fat/protein levels and different plant-based formulations can behave differently under steam. Breville and De’Longhi both warn that milk type and brand affect how much foam you get, so a technique that works with one carton may need adjustment with another.
For plant-based drinks, start cold and follow the milk maker or machine maker’s temperature guidance. Some plant beverages can lose texture or separate sooner than dairy milk when overheated.
What if the technique looks right but the milk still will not spin?
That is when you move from a technique problem to a machine check. Make sure the machine has fully reached steam mode, the tip holes are open, condensation was purged and the pitcher is not so full that the steam jet cannot create rotation.

- Gaggia Classic Pro weak steam: tip, valve, priming or heat?
- Rancilio Silvia weak steam: clean the tip before blaming the thermostat
- Breville Bambino no steam: BES450 vs Bambino Plus troubleshooting
- De’Longhi Dedica steam wand weak, spitting water or hard to froth
FAQ
Why do I get huge bubbles when steaming milk?
The steam tip is usually spending too much time above or right at the surface, so it pulls in large amounts of air. Lower the tip slightly and shorten the stretching phase.
Why is my milk hot but completely flat?
You probably heated it without introducing enough air early in the process. Bring the tip closer to the surface while the milk is still cold, then move deeper once you have the texture you want.
Why does my milk make a screaming sound?
A high-pitched scream usually means the tip is too deep and the milk is heating without enough air entering. Move the milk surface closer to the tip until the sound changes to a quieter, controlled air-intake sound.
What temperature should steamed milk reach?
For dairy milk, many current manufacturer guides land around 60–65°C / 140–150°F, but the correct target can vary with the milk, drink and machine. Follow the machine and milk maker’s guidance if it differs.
Should I tap and swirl the pitcher?
Yes. Breville explicitly recommends tapping to collapse larger bubbles and swirling to recombine foam and liquid before pouring.
References
- Breville — How to steam milk: a step-by-step guide
- Breville USA — How to texture milk (official video)
- De’Longhi — La Specialista Touch: Milk does not froth
- De’Longhi — Traditional milk frother guidance
- Clive Coffee — How to Steam Milk, updated August 2026
- Lance Hedrick — Learn to Steam Silky Milk
Evidence boundary: steam power, automatic milk systems and plant-based formulas vary. The technique above describes the common manual-steaming sequence confirmed across current manufacturer guidance; when an exact machine manual gives different placement or temperature instructions, follow that machine’s procedure.